")


The Maze of Snakes
Finds (The Swamp of Fangs):
3 relics (2 Emeralds, 1 fragment of "The Twin Snakes")
Finds (Snake Pit):
3 relics (2 Emeralds, 1 fragment of "The Twin Snakes")
Finds (The Bridge of Many Sides):
2 relics (1 Emerald, 1 fragment of "The Twin Snakes")
Finds (The Tower of Blades):
3 relics (1 fragment of "The Twin Snakes", 2 Emeralds)
Finds (Scaling by Danger):
3 relics (1 fragment of "The Twin Snakes", 2 Emeralds)
Finds (The Canyon of a Thousand Snakes):
4 relics (3 Emeralds, 1 fragment of "The Twin Snakes")
Finds (Dodging a Fang):
3 relics (2 Emerald, 1 fragment of "The Twin Snakes")
Finds (One Deadly Step):
3 relics (1 fragment of "The Twin Snakes", 2 Emeralds)
Finds (Cold-Blooded Cliff):
2 relics (1 Emerald, 1 fragment of "The Twin Snakes")
Finds (The Key of Stones):
3 relics (1 fragment of "The Twin Snakes", 2 Emeralds)
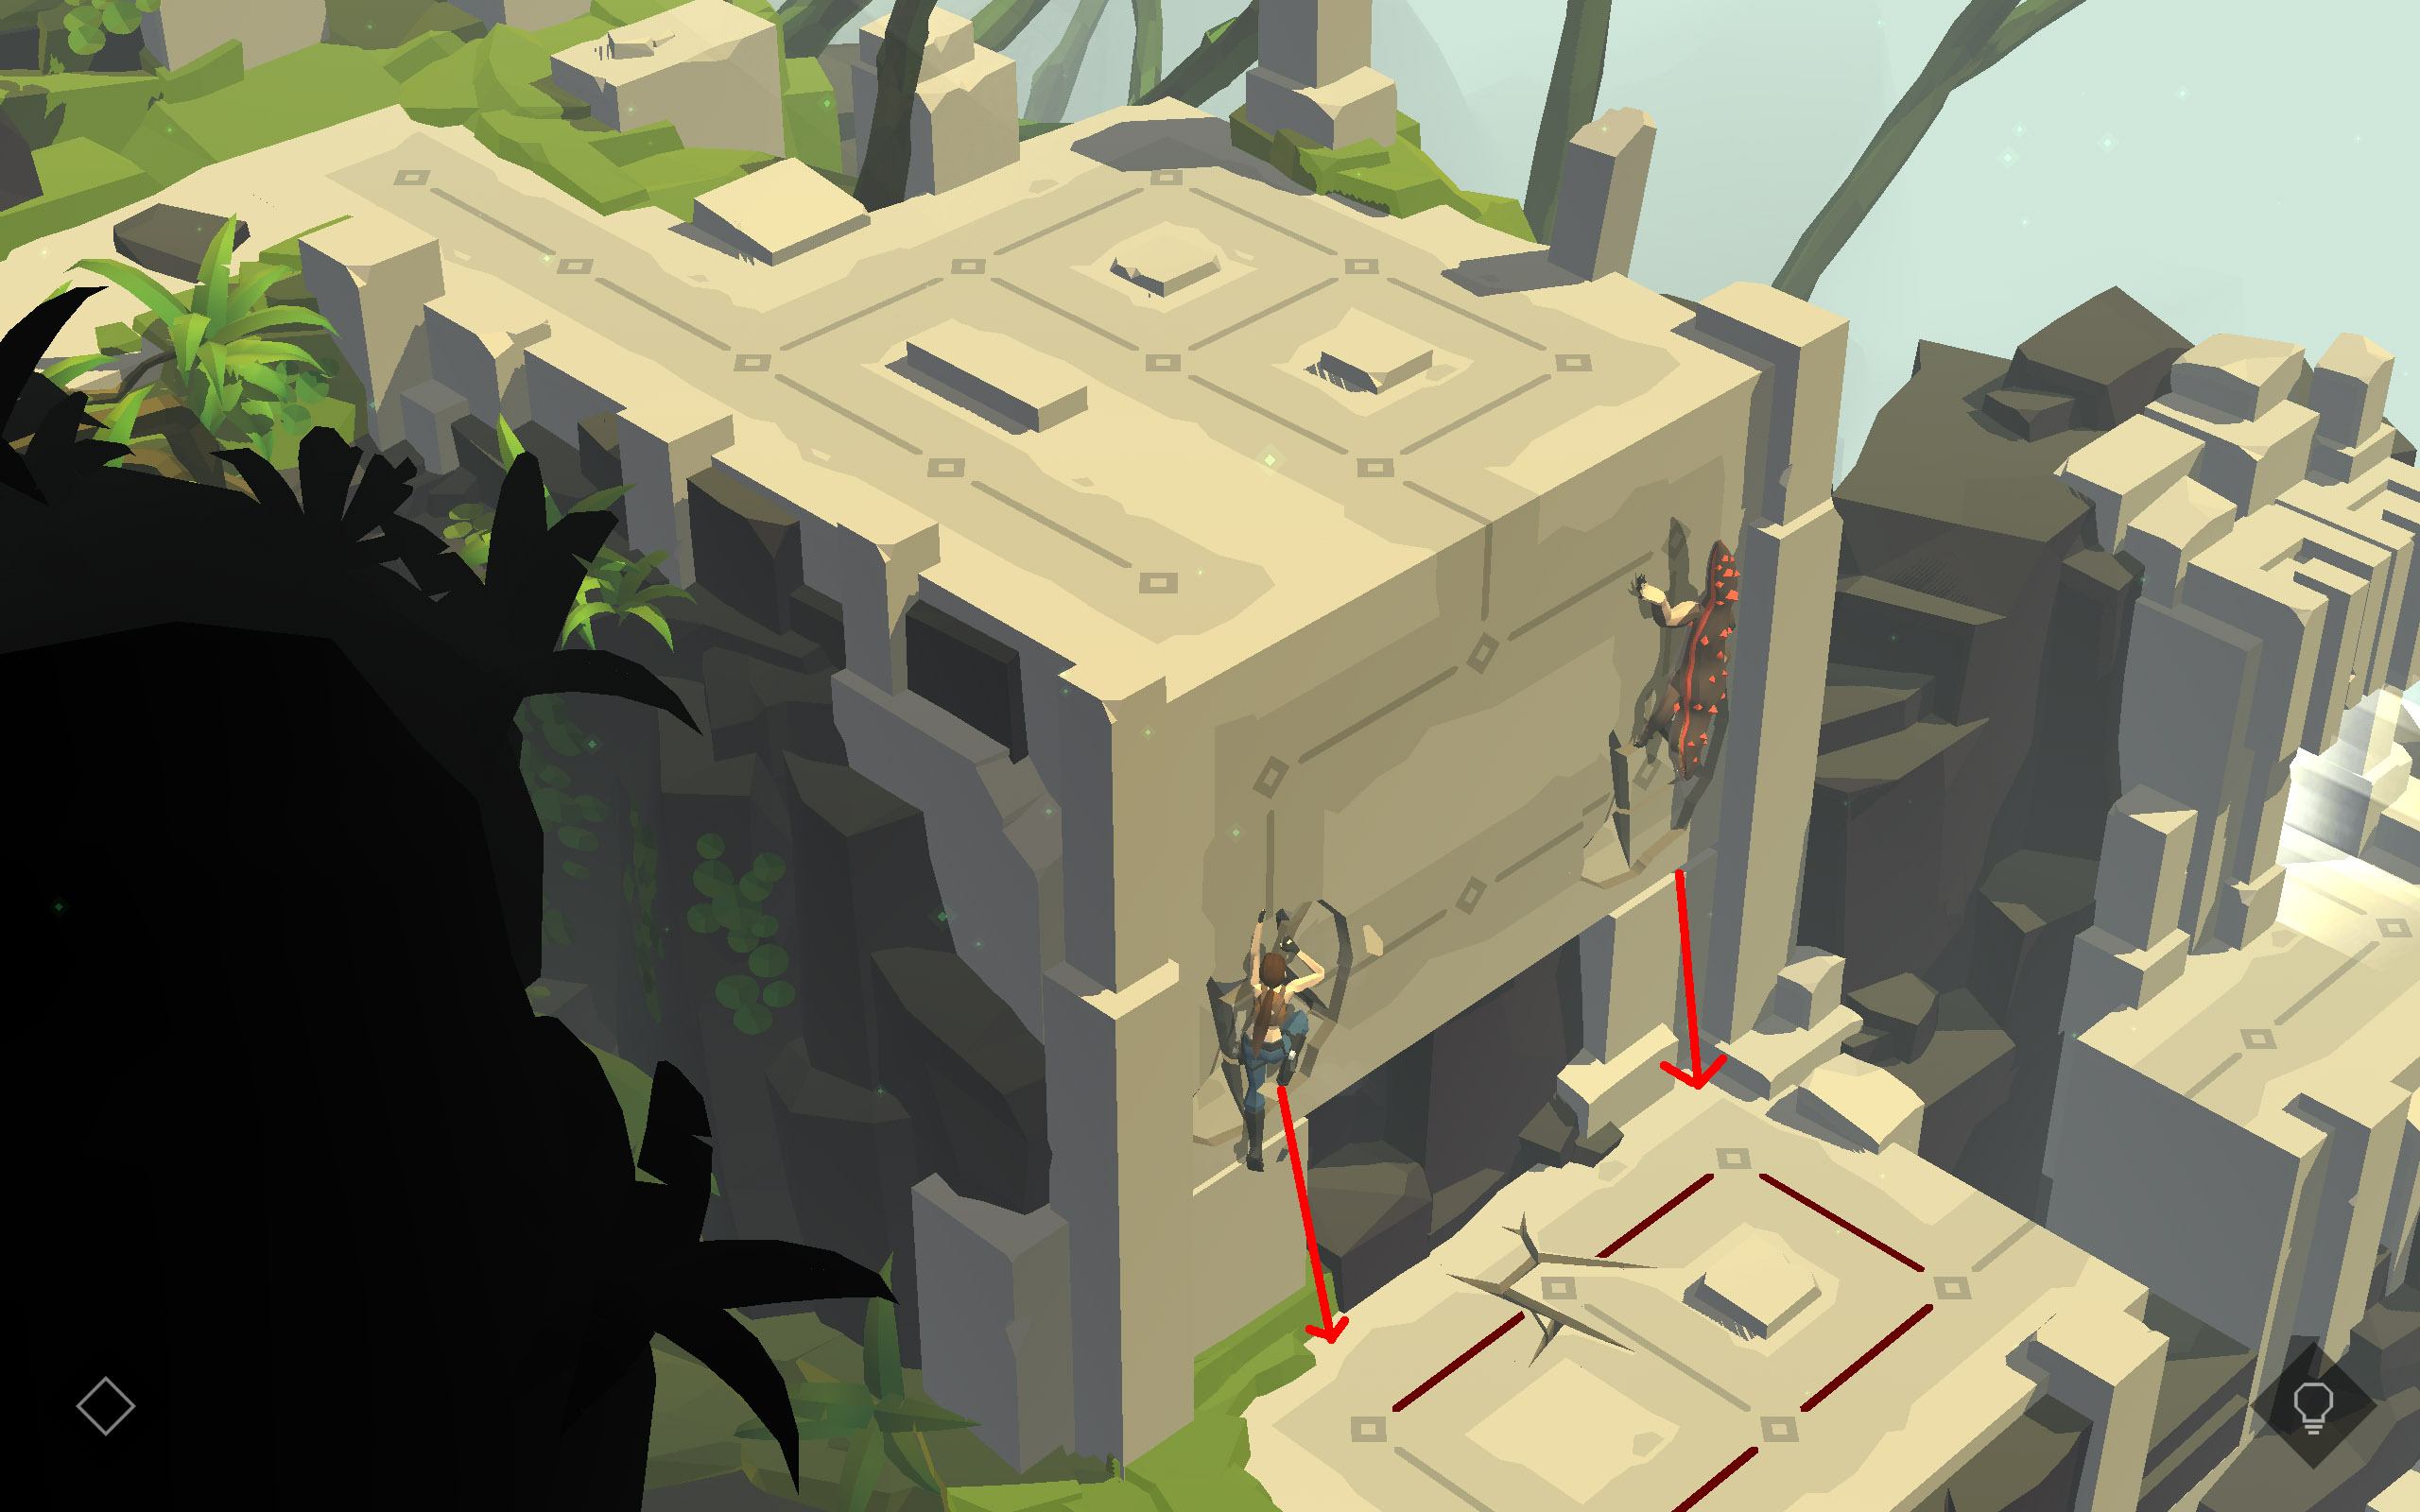
1. The Swamp of Fangs
Relic:
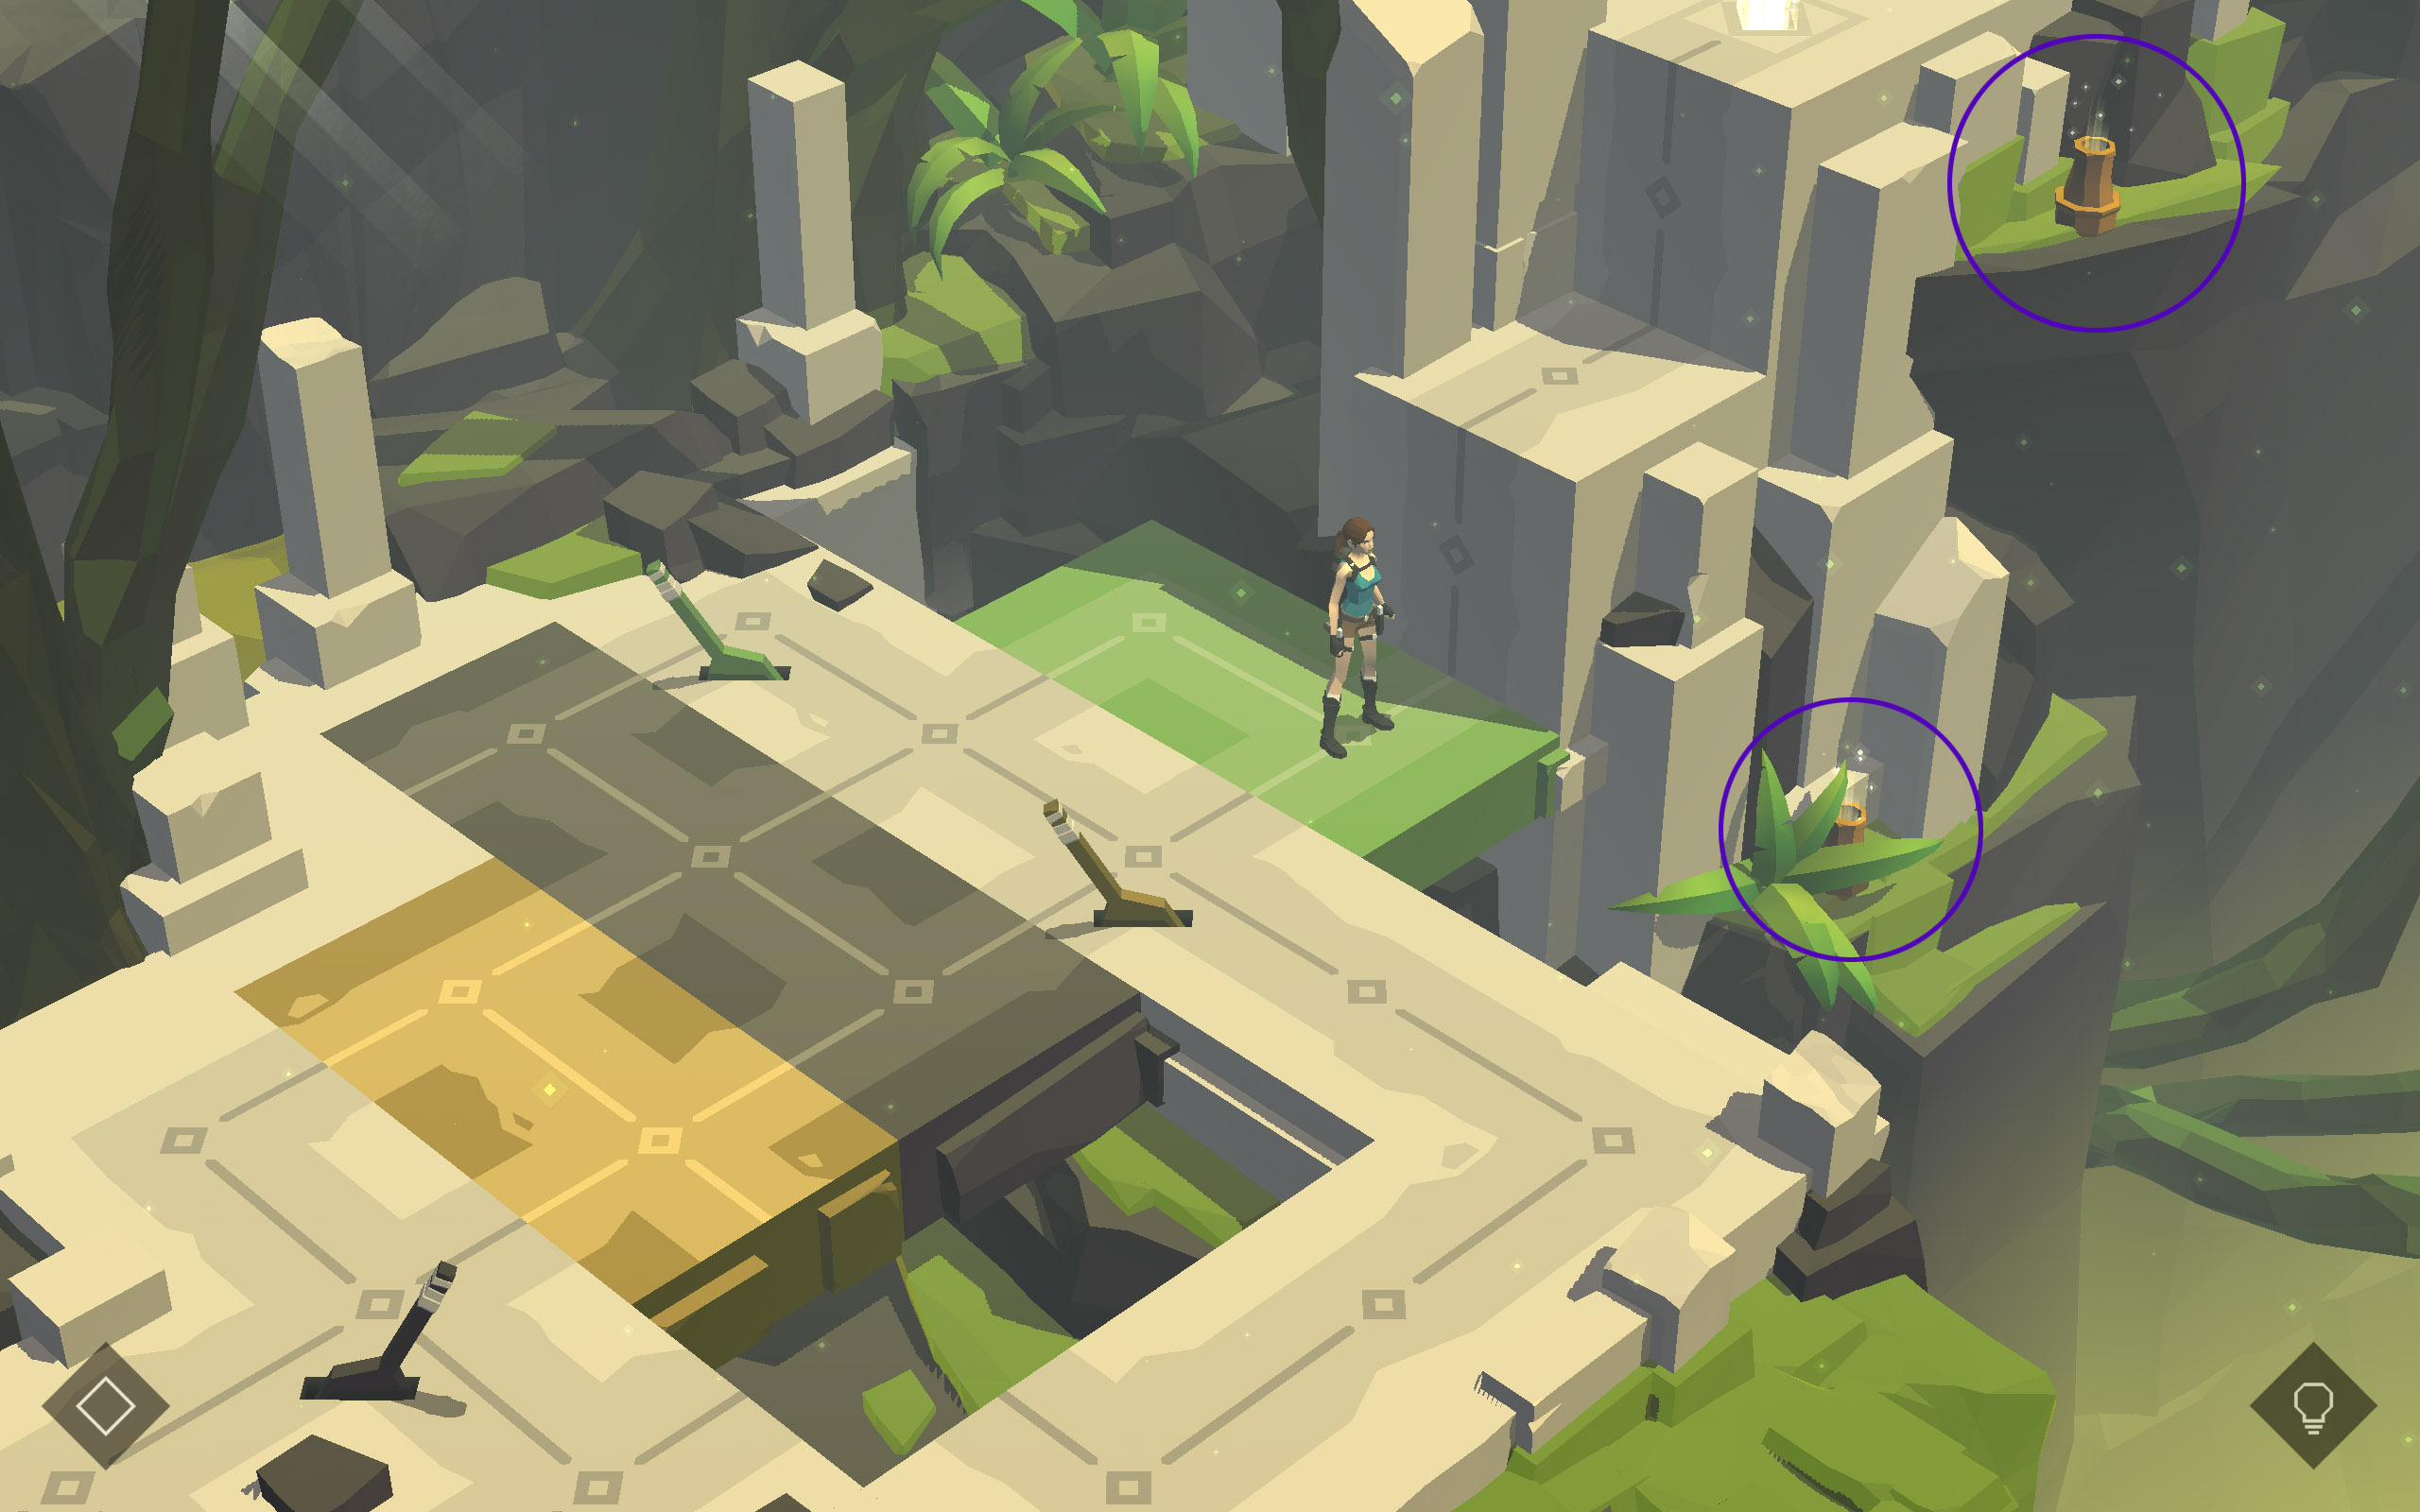
On the left side of the path you can spot a sparkling item. Tap it to collect the Emerald (1/19).
Head into the tunnel to come out on the other side. There is a Cobra sitting on the path. Since it is facing the other way, you simply have to approach it and Lara will shoot it. Climb down and the second Cobra will be taken care of. At the T-junction turn right to take on the third Cobra looking the other way. It's your choice if you want to kill the fourth Cobra from behind or if you just ignore it. Head up onto the next level. At the top shimmy to the right and pull up to tackle the Cobra there.
Relic:
Tap onto the Emerald (2/19) right of the path.
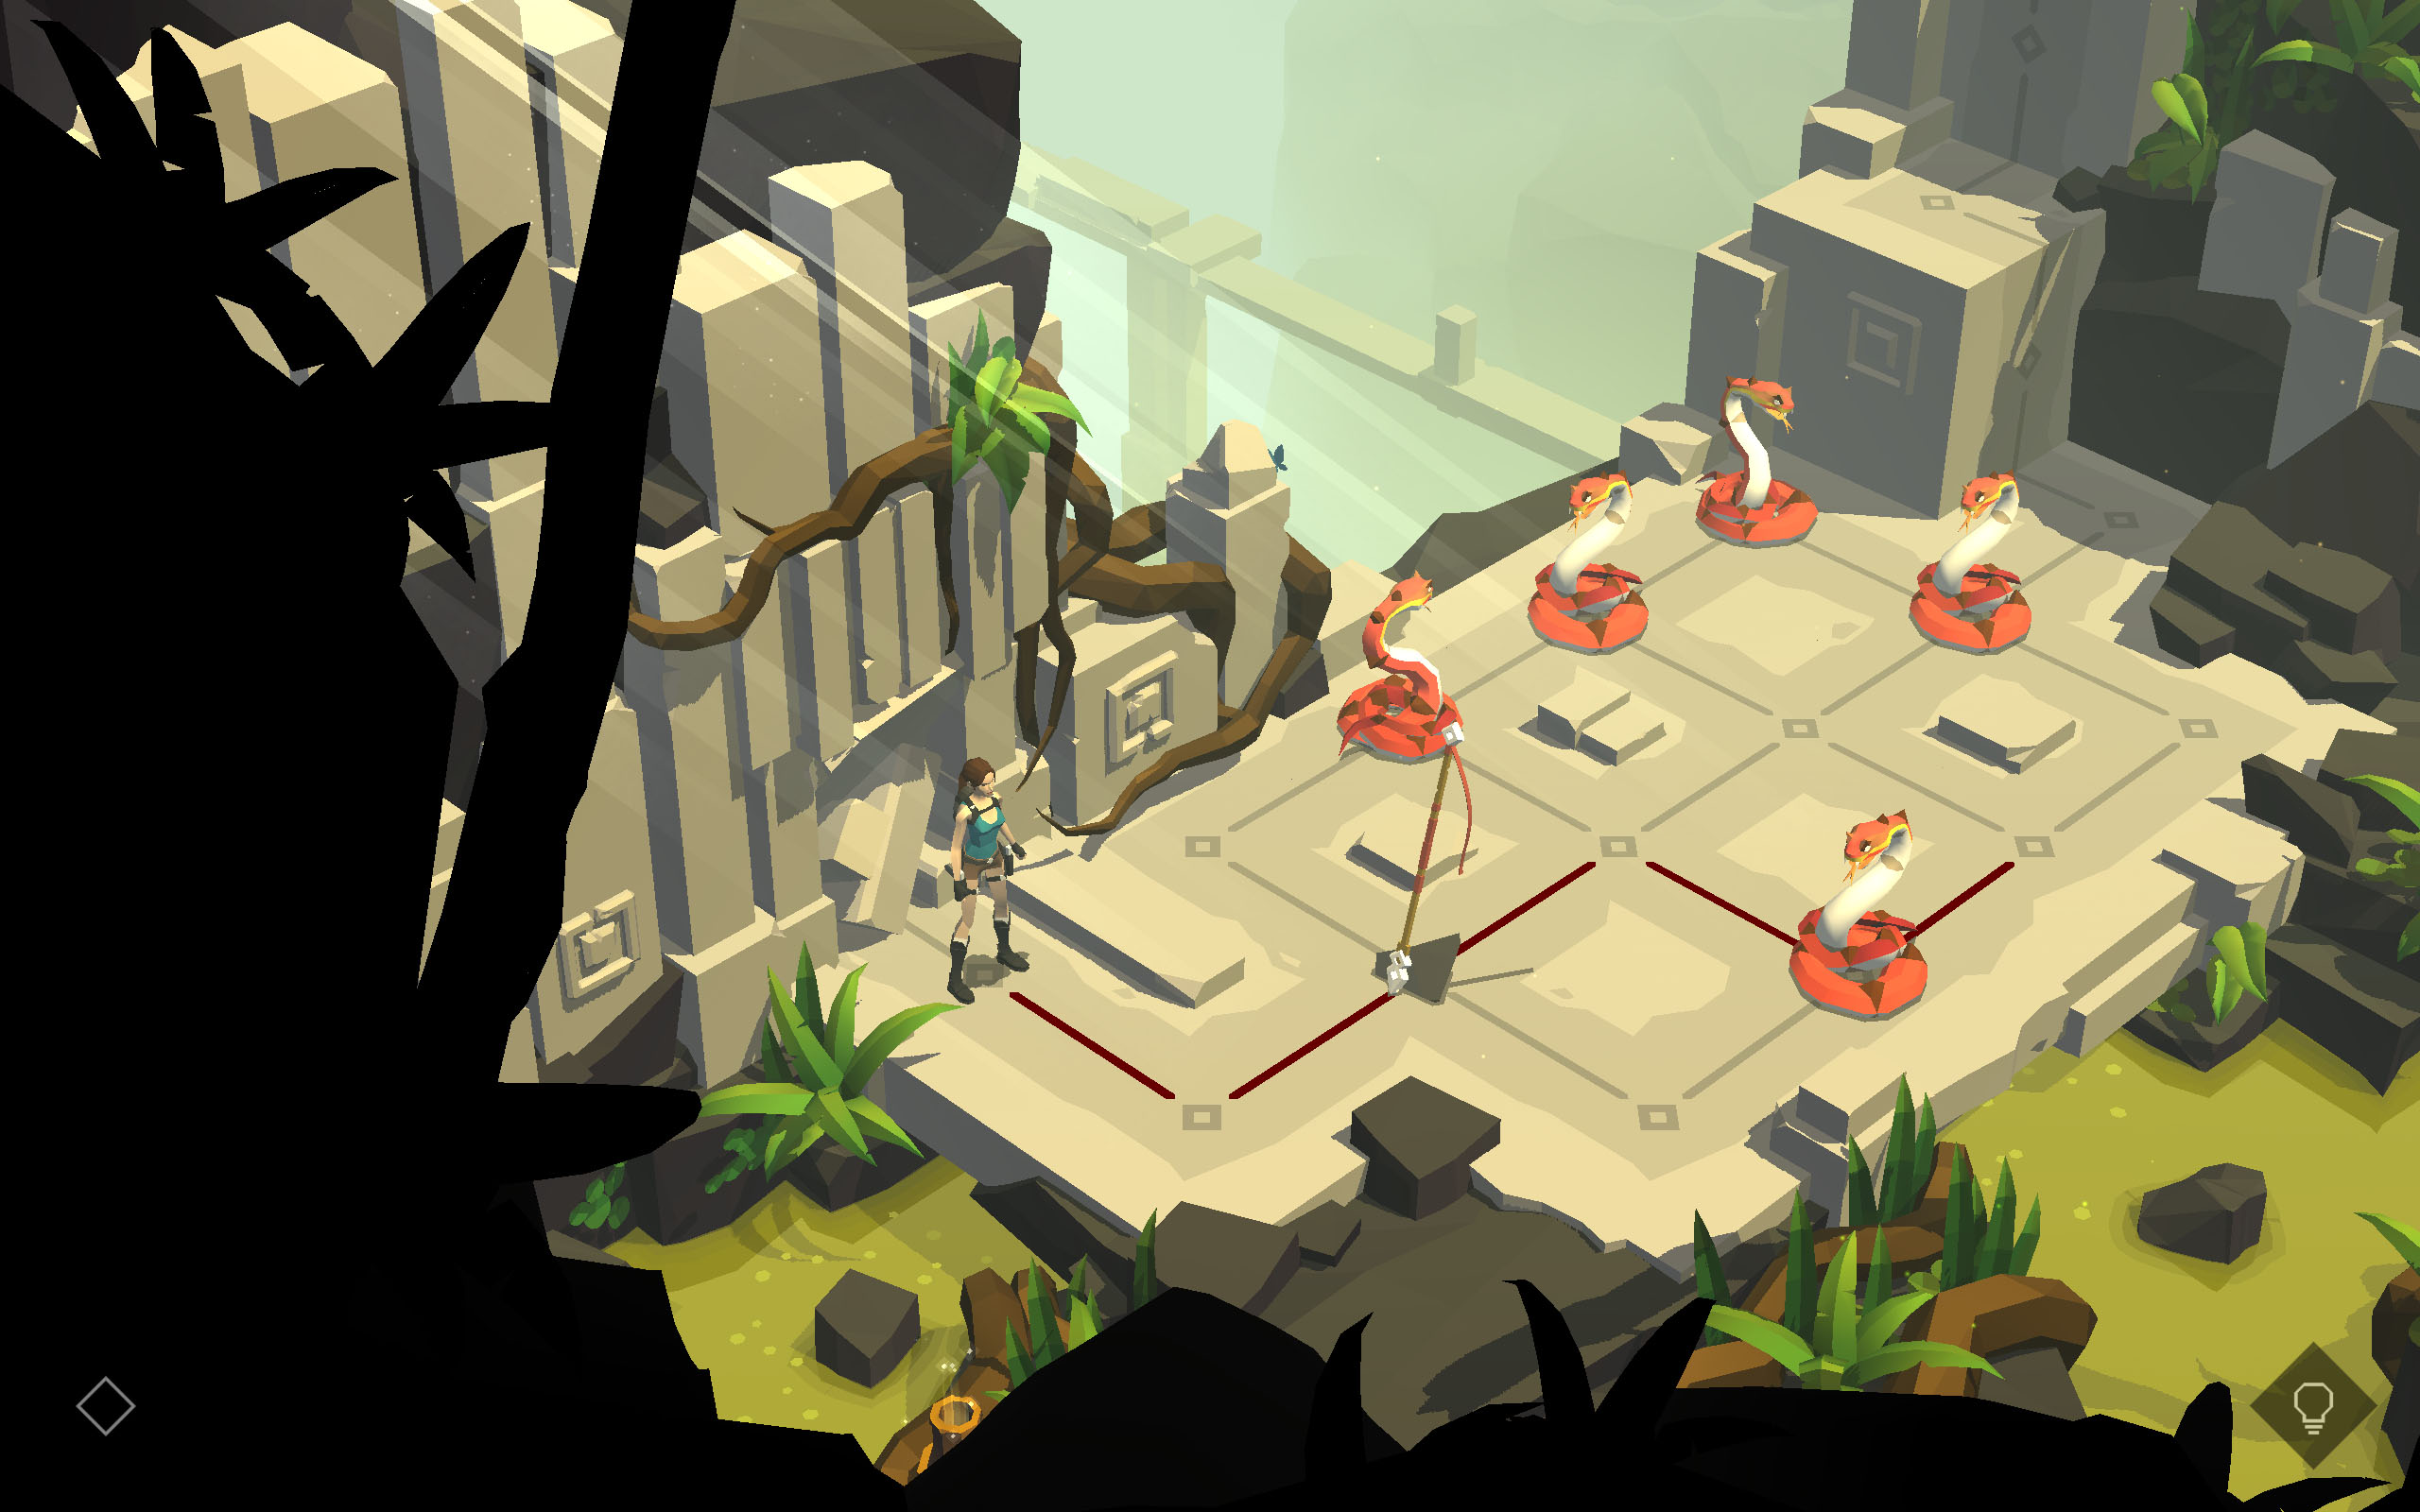
Again it's your choice what you do about Cobra number six. Step through the passage on the left. The passage closes up behind you. Climb up the wall right of the closed entrance. You are faced with the snake puzzle. [Note]
 1st part
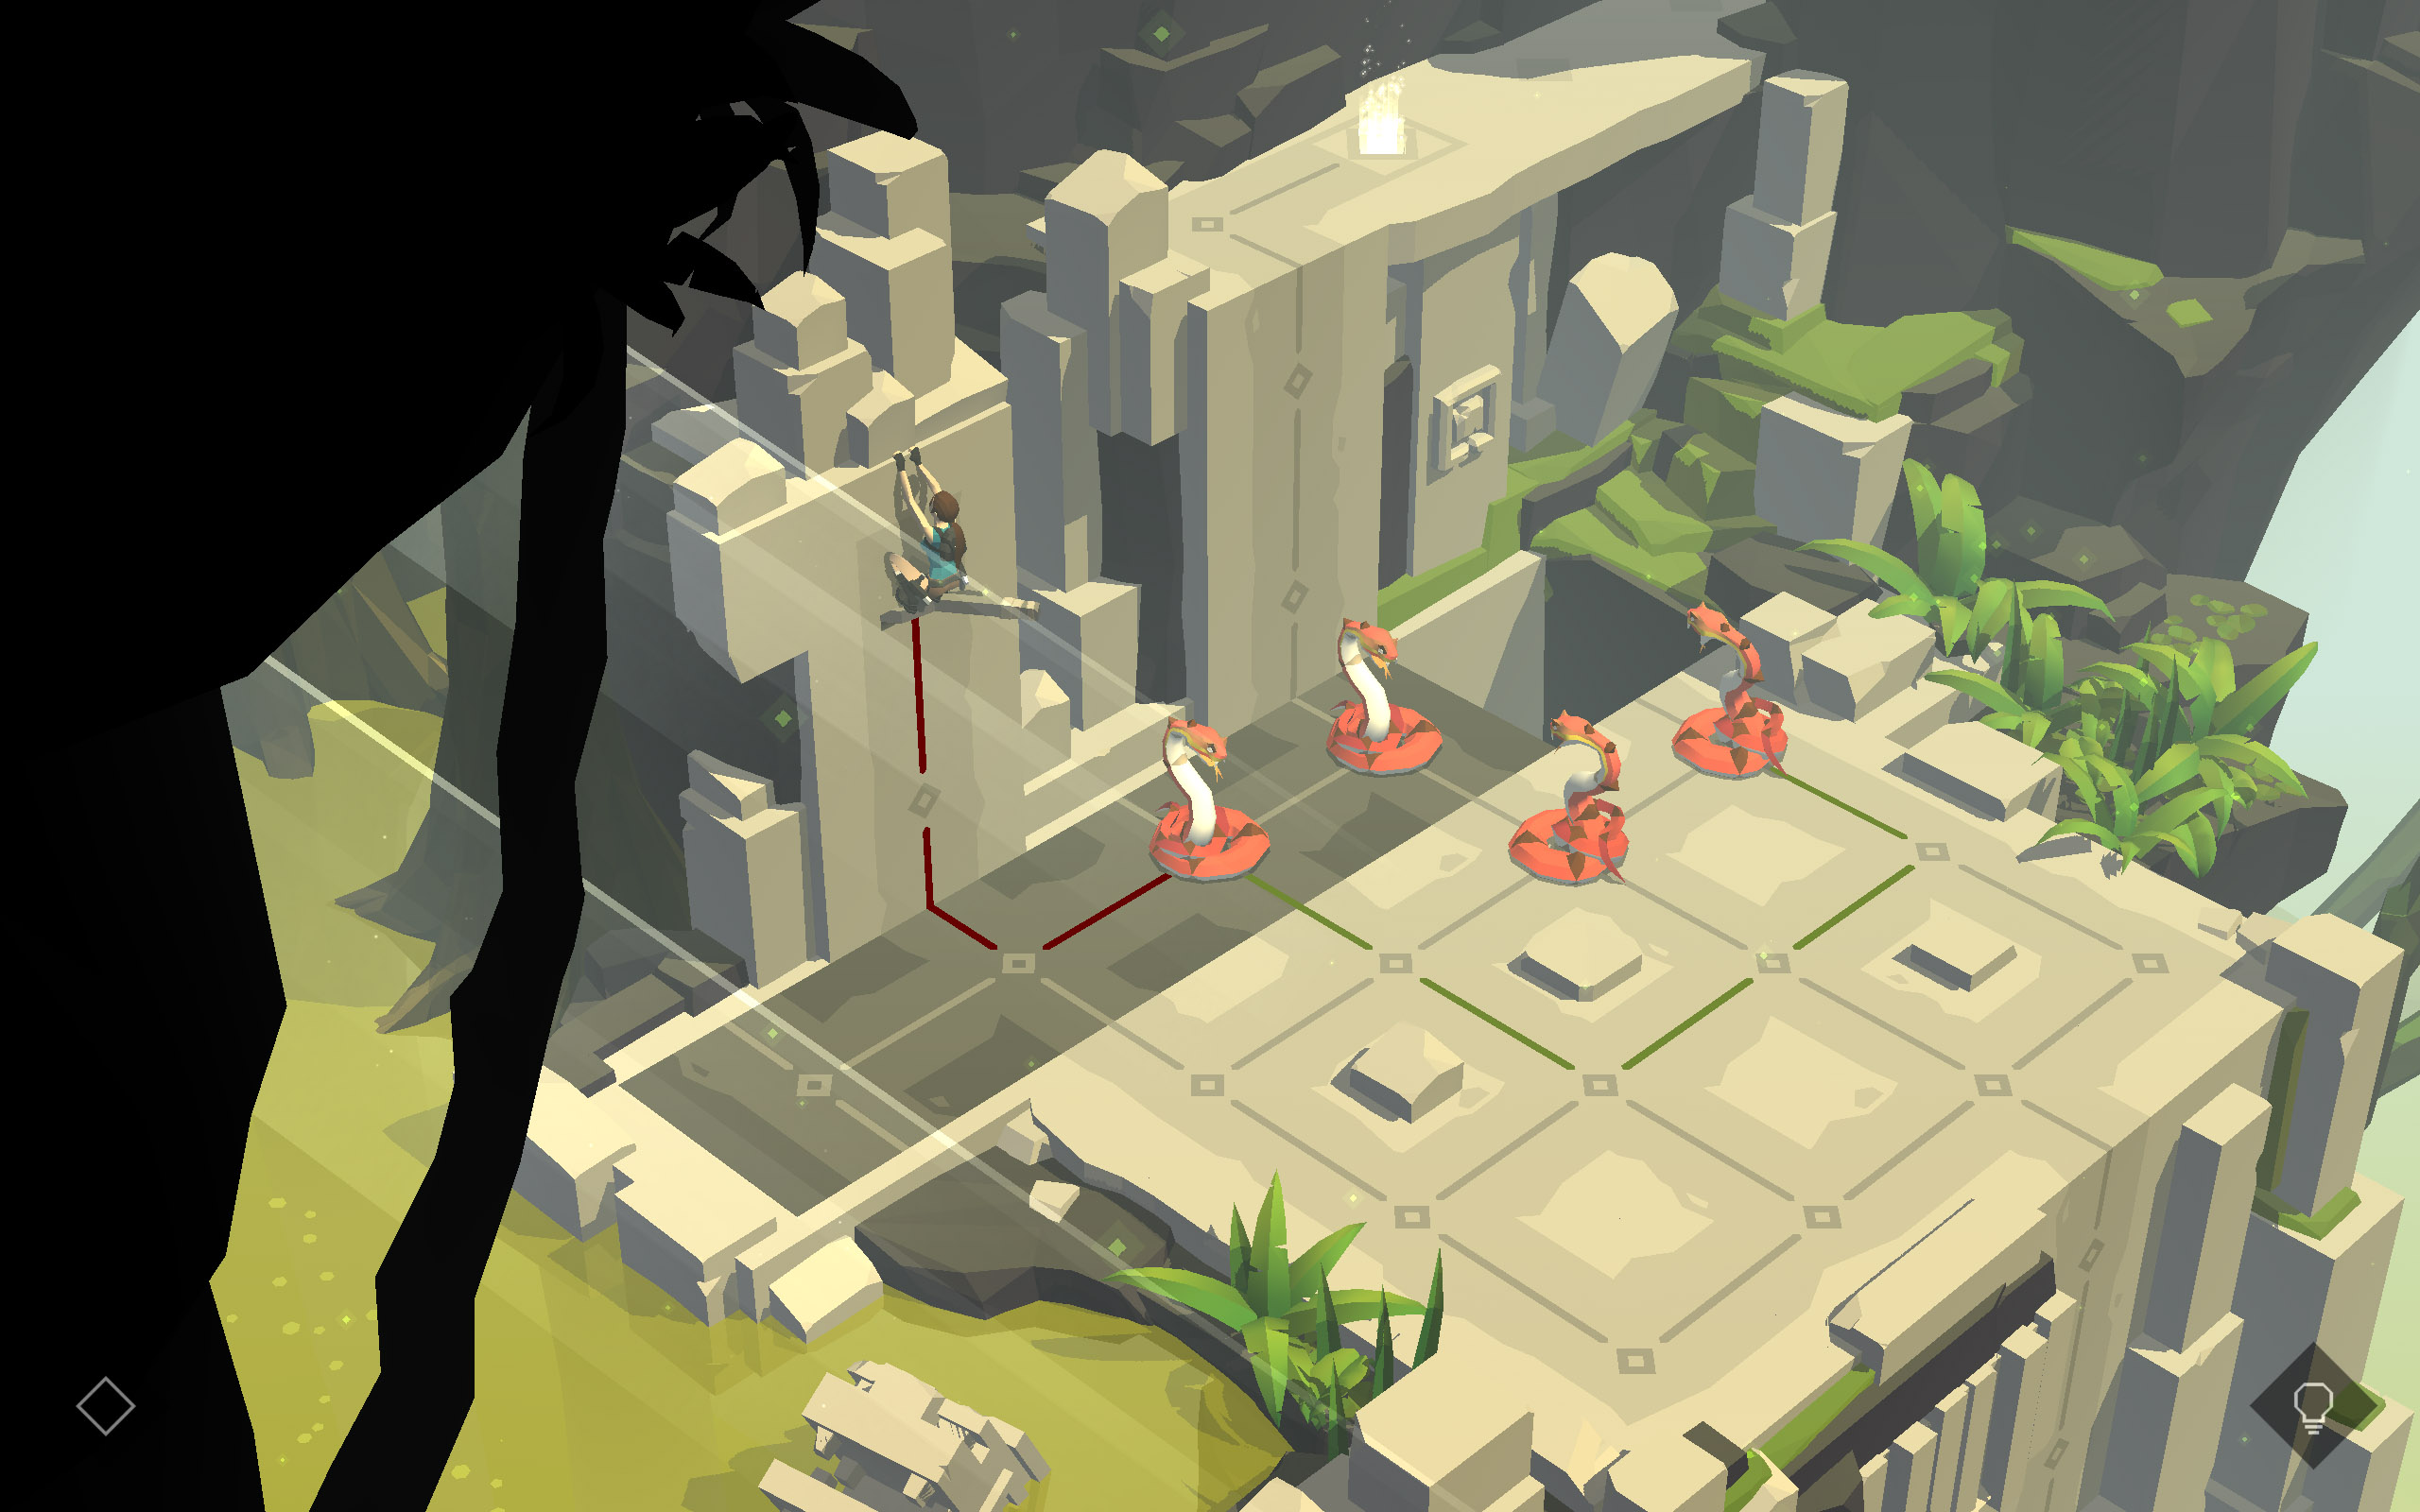 2nd part
 3rd part
Relic:
Just above the lever, sitting atop a column is the next vase, which holds a fragment of "The Twin Snakes" (1/10).
(2nd part) The row of black floor plates just below the switch did slide one spot to the left, when the switch was used, also moving the two remaining cobras blocking the exit. Head back down and over to the right, to kill the next Cobra, the one that previously blocked the exit. Optionally you may also kill the cobra at the right end. Return to the black Wall-Mounted Lever Switch to flip it again.
(3rd part) Approach the Cobra that is guarding the exit from the side to kill it and then head up the wall. Step right to reach the exit square.
X
Images 2 and 3 have been taken after flipping the switch.
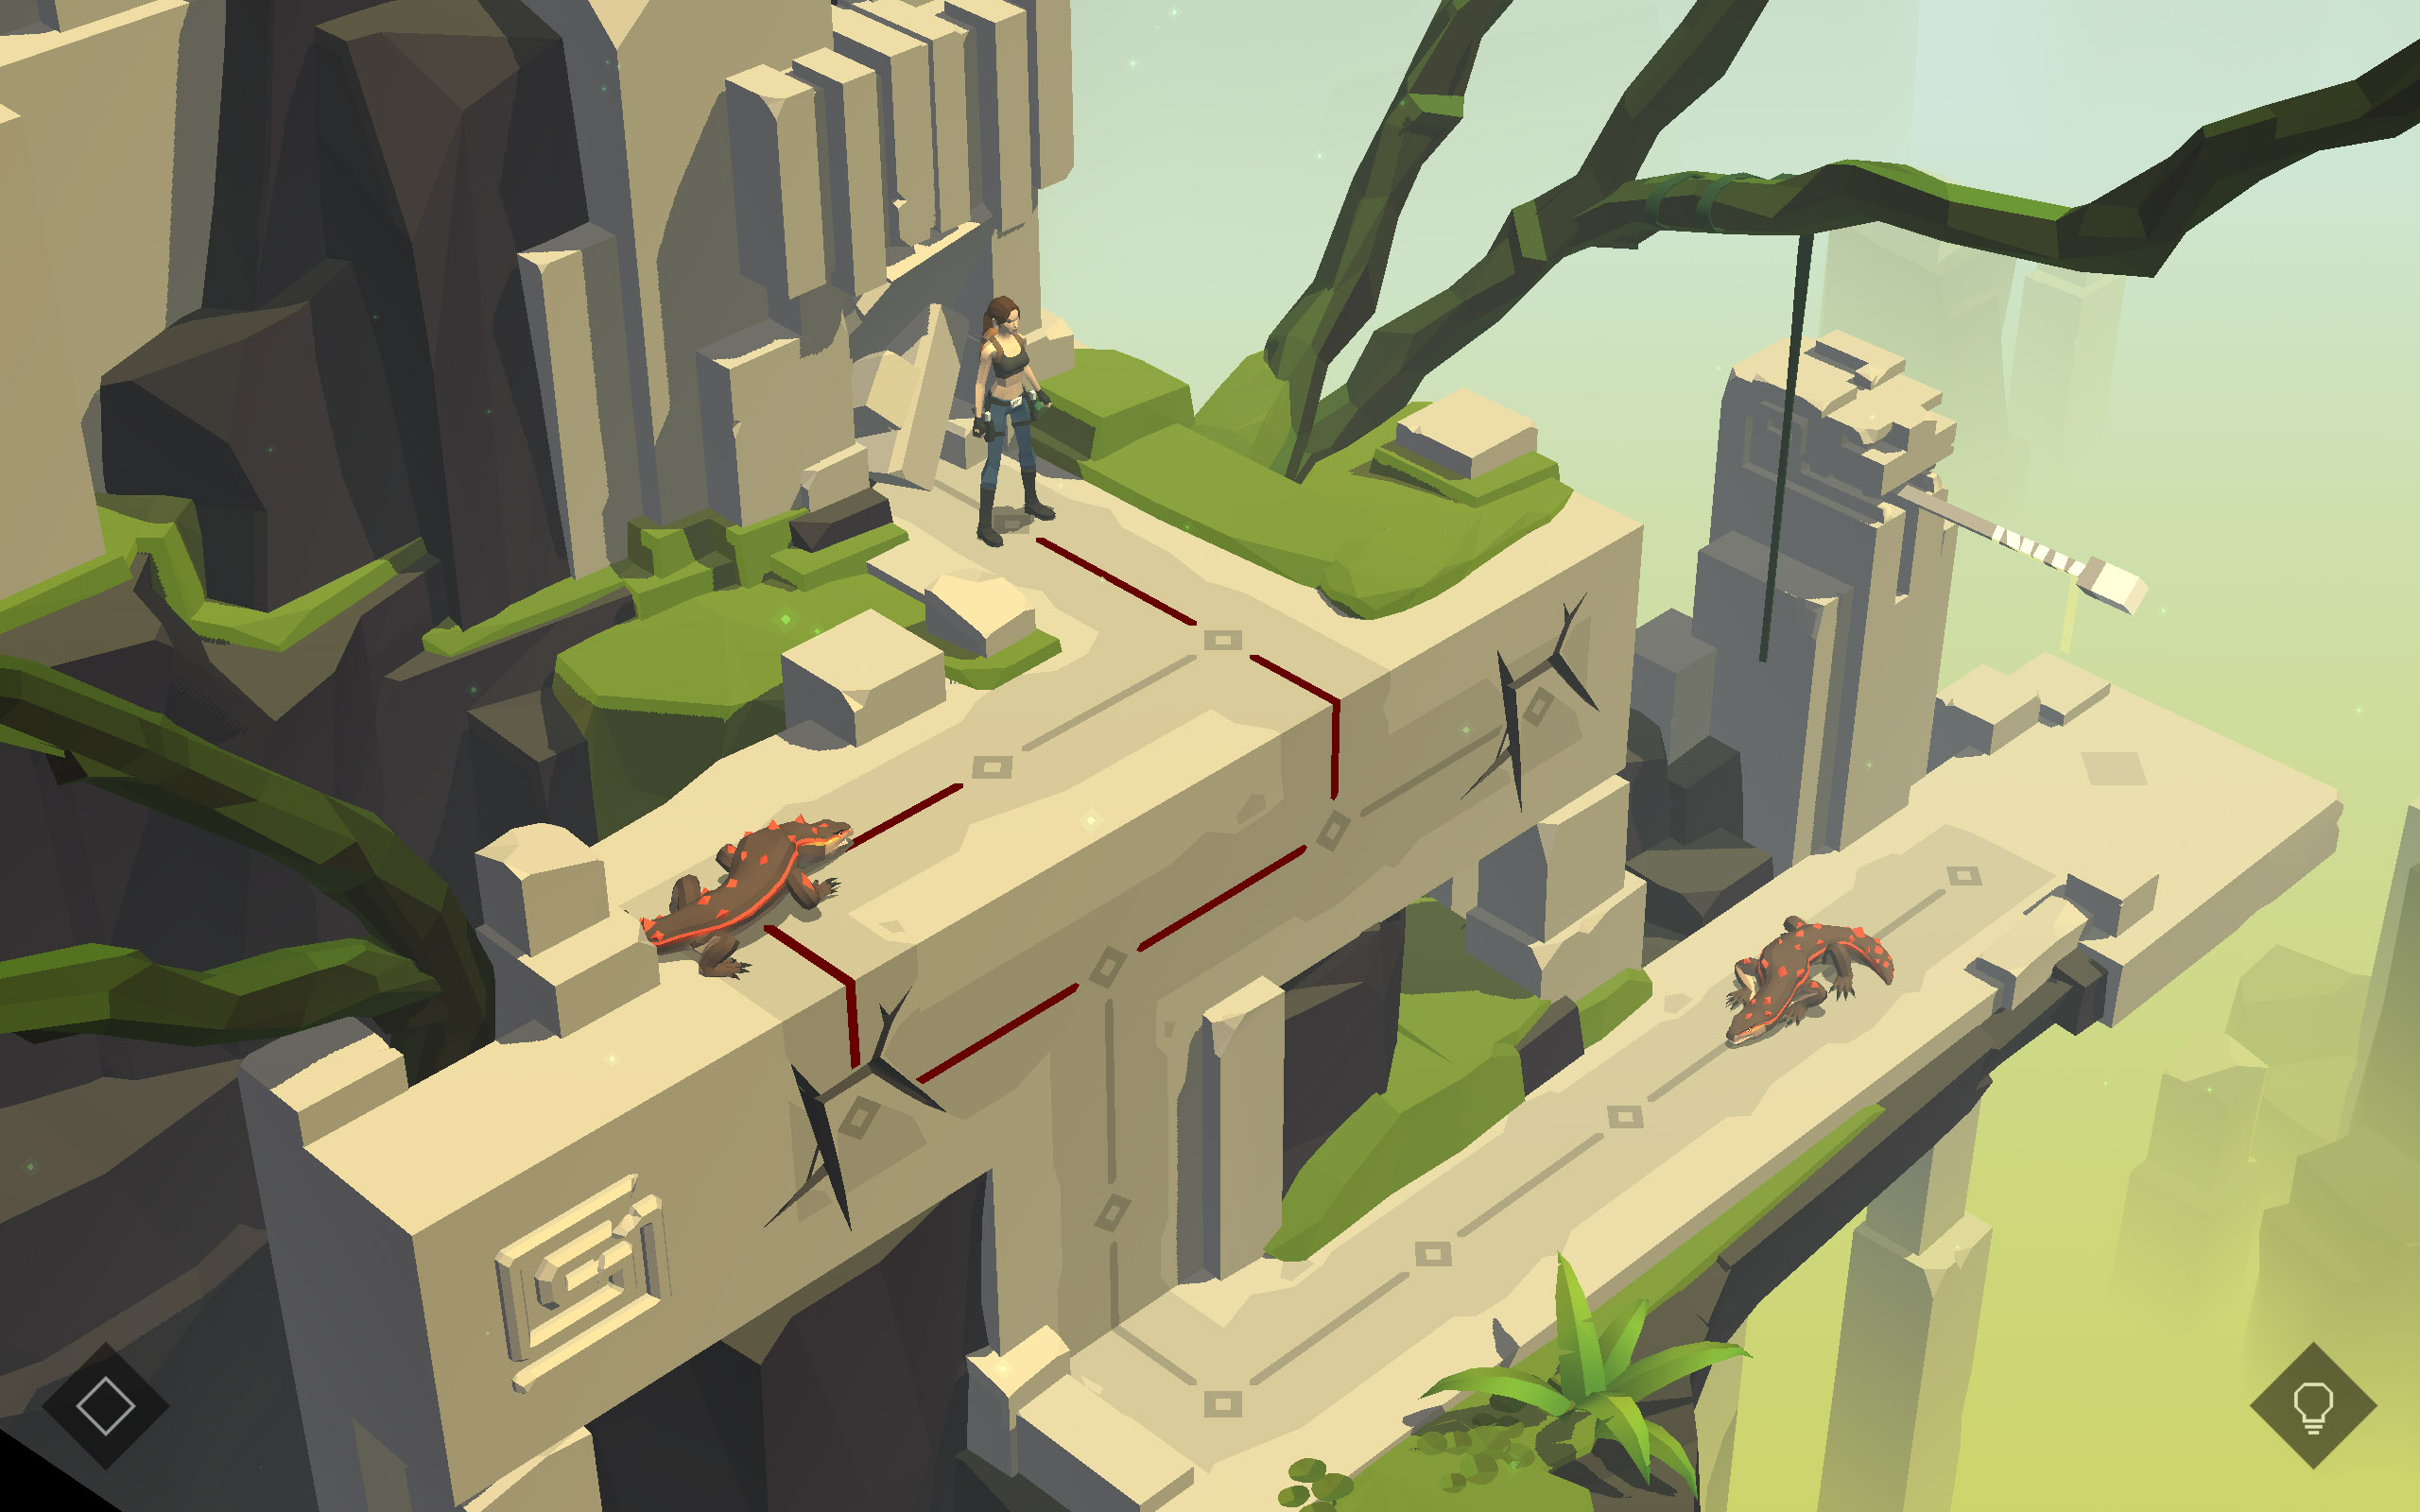
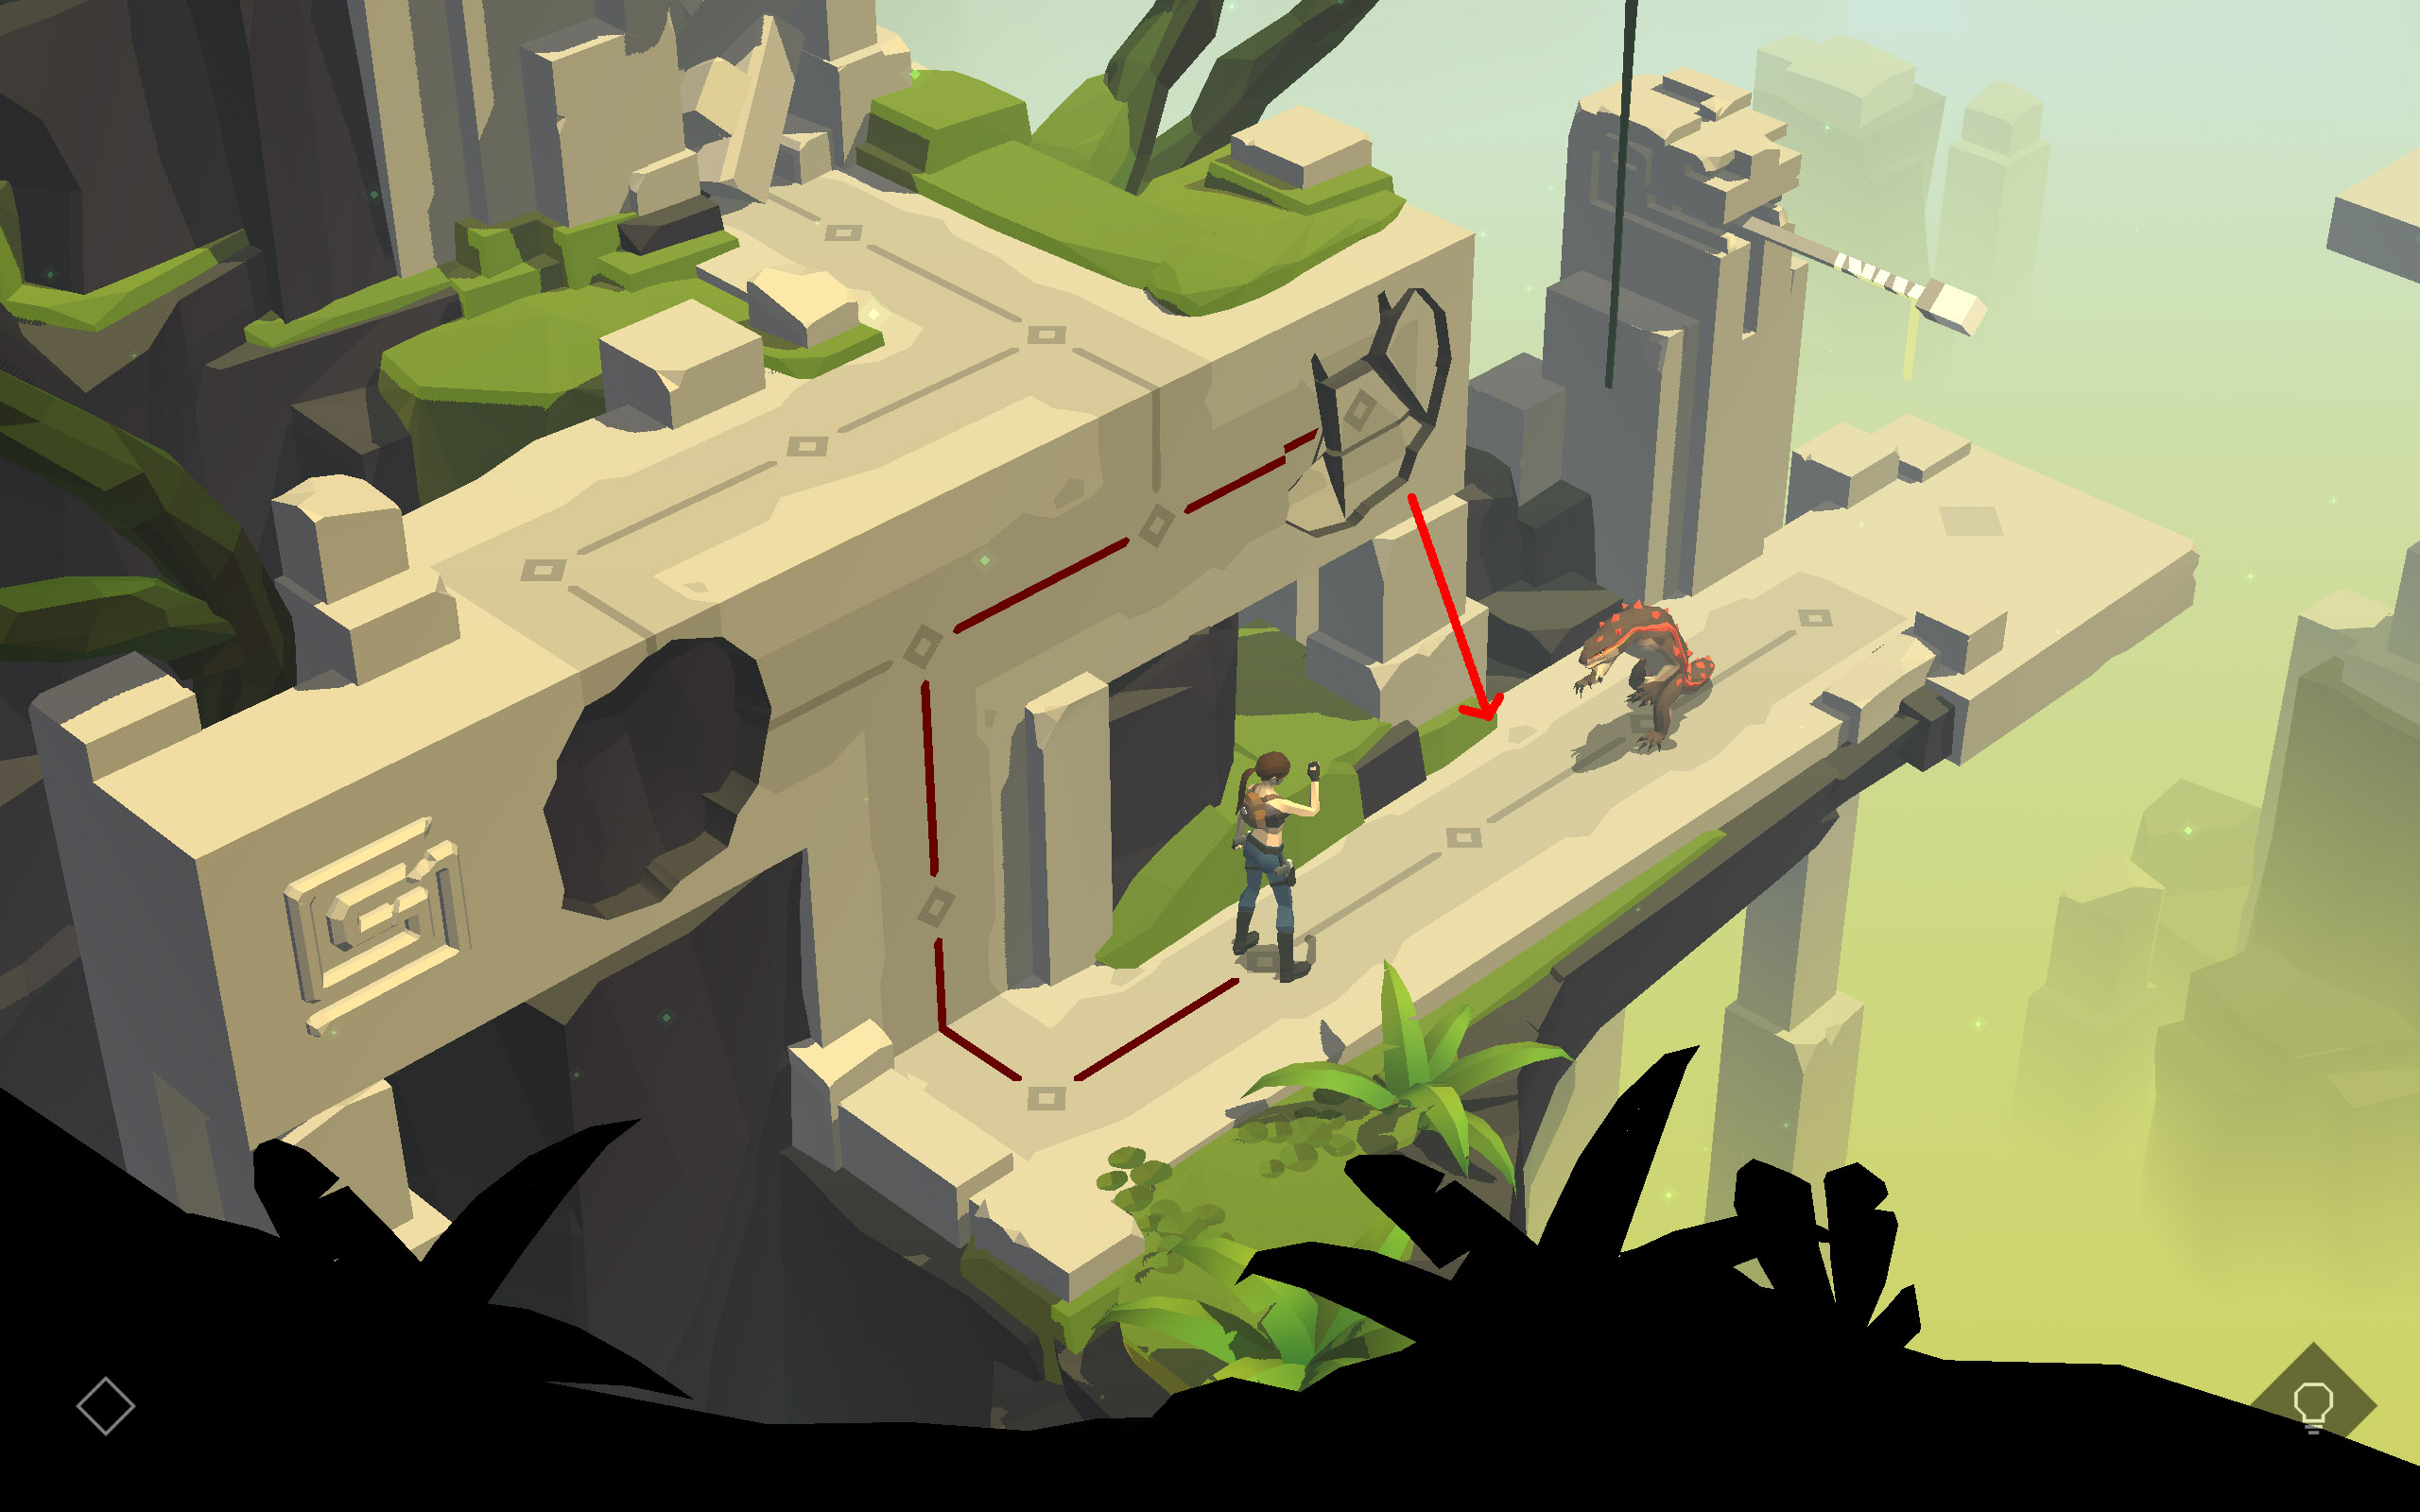
Snake Puzzle
Look at the images if you need additional help. The red lines indicate necessary steps, the green lines are optional. Three of the cobras do not have to be killed in order to proceed.Images 2 and 3 have been taken after flipping the switch.
2. Snake Pit
Relic:
Before you do anything else, collect the vase sitting on a rock right of the path to collect the Emerald (3/19).
Hop across the two stones in the water to reach the other side.
(1st part) Here approach the right Cobra from the side, to kill it. Then take to steps forward, onto the golden platform, here take one step left and one towards the second Cobra to kill it. Now head back to the golden platform and step off it to the right to approach and kill the third Cobra, the one guarding a lever.
(2nd part) Flip the golden Lever Switch (#1) to move the golden floor squares. Now step first onto the black, then onto the golden plates. Here take one step up onto the second golden square and approach the fourth Cobra from the side and kill it. The black lever is now clear.
(3rd part) Flip the black Lever Switch (#2) to move the black floor squares. Now approach the Cobra sitting on the black floor from the side to get rid of it. Then simply return to the black lever.
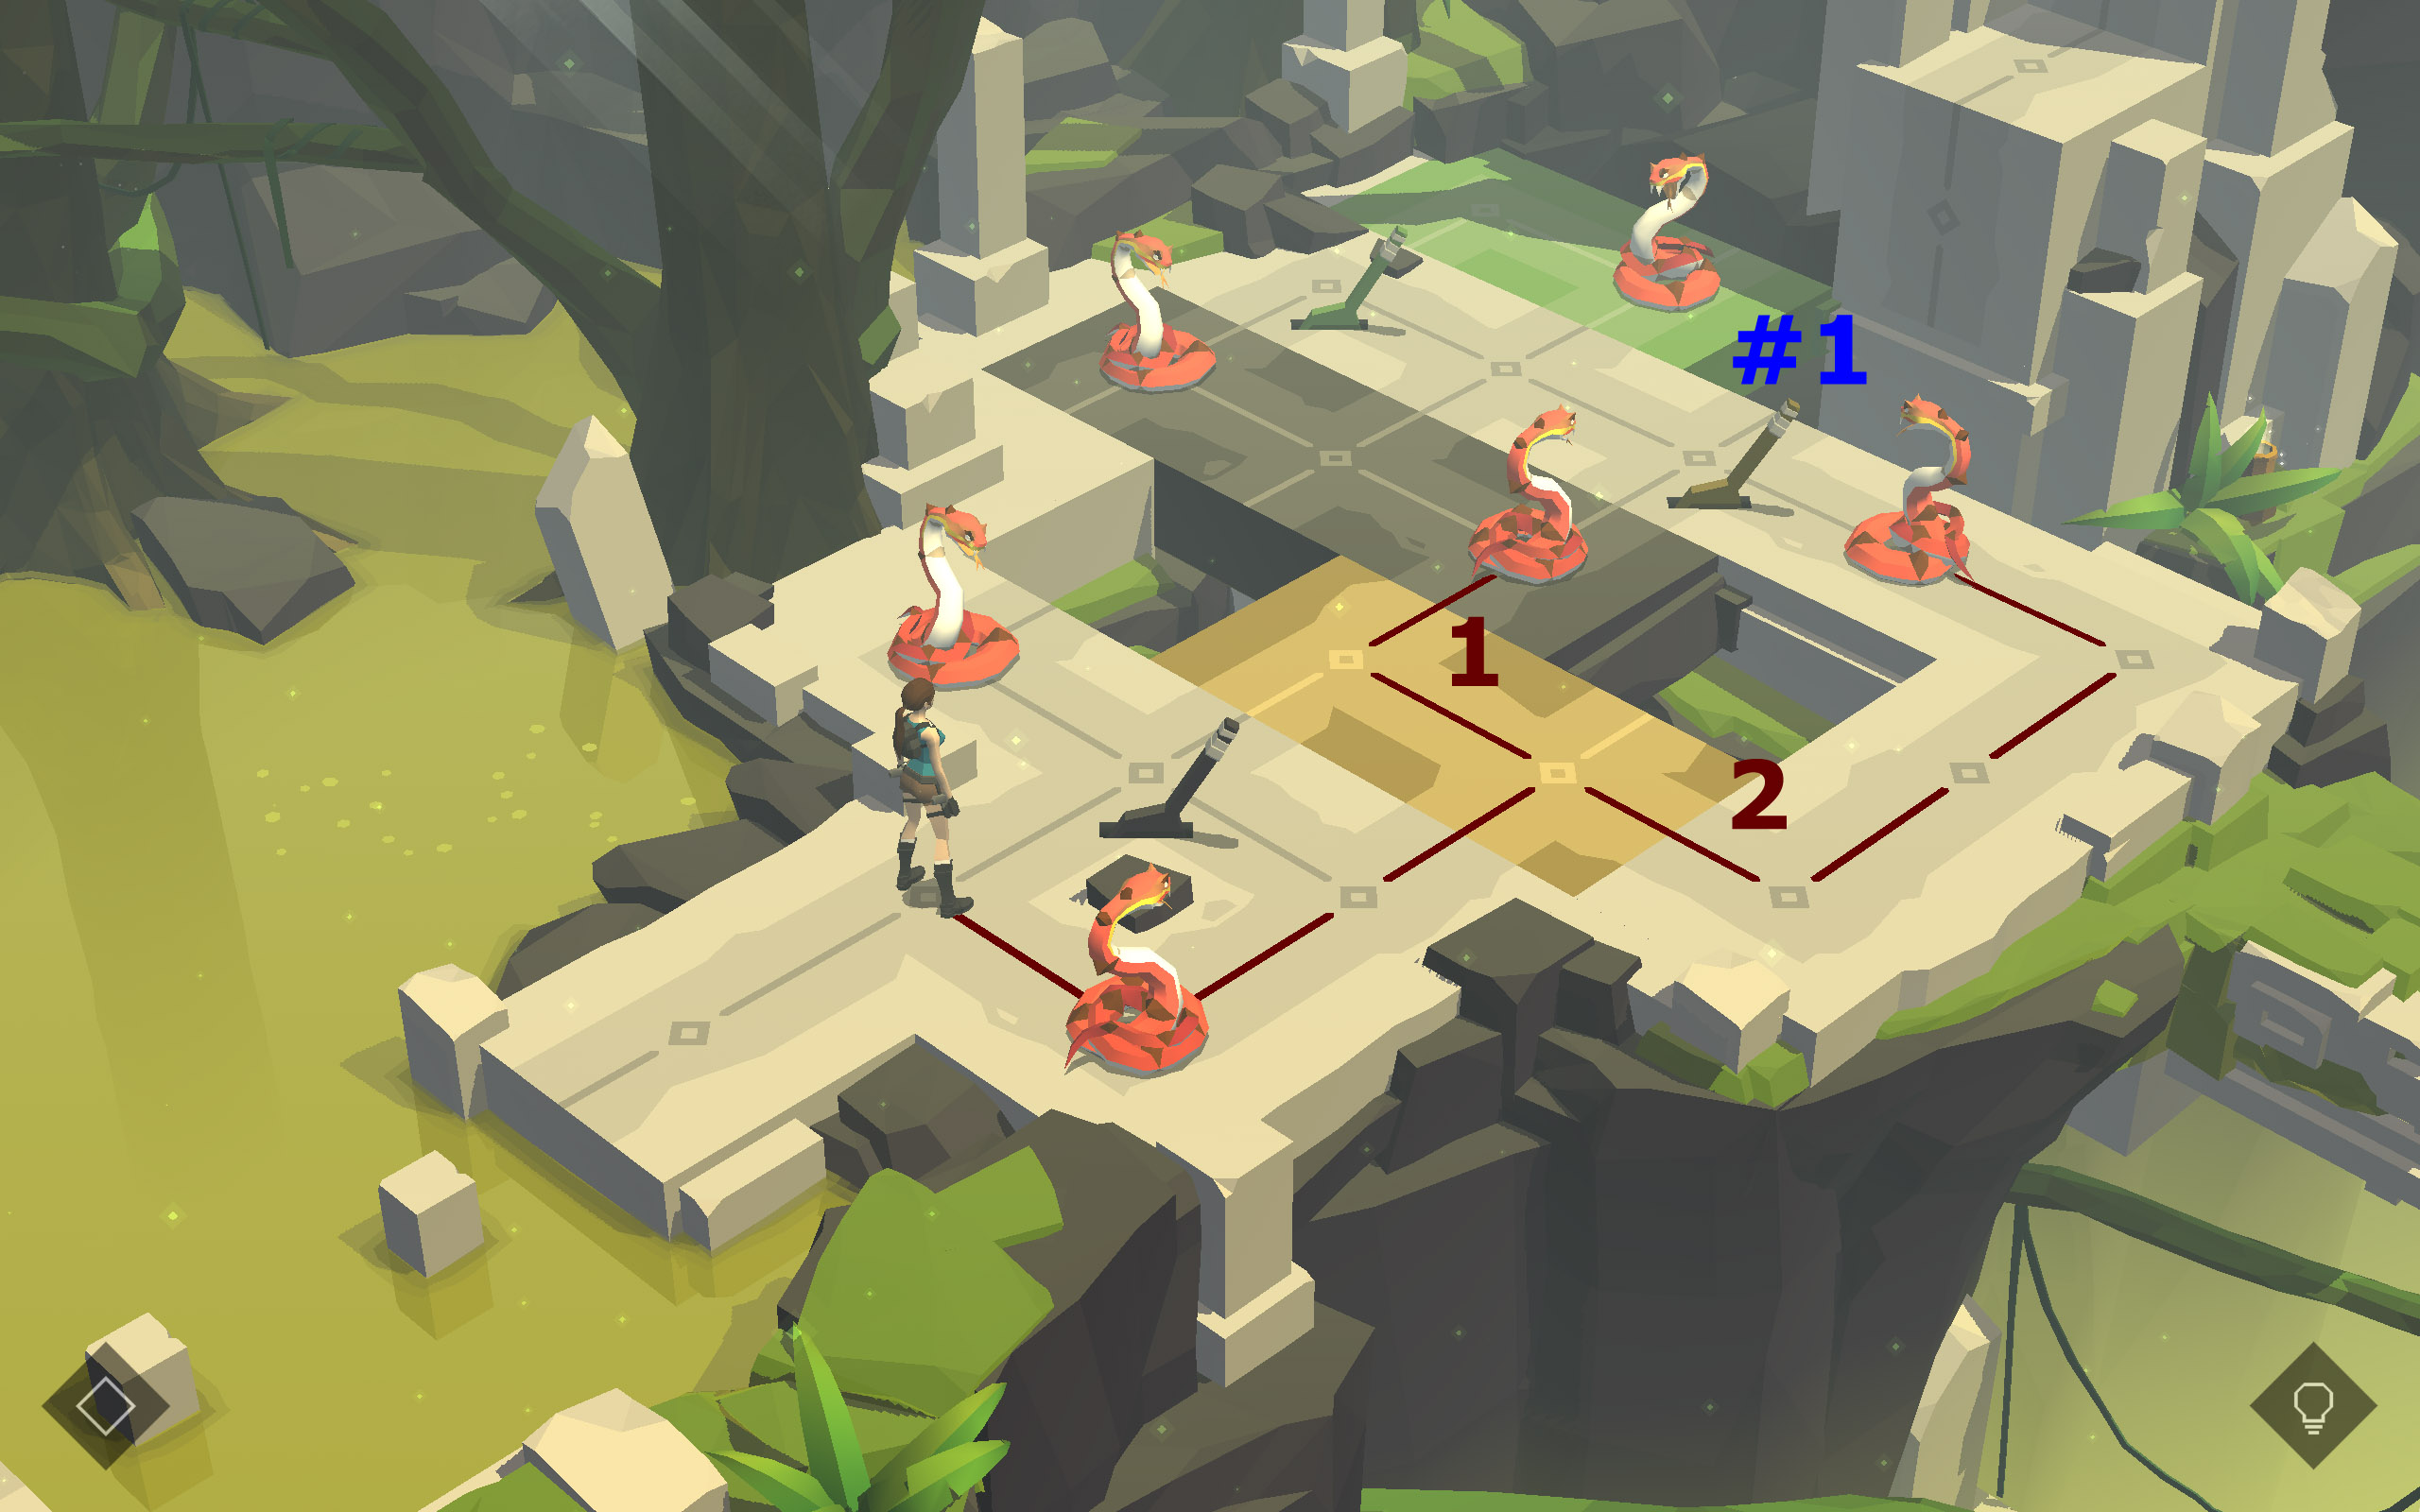 1st part
 2nd part
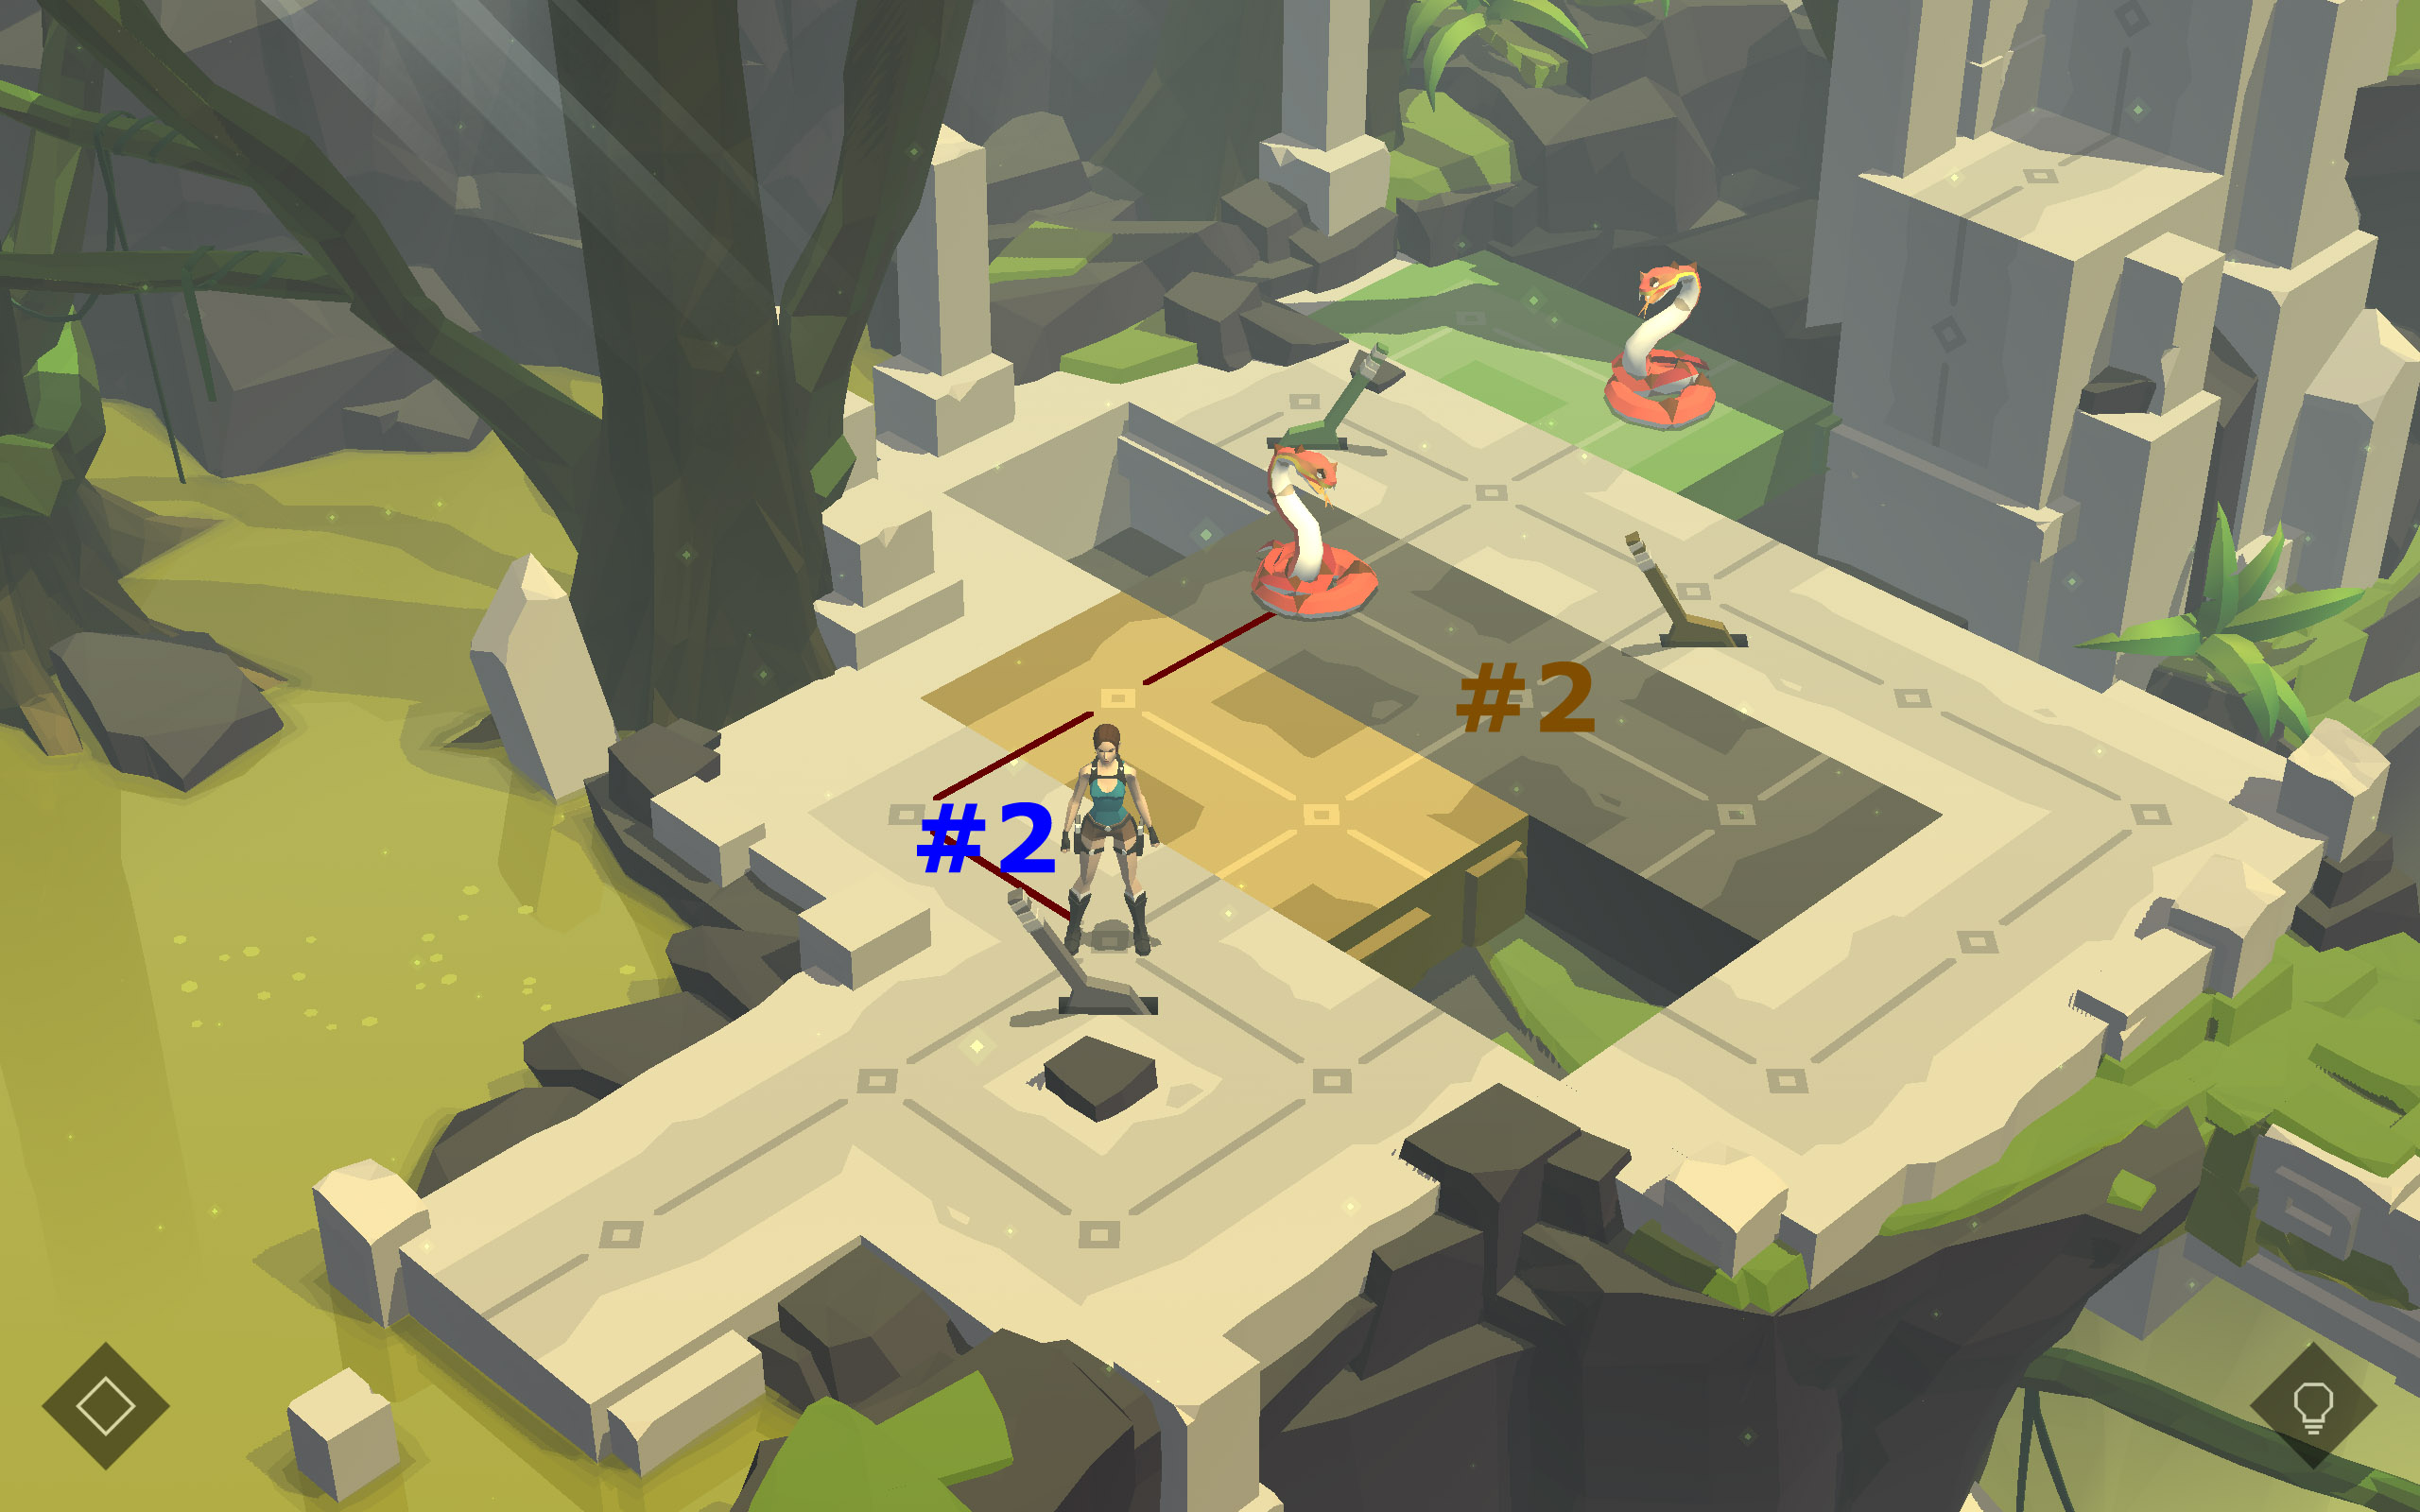 3rd part
 4th part
 5th part
Relics:
 Relic 2 and 3
Before you leave the area, grab the next vase hidden behind some greenery just right of the final cobra. It holds a fragment of "The Twin Snakes" (2/10).
Further up and right, near the exit square is another vase holding an Emerald (4/19).
Relic 2 and 3
Before you leave the area, grab the next vase hidden behind some greenery just right of the final cobra. It holds a fragment of "The Twin Snakes" (2/10).
Further up and right, near the exit square is another vase holding an Emerald (4/19).
 Relic 2 and 3
3. The Bridge of Many Sides
Take three steps forward and you will find yourself in the path of a Saw Blade. Head up the wall on the left, up to the top and traverse to the right. Climb down once. Instead of going down to the bottom however climb back up. Otherwise you will be killed by the saw blade. The saw blade is still in the right corner and it is not safe to climb down just yet. Traverse left once. Then traverse right again and now climb down while the blade is on the left side of the track. Quickly move to the end of the walkway.Relics:
Grab the vase sitting on the jutting rock. Inside is an Emerald (5/19).
Turn right and take two steps onto the next track. There is no saw blade at the moment, but a cobra is blocking the path. Climb down the wall and past the Collapsible Wall to the right. Activate the golden Lever Switch to move the golden platform.
Relics:
Look below you where the next vase is hidden behind the column, holding the next fragment of "The Twin Snakes" (3/10).
Climb further right and the Saw Blade will move onto the track above you, killing the Cobra. Climb up once. You cannot climb further, as the saw blade is blocking the path. Climb down once and then up onto the track, when the blade is over on the left. Go to the exit square.
4. The Tower of Blades
 1st part
Relics:
Up on a rock on the left side of the path is another vase. It holds a fragment of "The Twin Snakes" (4/10).
Head around the corner to the right.
Relics:
On a rock below the path is the second vase of this chapter. Inside is an Emerald (6/19).
Stand underneath the wall.
Relics:
On a rock right of the wall sits the third and final vase of the chaper. Grab the Emerald (7/19) inside.
 2nd part
5. Scaling by Danger
Relics:
Just to your right, once above the upper saw blade, once below it, are two vases. The top one contains a fragment of "The Twin Snakes" (4/10), the bottom one an Emerald (8/19).
Climb down the wall in front twice. Here the moving Saw Blade is blocking your path. So climb up once and back down . Climb right and straight up to reach the black Lever Switch. Flip it and the black wall part moves up, trapping the saw blade there. The path to the second lever is now clear.
Climb down twice and over to the right three times. Head straight up to the second black Lever Switch. Flip it and the black wall part moves back down. Climb down once and immediately up again. Both saw blades should be on the black wall again, so flip the second black Lever Switch again. Now both blades are trapped. Climb down to the bottom and there all the way over to the left. Climb down.
Relics: Before doing anything else, grab the vase below you, containing the next Emerald (9/19).
Then step right onto the exit square.
6. The Canyon of a Thousand Snakes
Take two steps forward.Relics:
Near the top of the screen, just next to the left-most cobra is another vase. Inside is an Emerald (10/19).
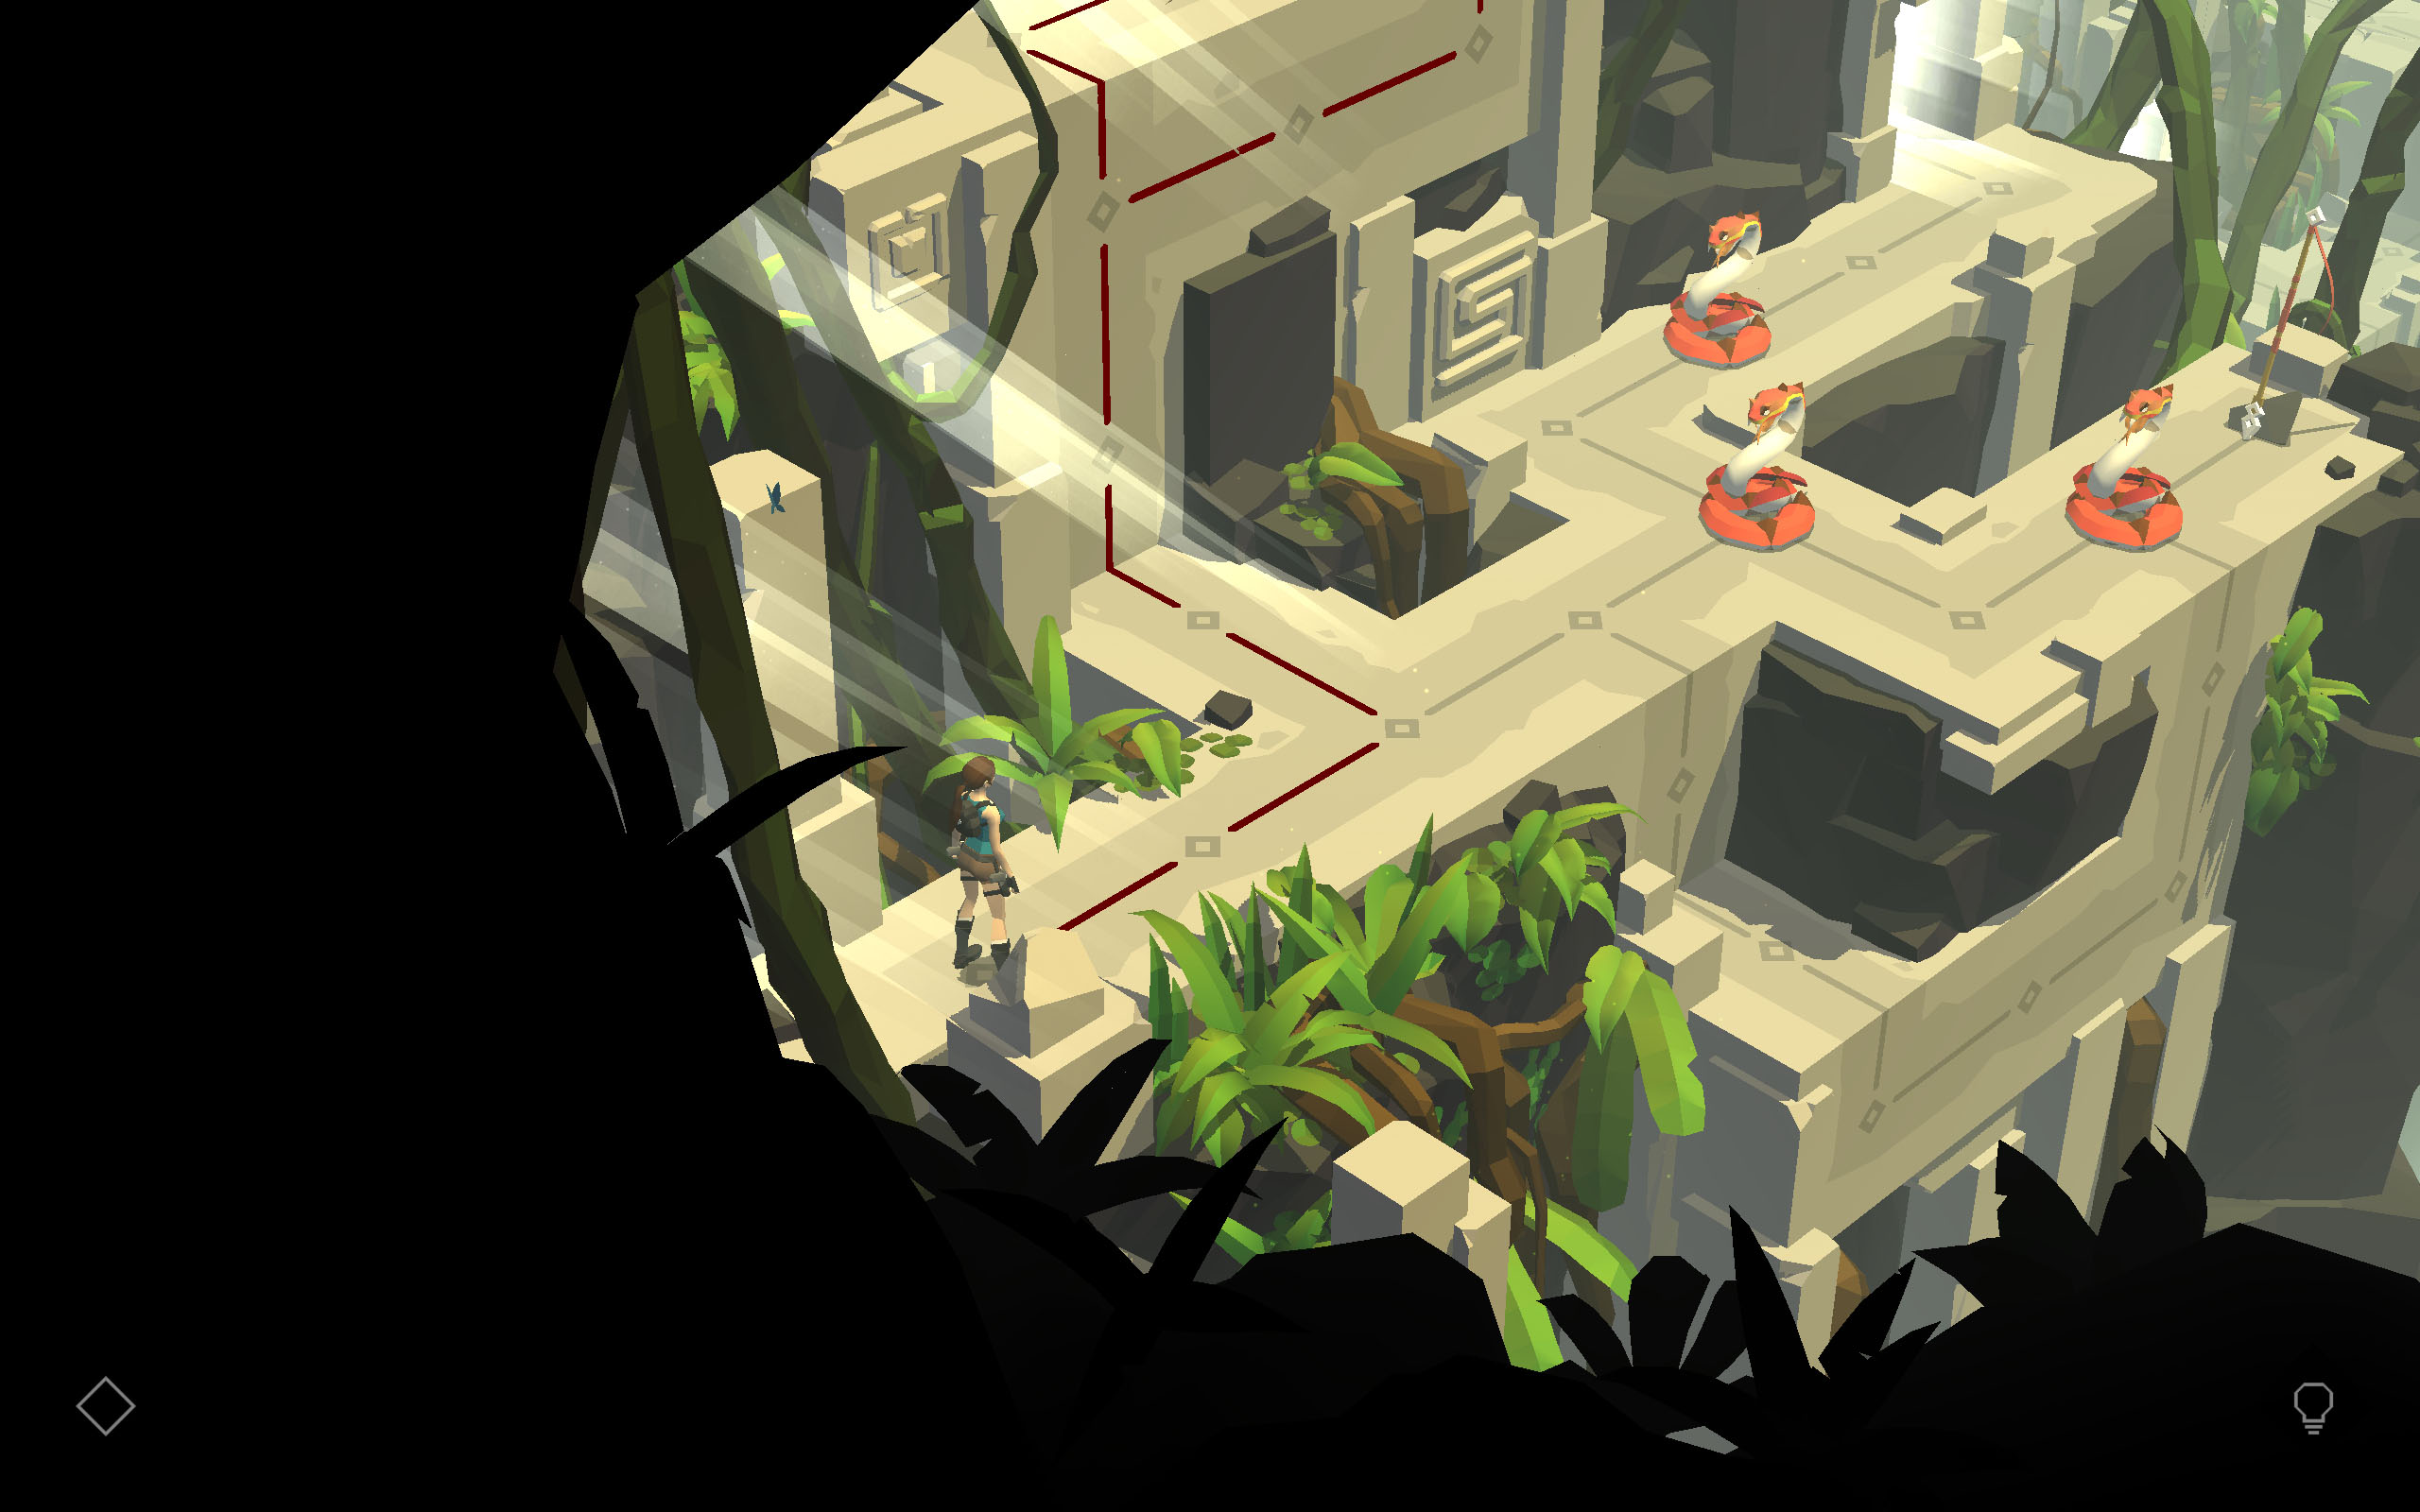
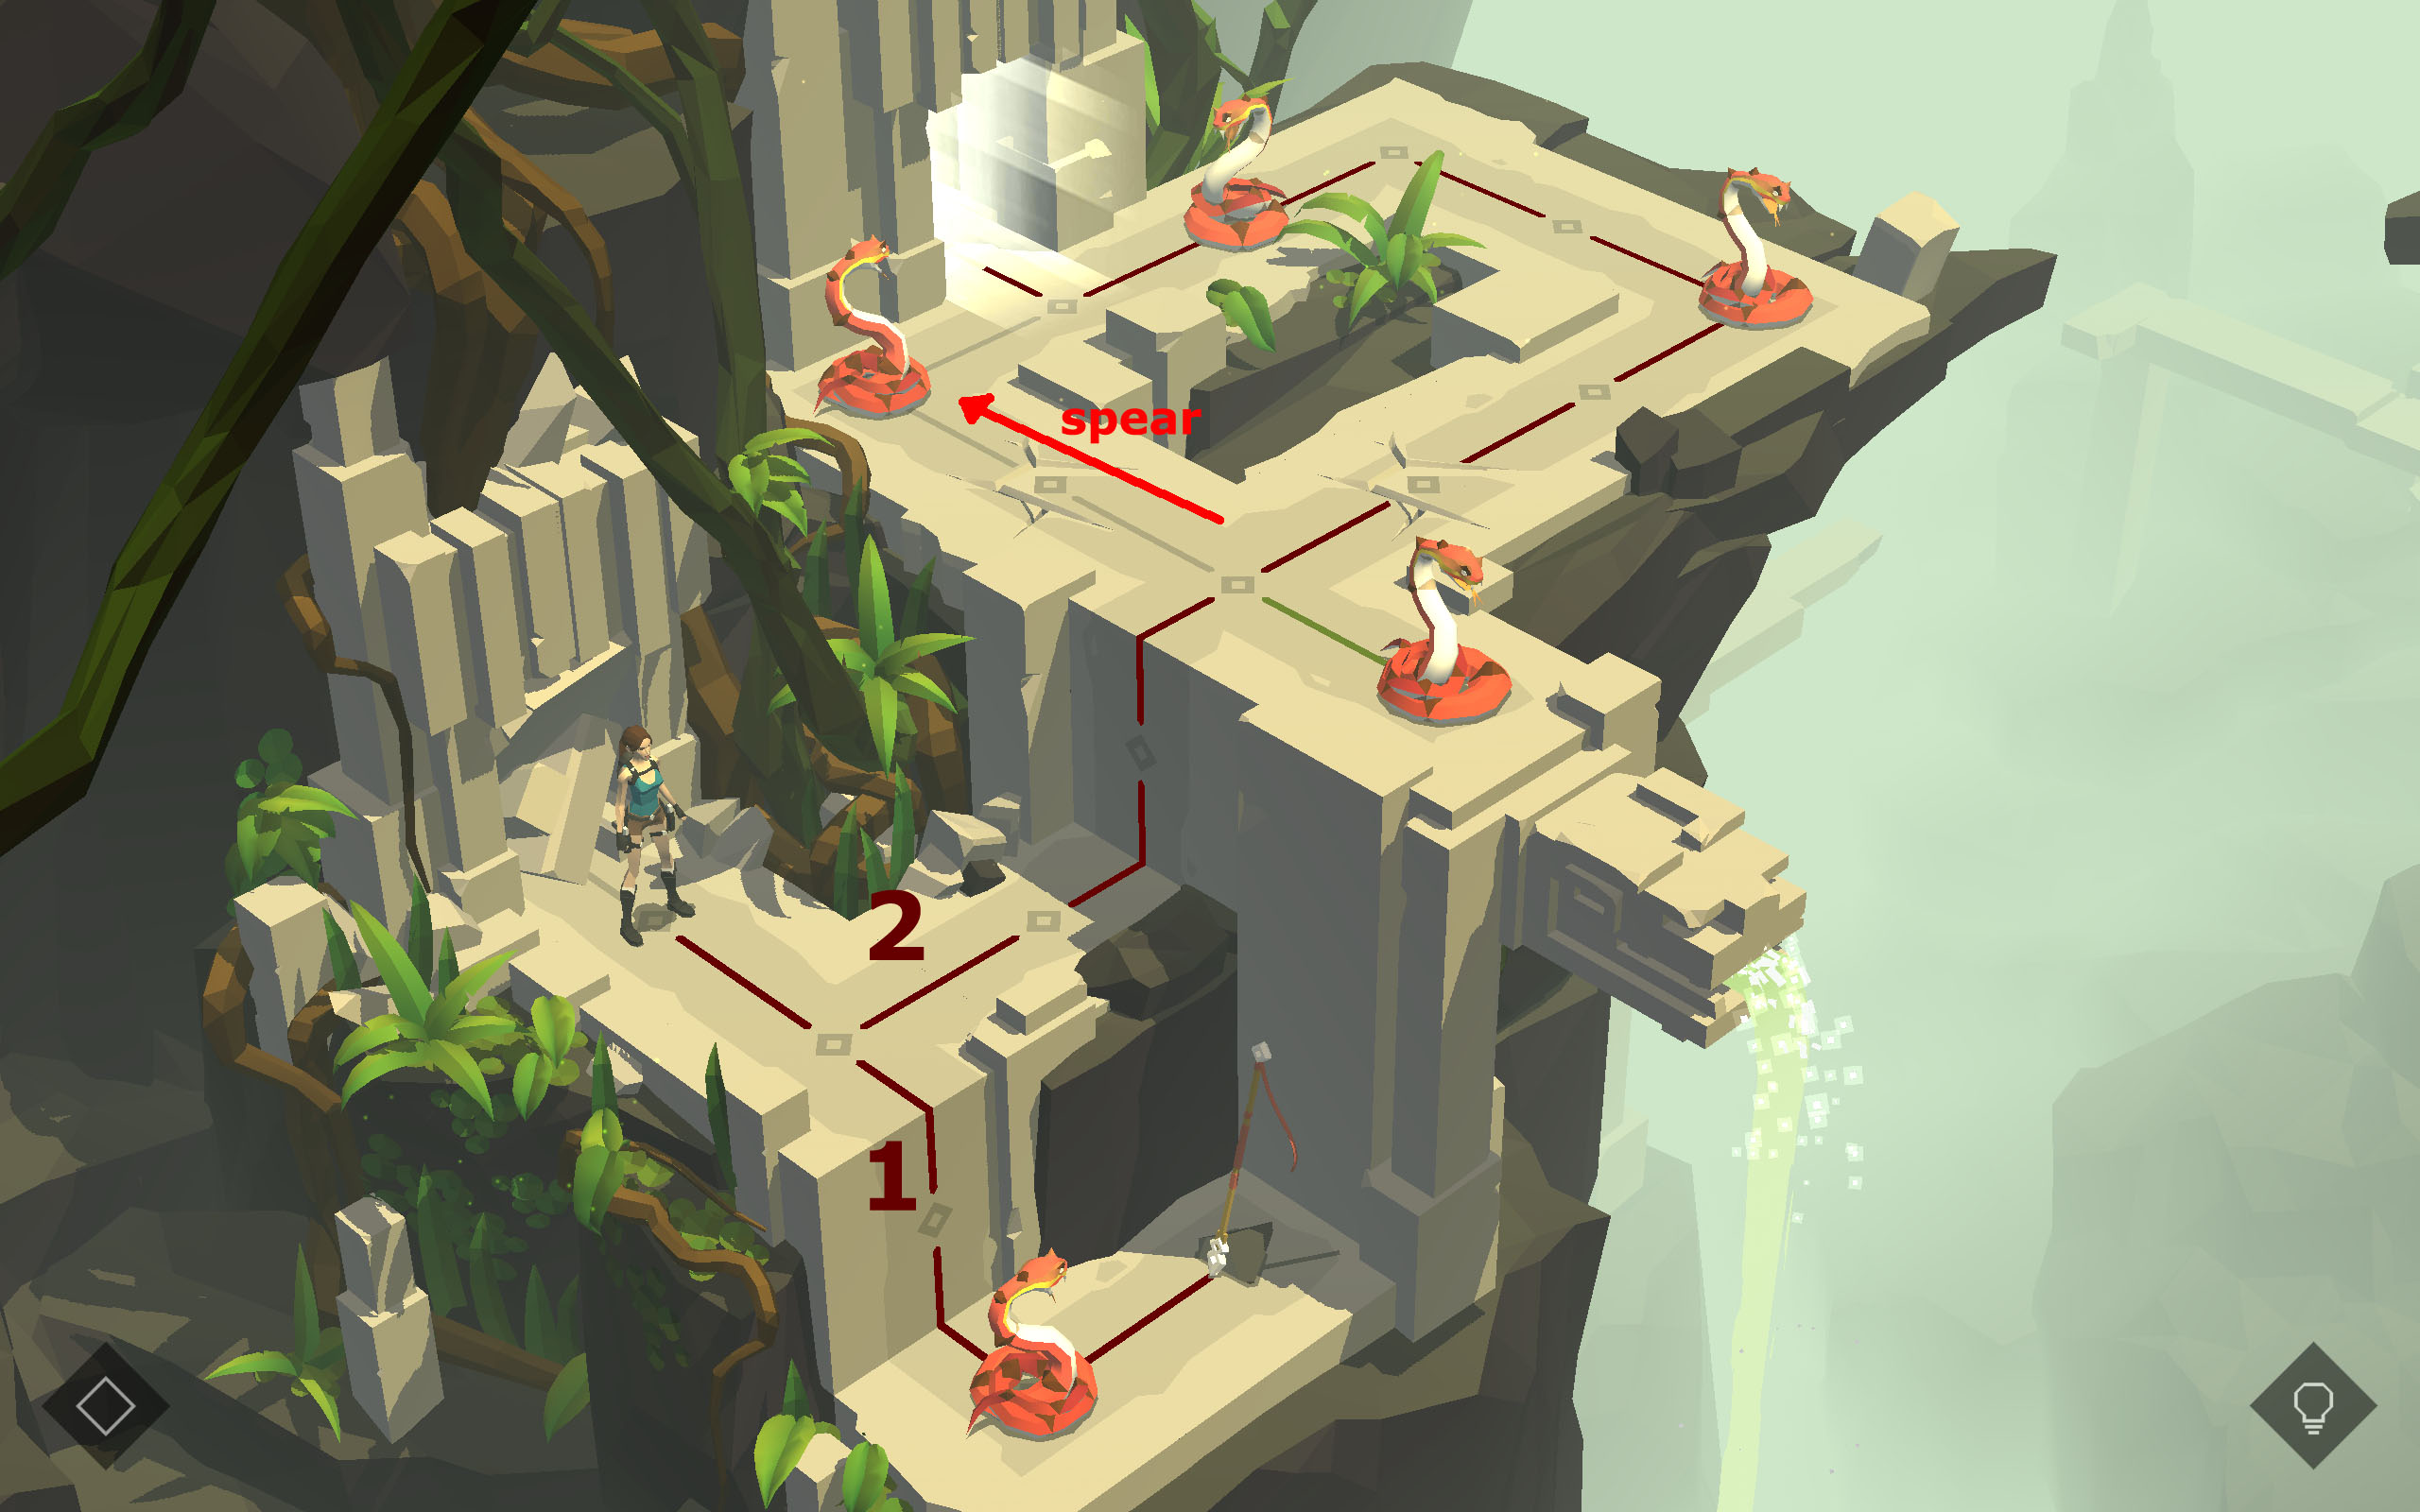
Turn left and climb up. On the walkway above you can see a Collapsible Floor, so instead of pulling up right away, climb along the edge to the right and pull up just underneath the Spear. Since you have not crossed it yet, you can safely move over to the left, walking across the collapsible floor. Climb back down and return to the crossing. You are standing two squares away from the first Cobra. Tap it, to use the spear and kill it. Then take on step forward. (Note how the other two cobras are also facing your way.) Climb down to the right and all the way down till you can climb along the ledge to the right. Climb up to kill the second Cobra, climbing up from the side. (You may spot a vase below, but in a moment we will get much closer, so keep it for later.) Step right and grab the next Spear. Step back onto the T-junction to stand opposite the third Cobra. Tap it, to kill it with the spear. Then walk around and over to the lit entrance. Step through.
 1st part
 2nd part
 3rd part
Relics:
Just to Lara's right (that is left for you) is the next vase. It contains an Emerald (11/19).
Step to the right and grab the Spear. Climb back up and turn right. At the top tap onto the Cobra on the left to kill it using the spear. Optionally step to the right to kill the Cobra, before crossing the Collapsible Floor on the right. Shoot the Cobra at the end.
Relics:
On the black outcrop to your right is another vase. Inside is the next fragment of "The Twin Snakes" (6/10).
Follow the path around and kill the final Cobra before stepping through the entrance.
 Outside
 Dark Cave
Relics:
Right at the beginning of this next puzzle you can find another vase. It is sitting on a brown root in the bottom left corner of the screen. It contains an Emerald (12/19).
 1st part
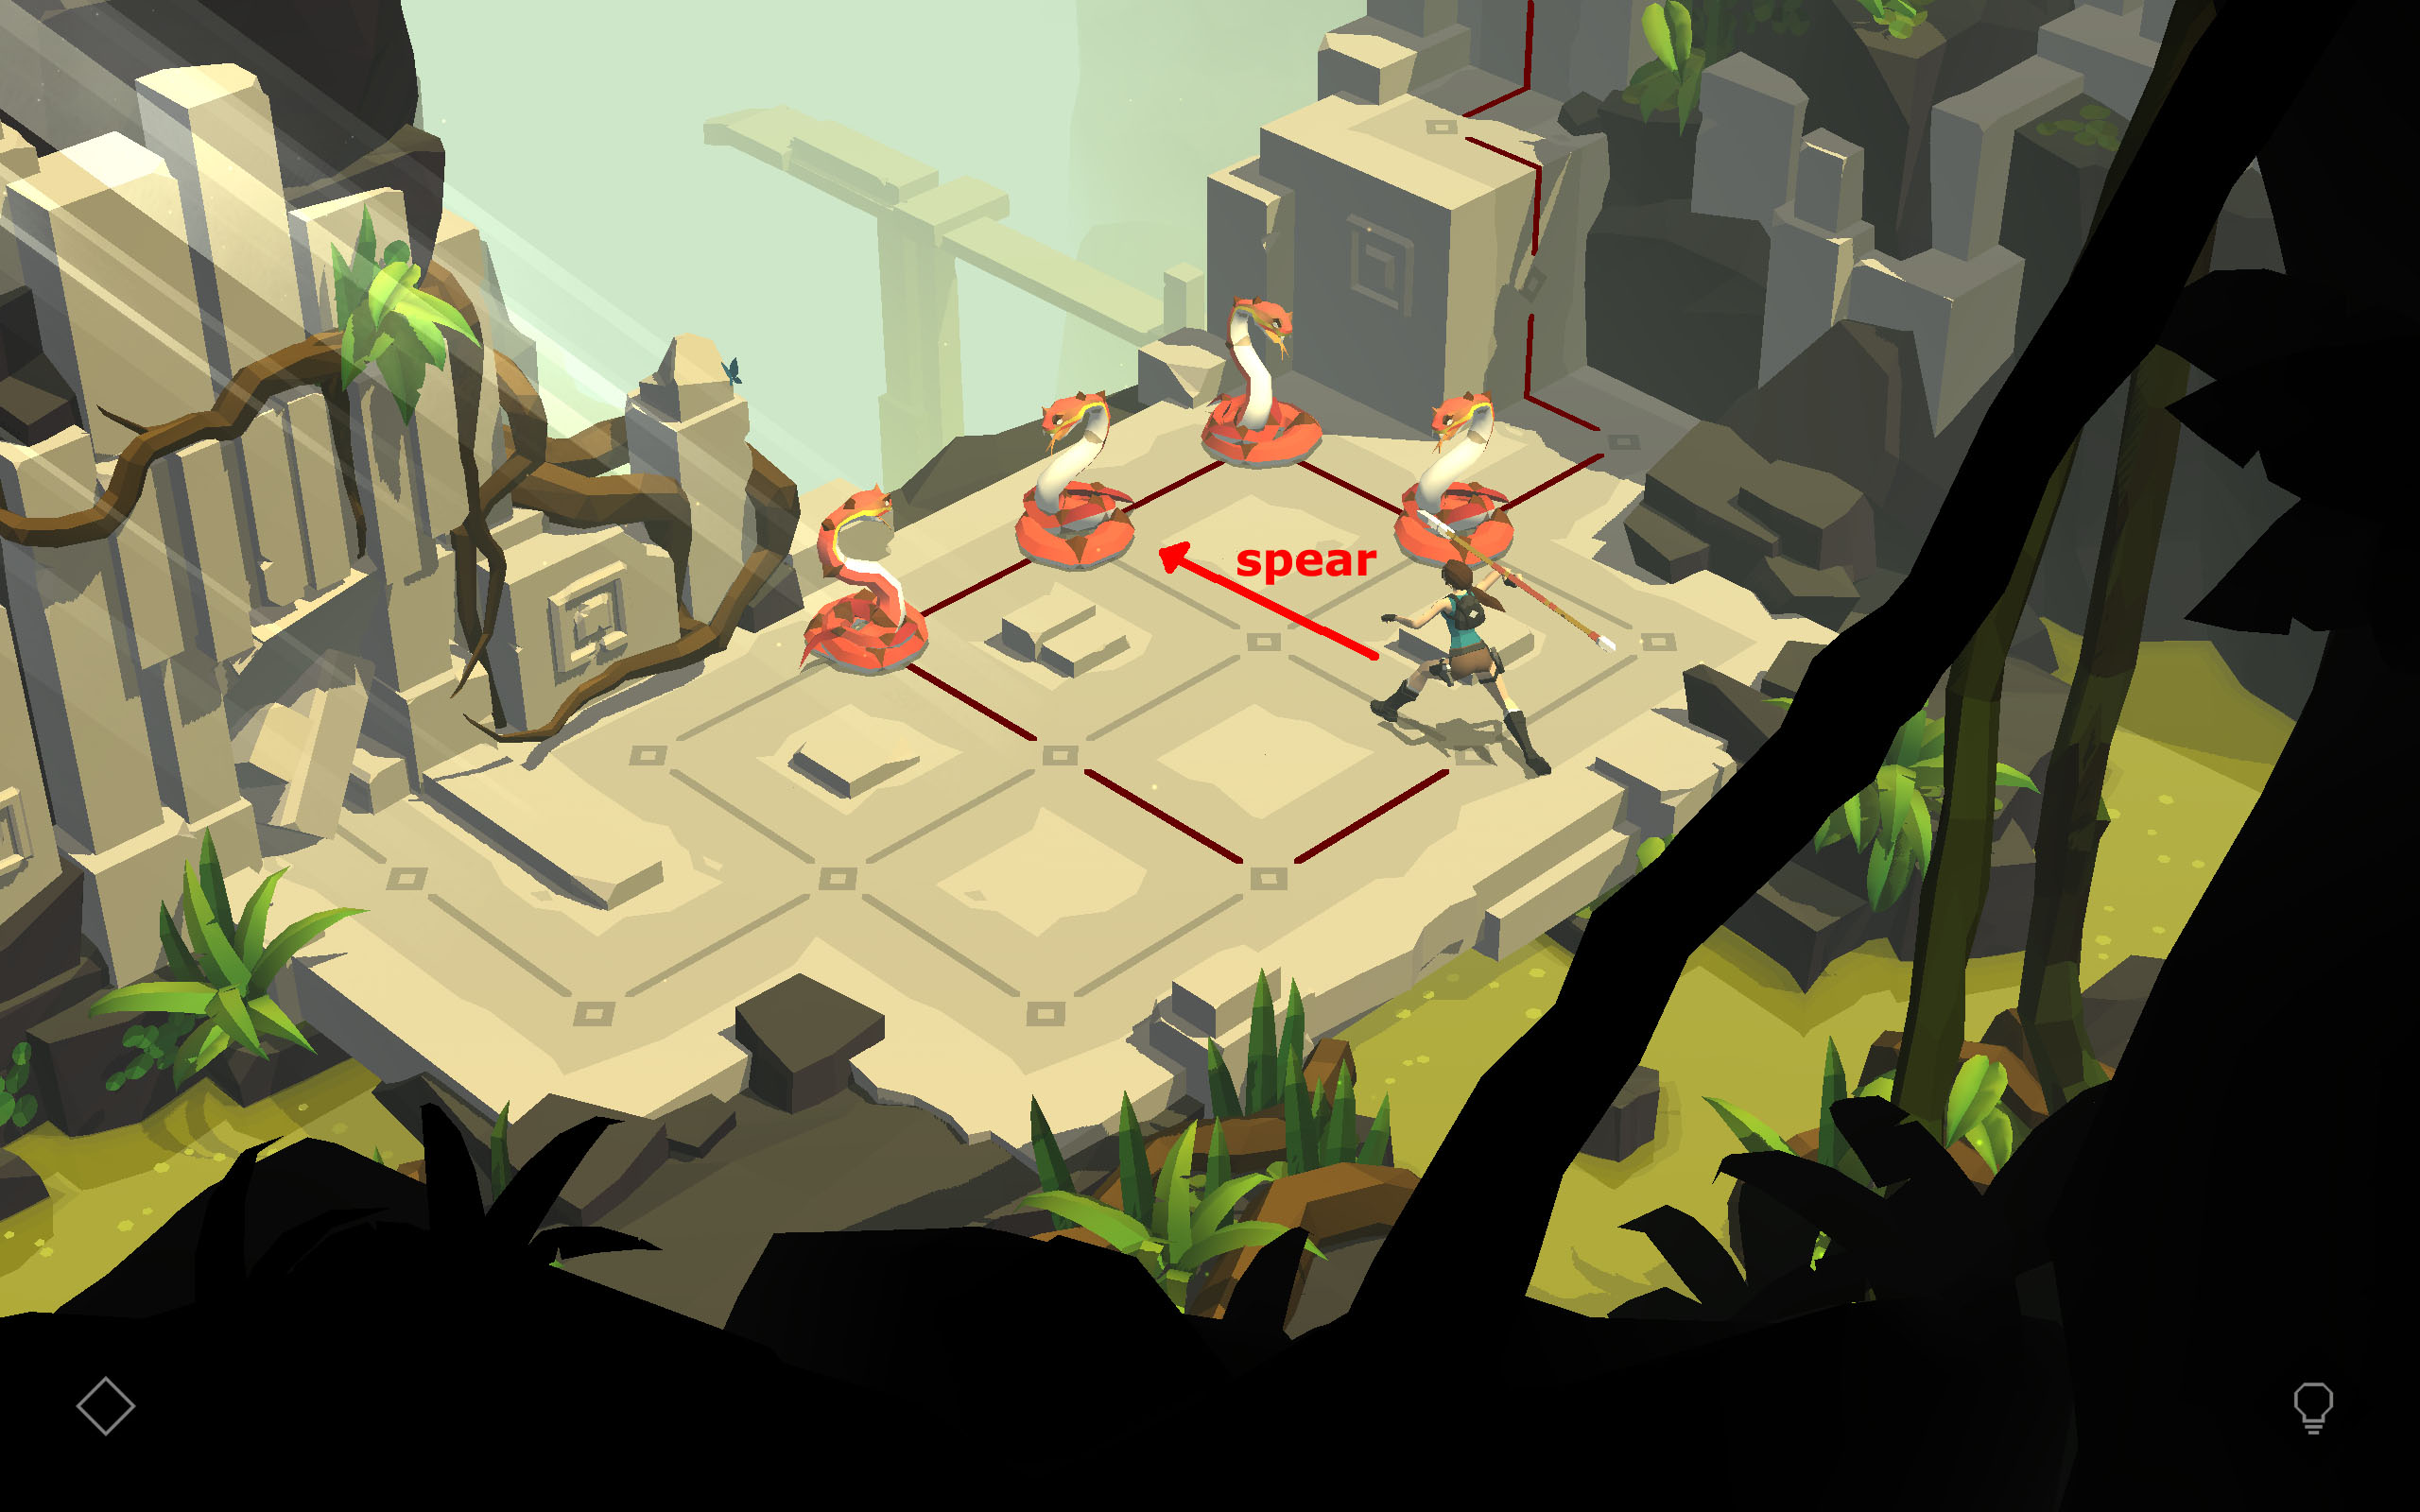 2nd part
7. Dodging a Fang
Relics:
The first vase is right at the beginning of the chapter. It is sitting on a black rock in the upper left corner. Inside is an Emerald (13/19).
Take two steps forward. (The path up ahead is guarded by a Cobra.)
Climb down to the right and advance to the first T-junction.
Relics:
In the upper right corner, behind a grey column you can spot another vase. It contains a fragment of "The Twin Snakes" (7/10).
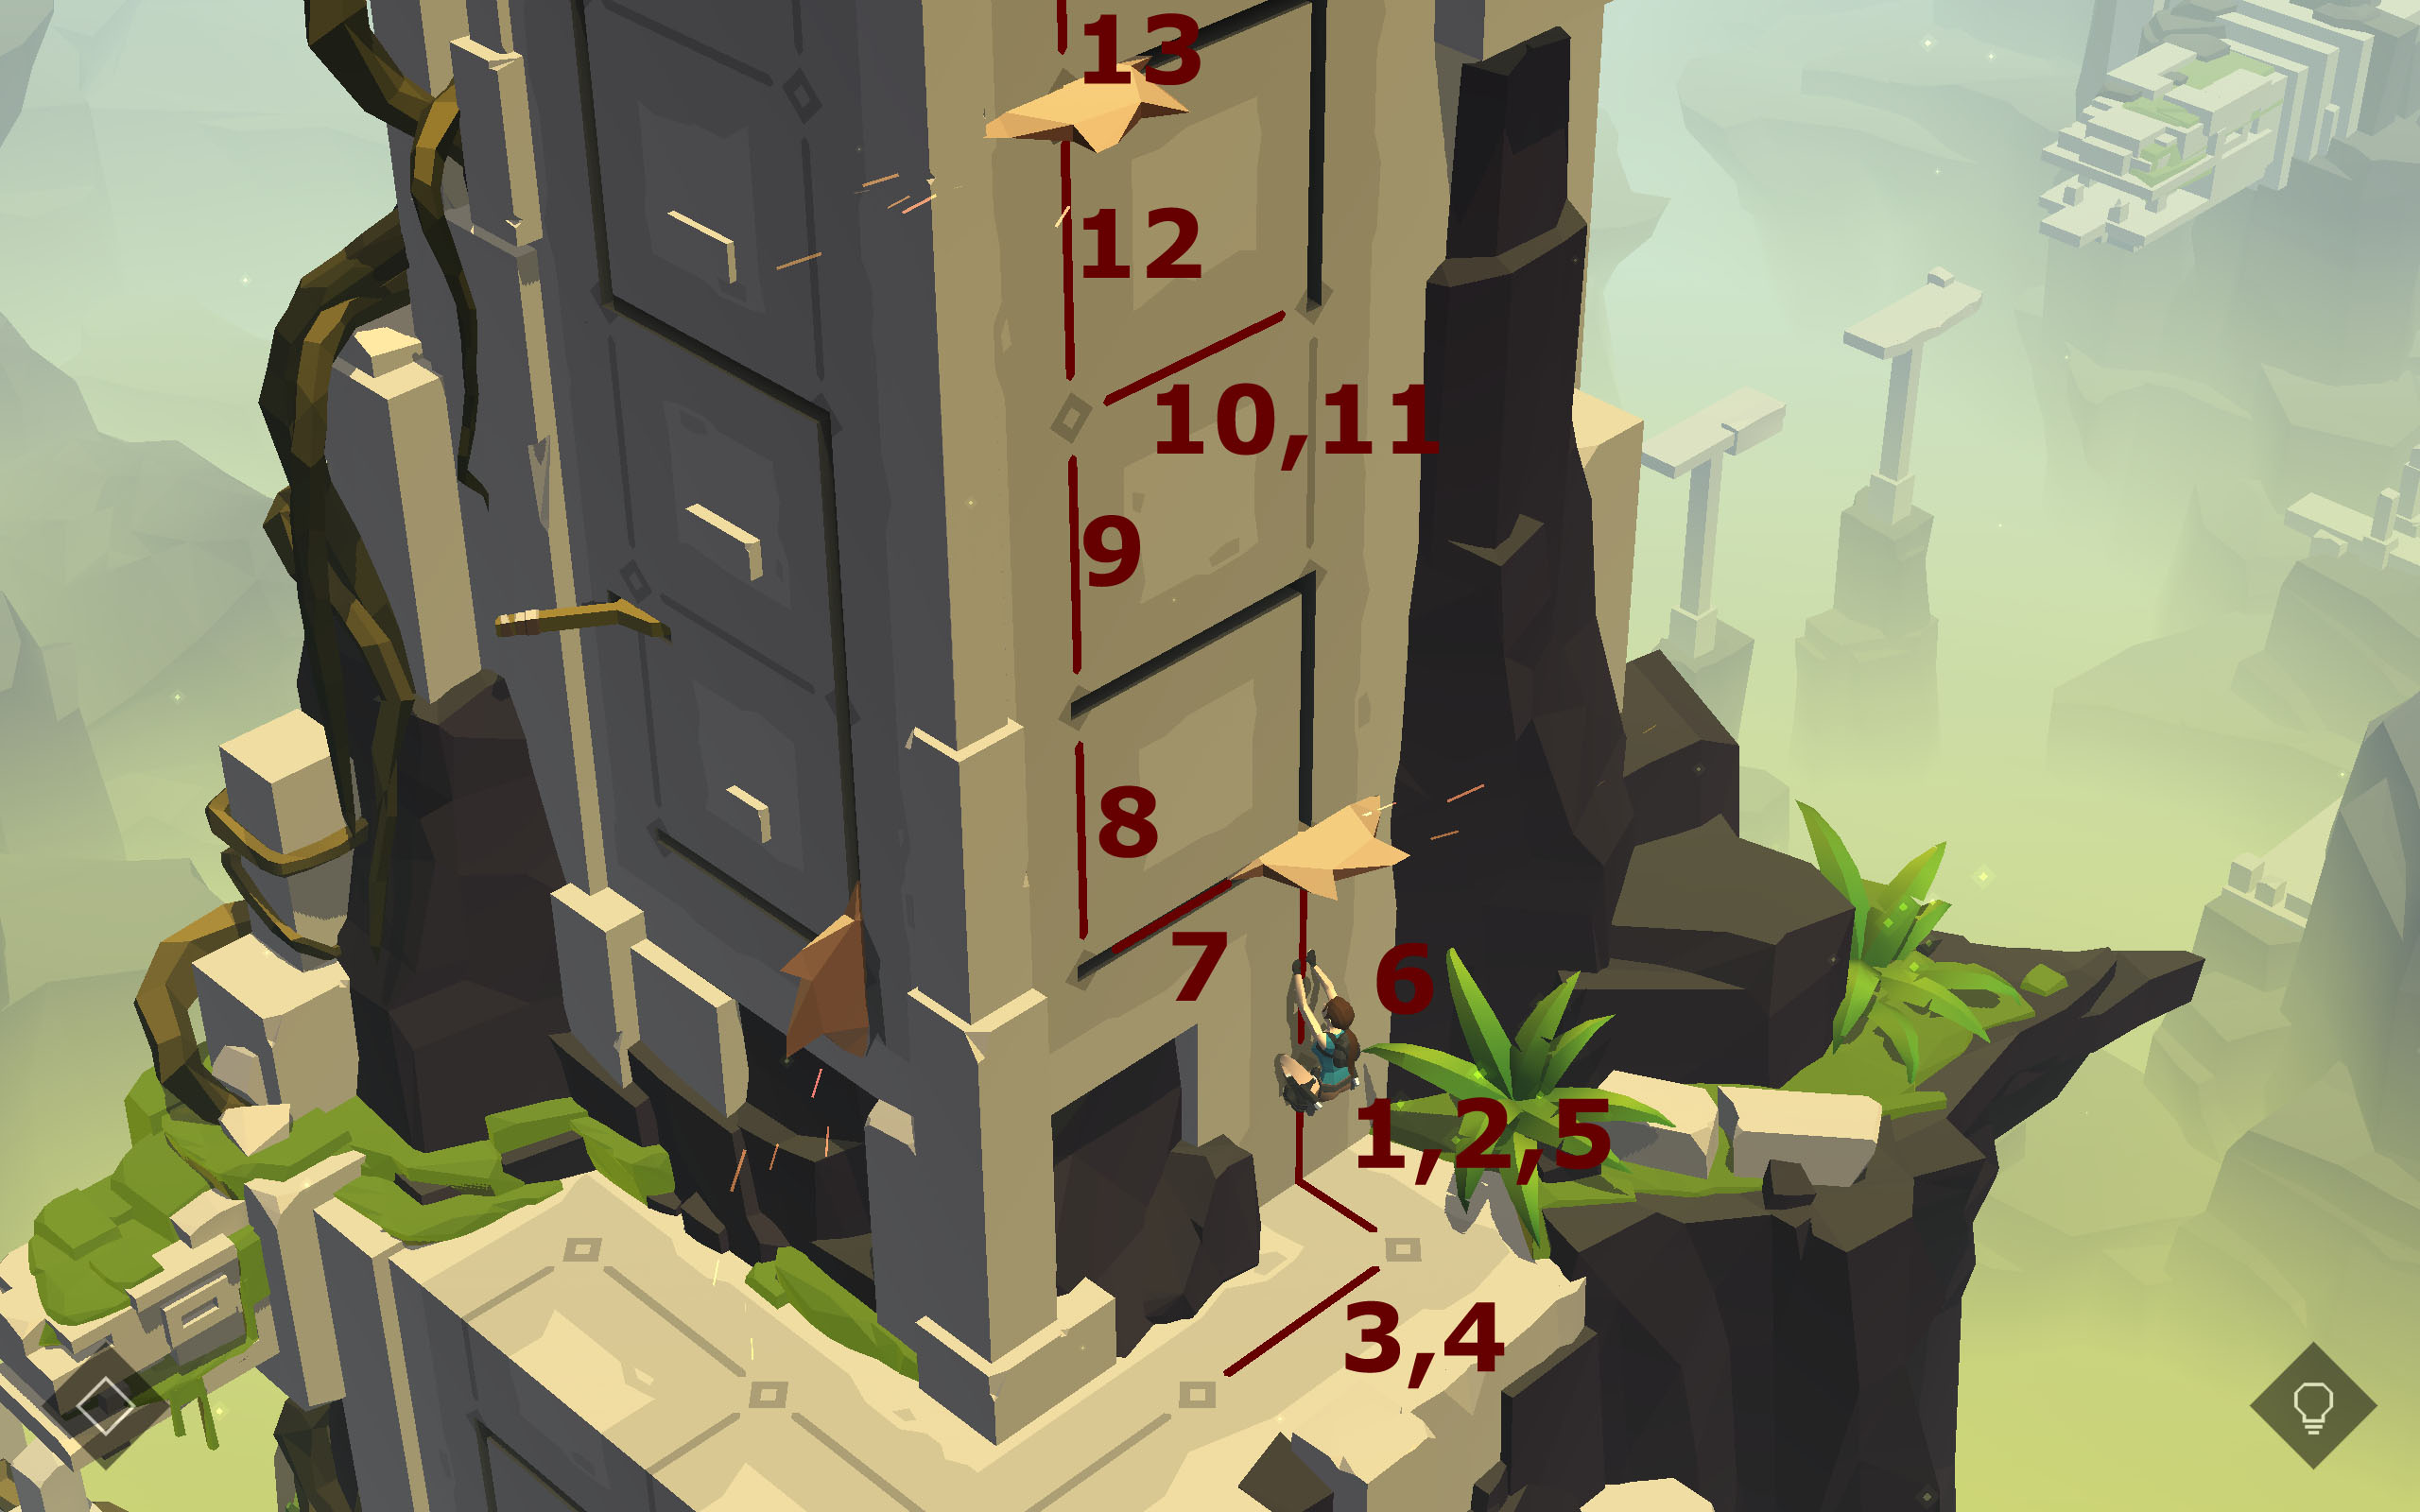
Follow the slit in the floor down to the left. Step towards the golden Lever Switch and flip it. (1st image) The saw blade will be transported to the second slit in the floor, along with the moving golden platform. (2nd image) Step away from the lever in any direction and immediately return to it. The saw blade has now left the golden platform. Flip the golden Lever Switch again. (3rd image) Once again step away from the lever and return. The saw blade is now in the second slit of the golden platform. Flip the golden Lever Switch for the third time and the saw blade is now in the slit closest to you. (4th image) Step away from the lever, towards the dead end, otherwise you will be killed by the Saw Blade. Return to the golden Lever Switch to flip it one final time. (5th image) Now head out of the corner, slipping past the saw blade while it's at the right end. Step out onto the golden platform and follow it around to reach the Spear. Collect it. Before moving away, throw it at the Cobra. (6th image)
 1st part
 2nd part
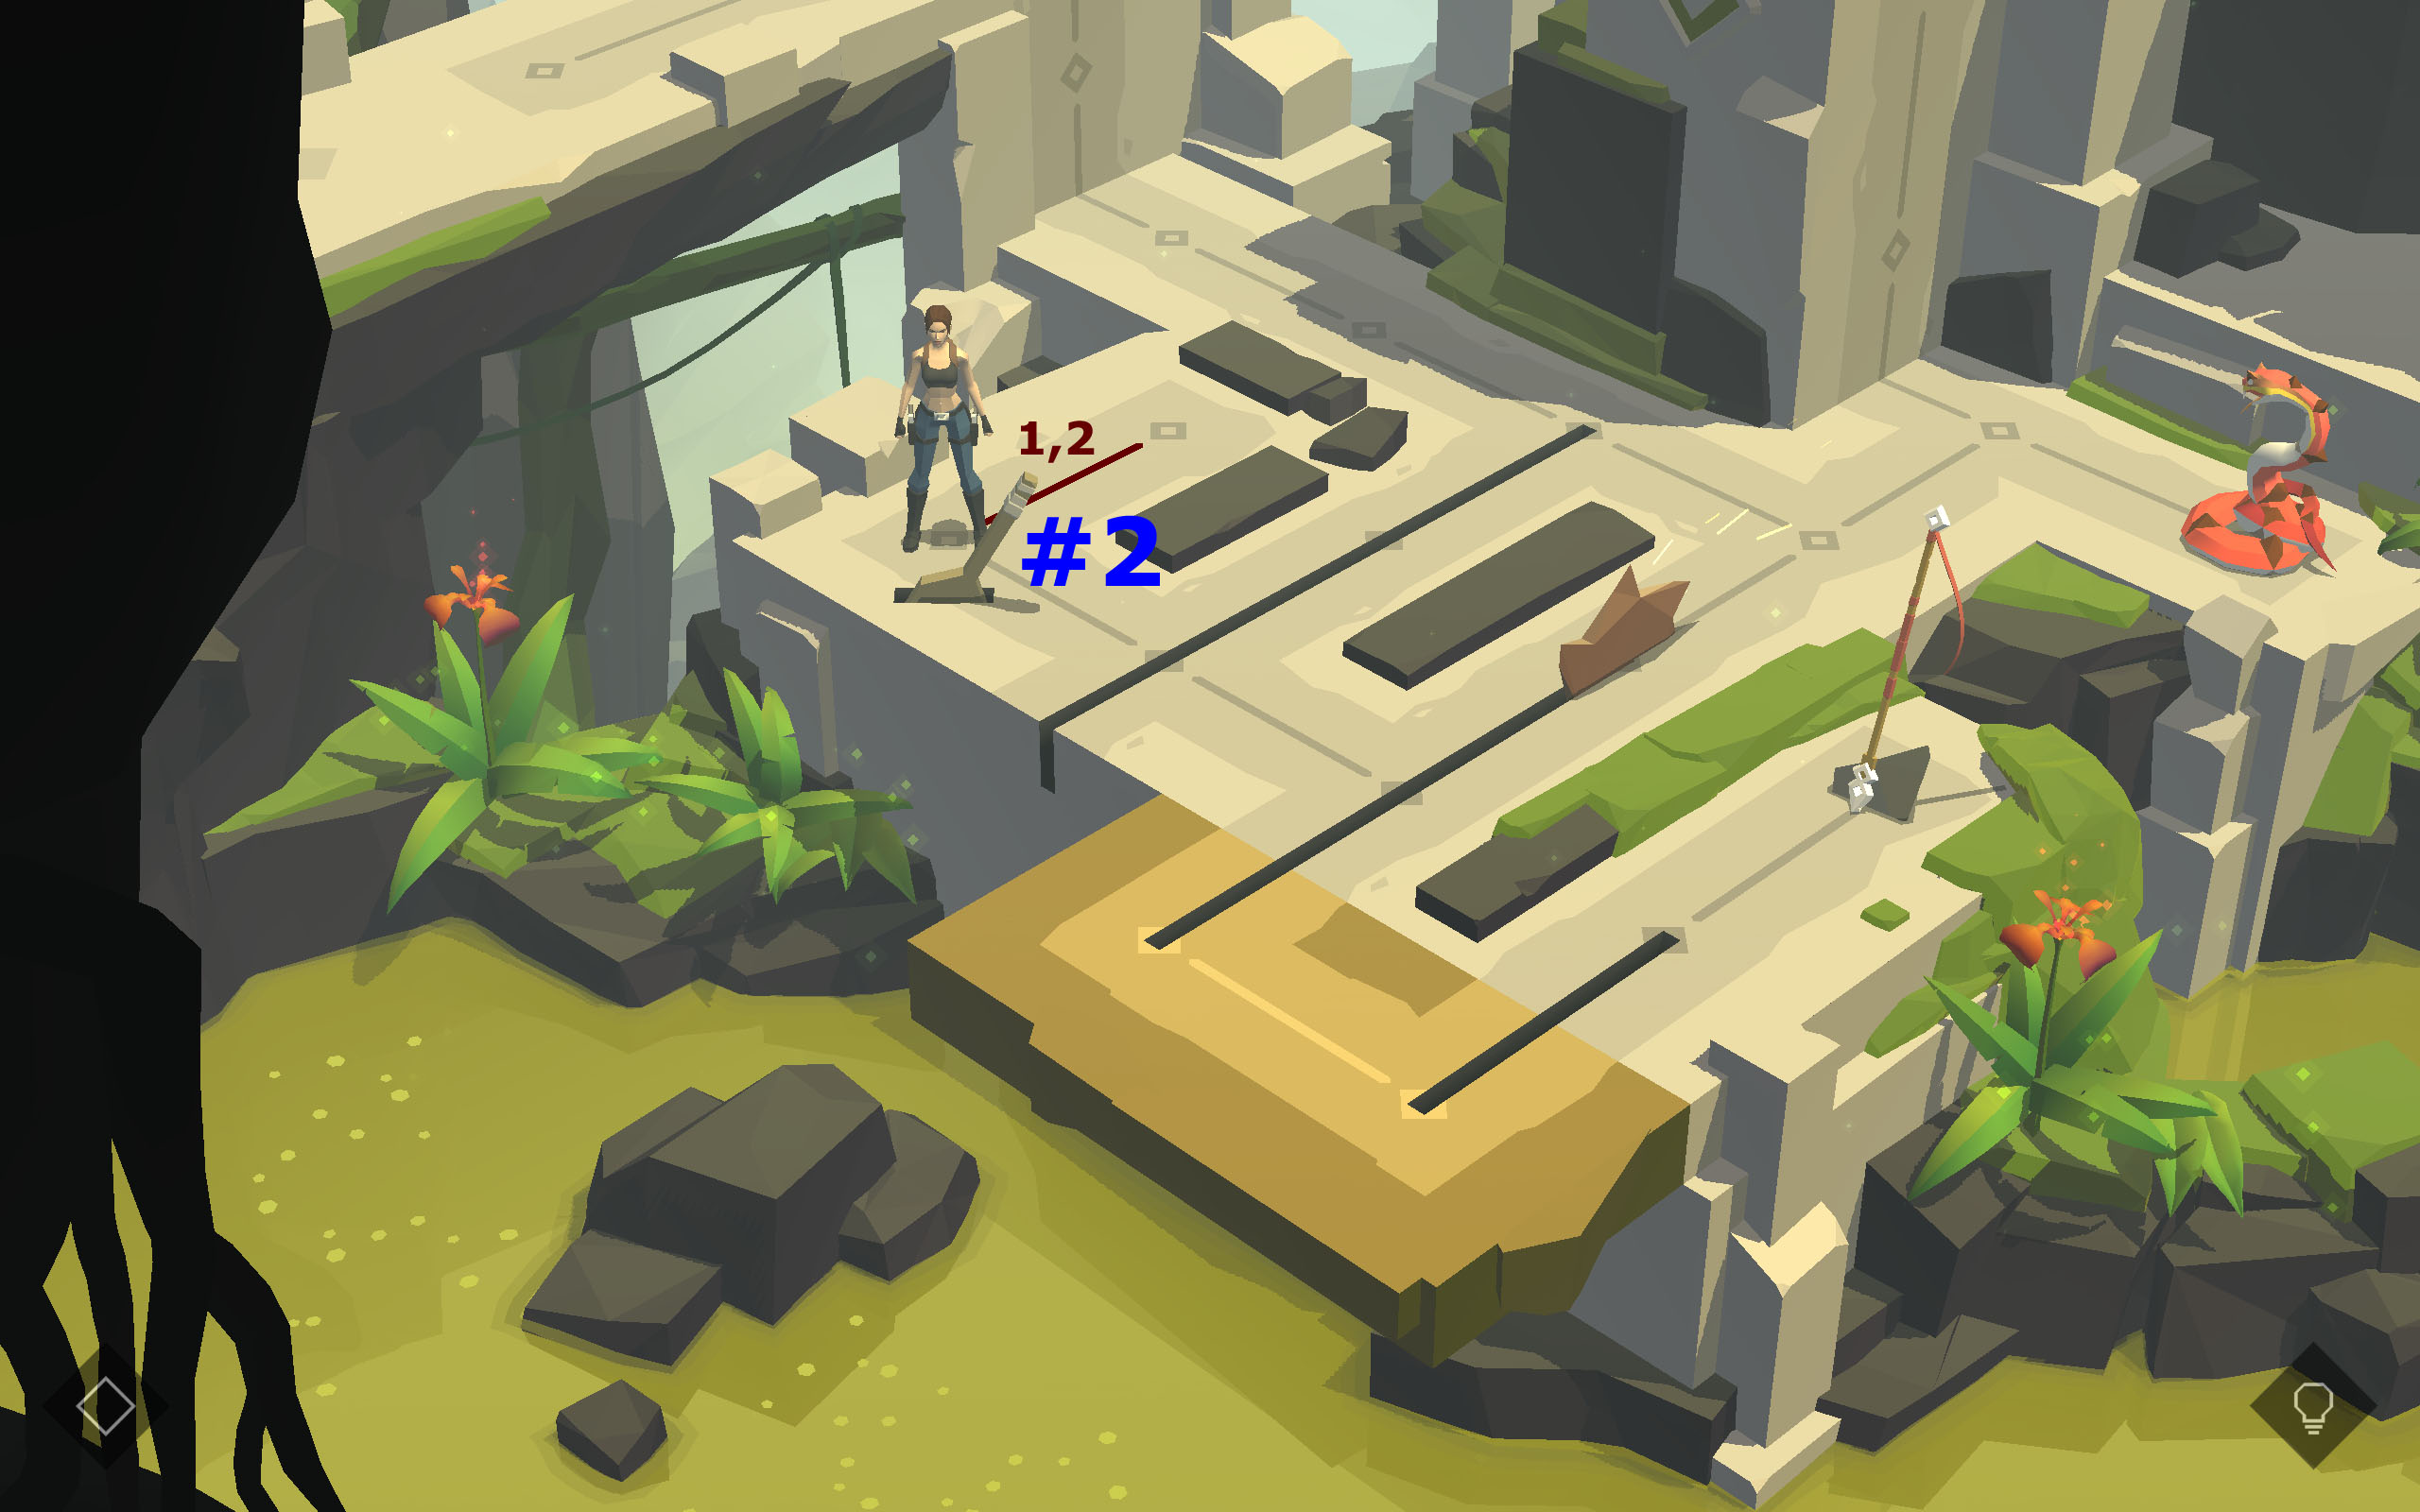 3rd part
 4th part
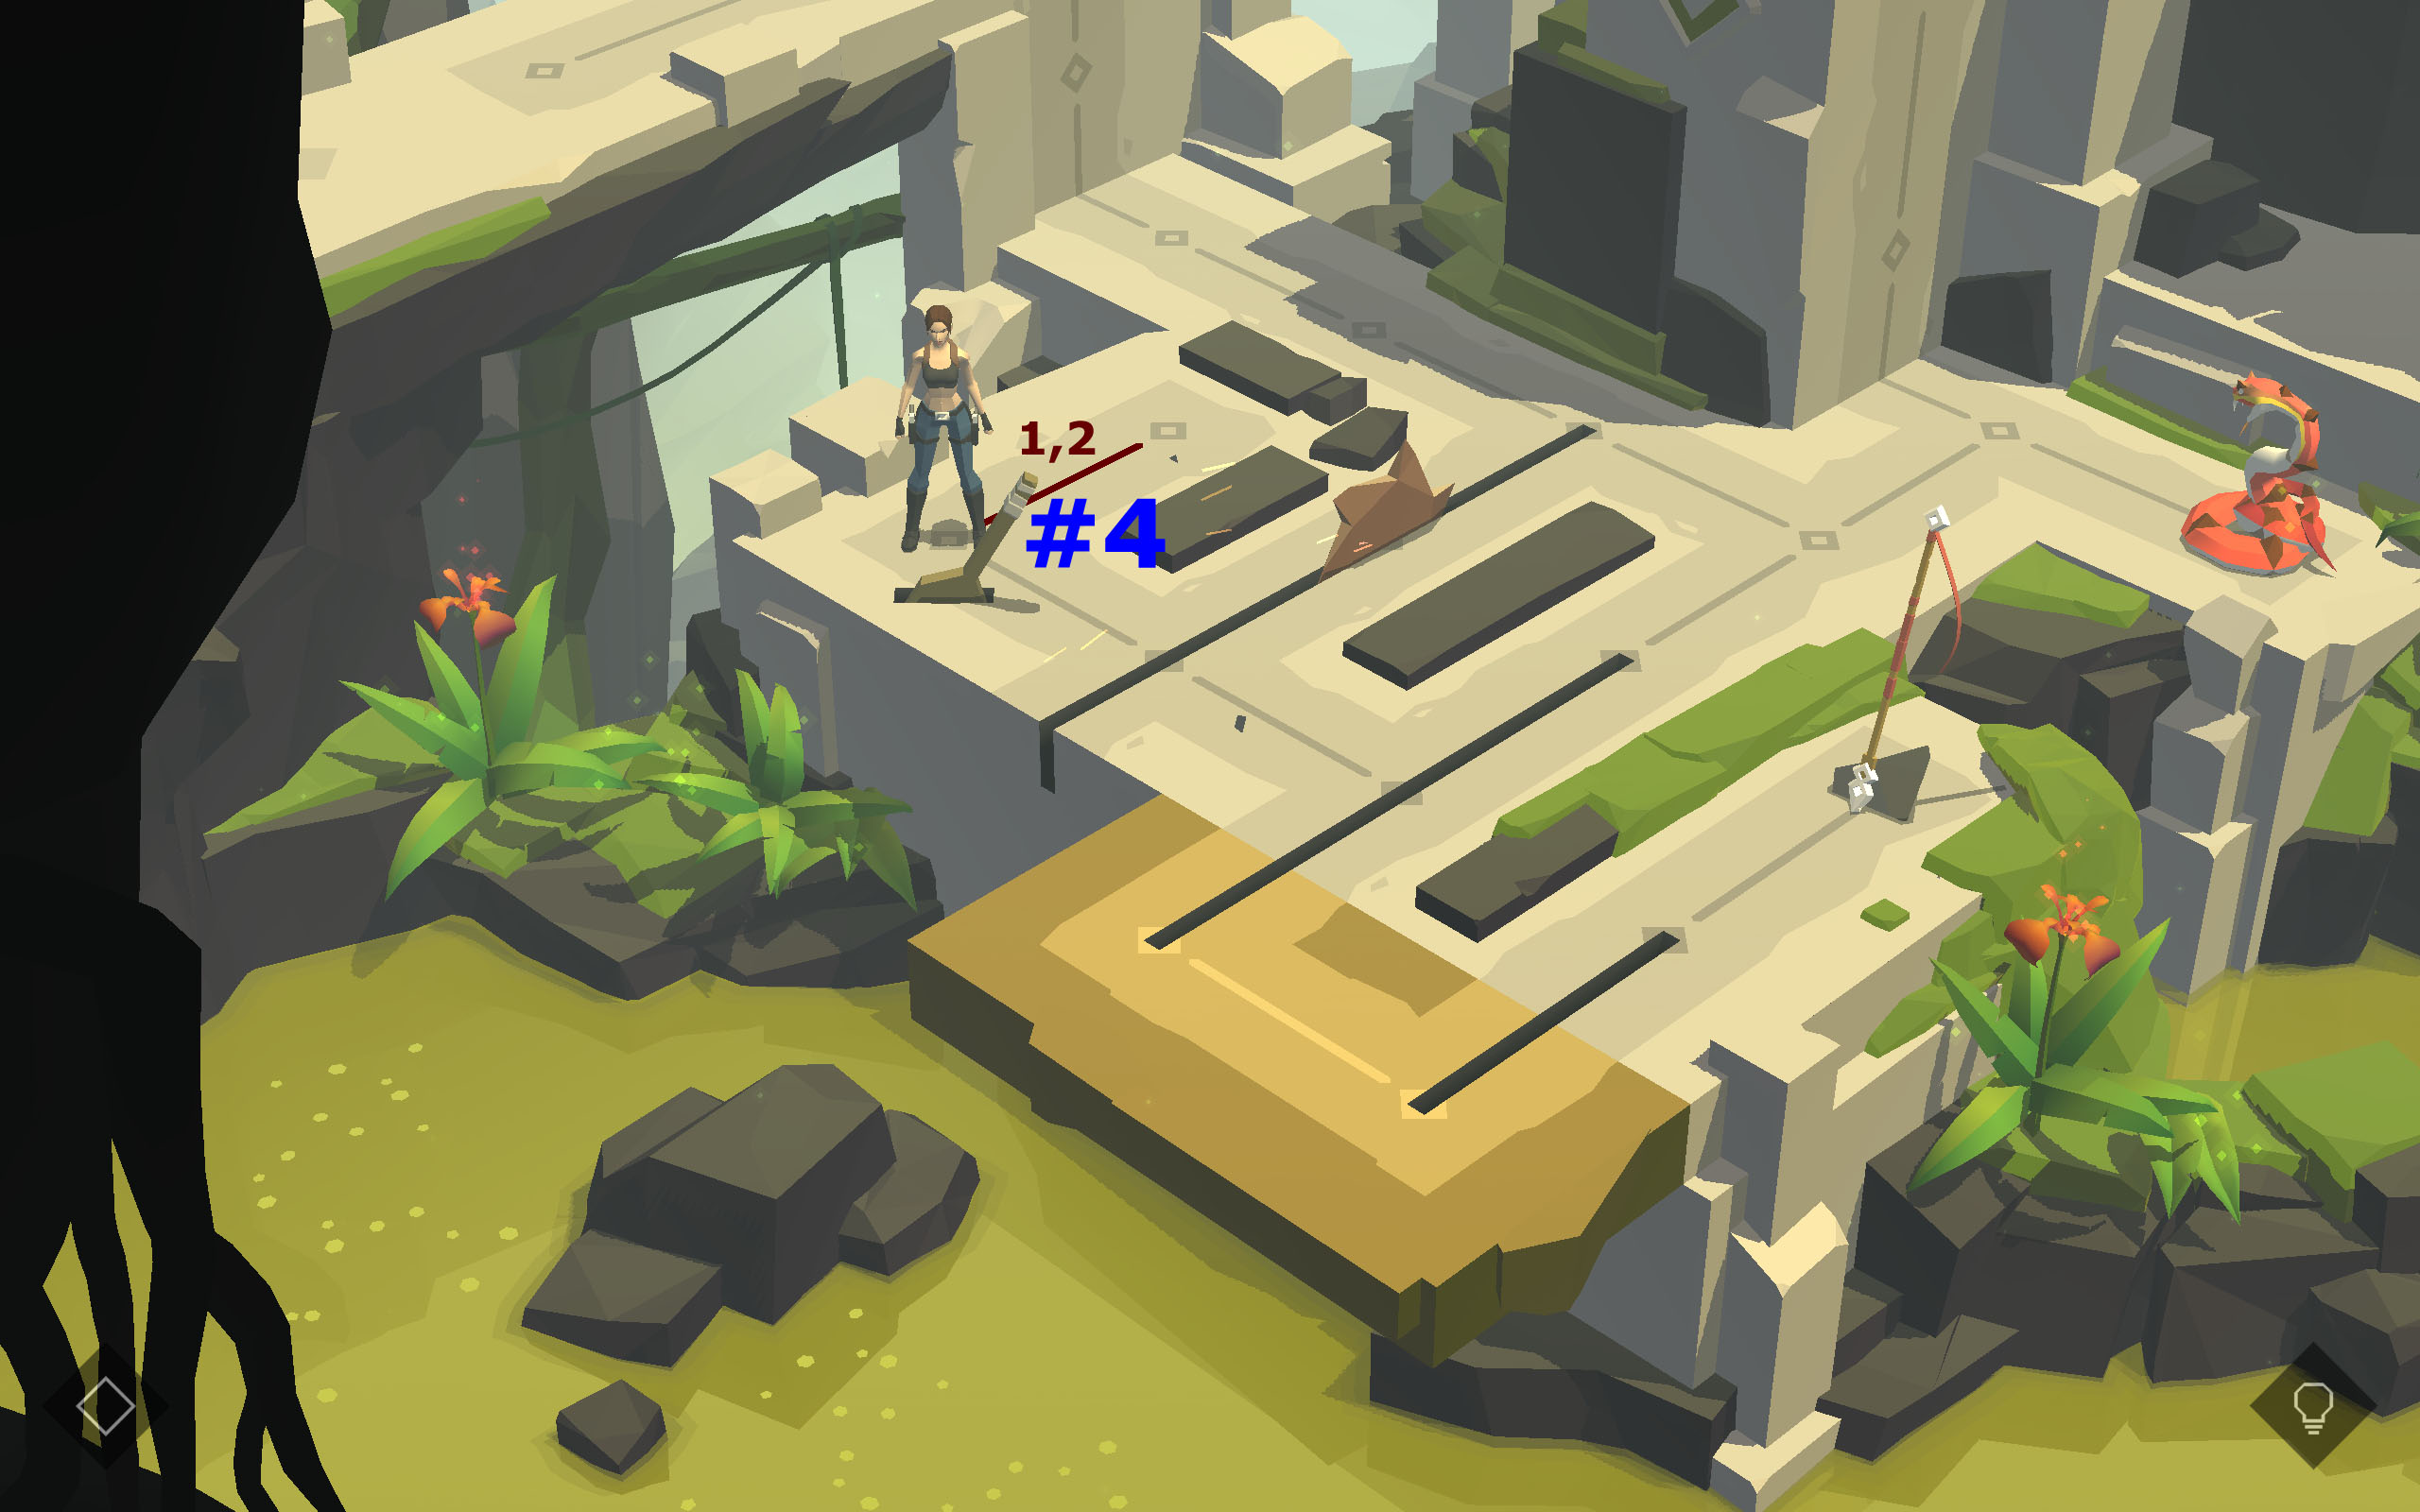 5th part
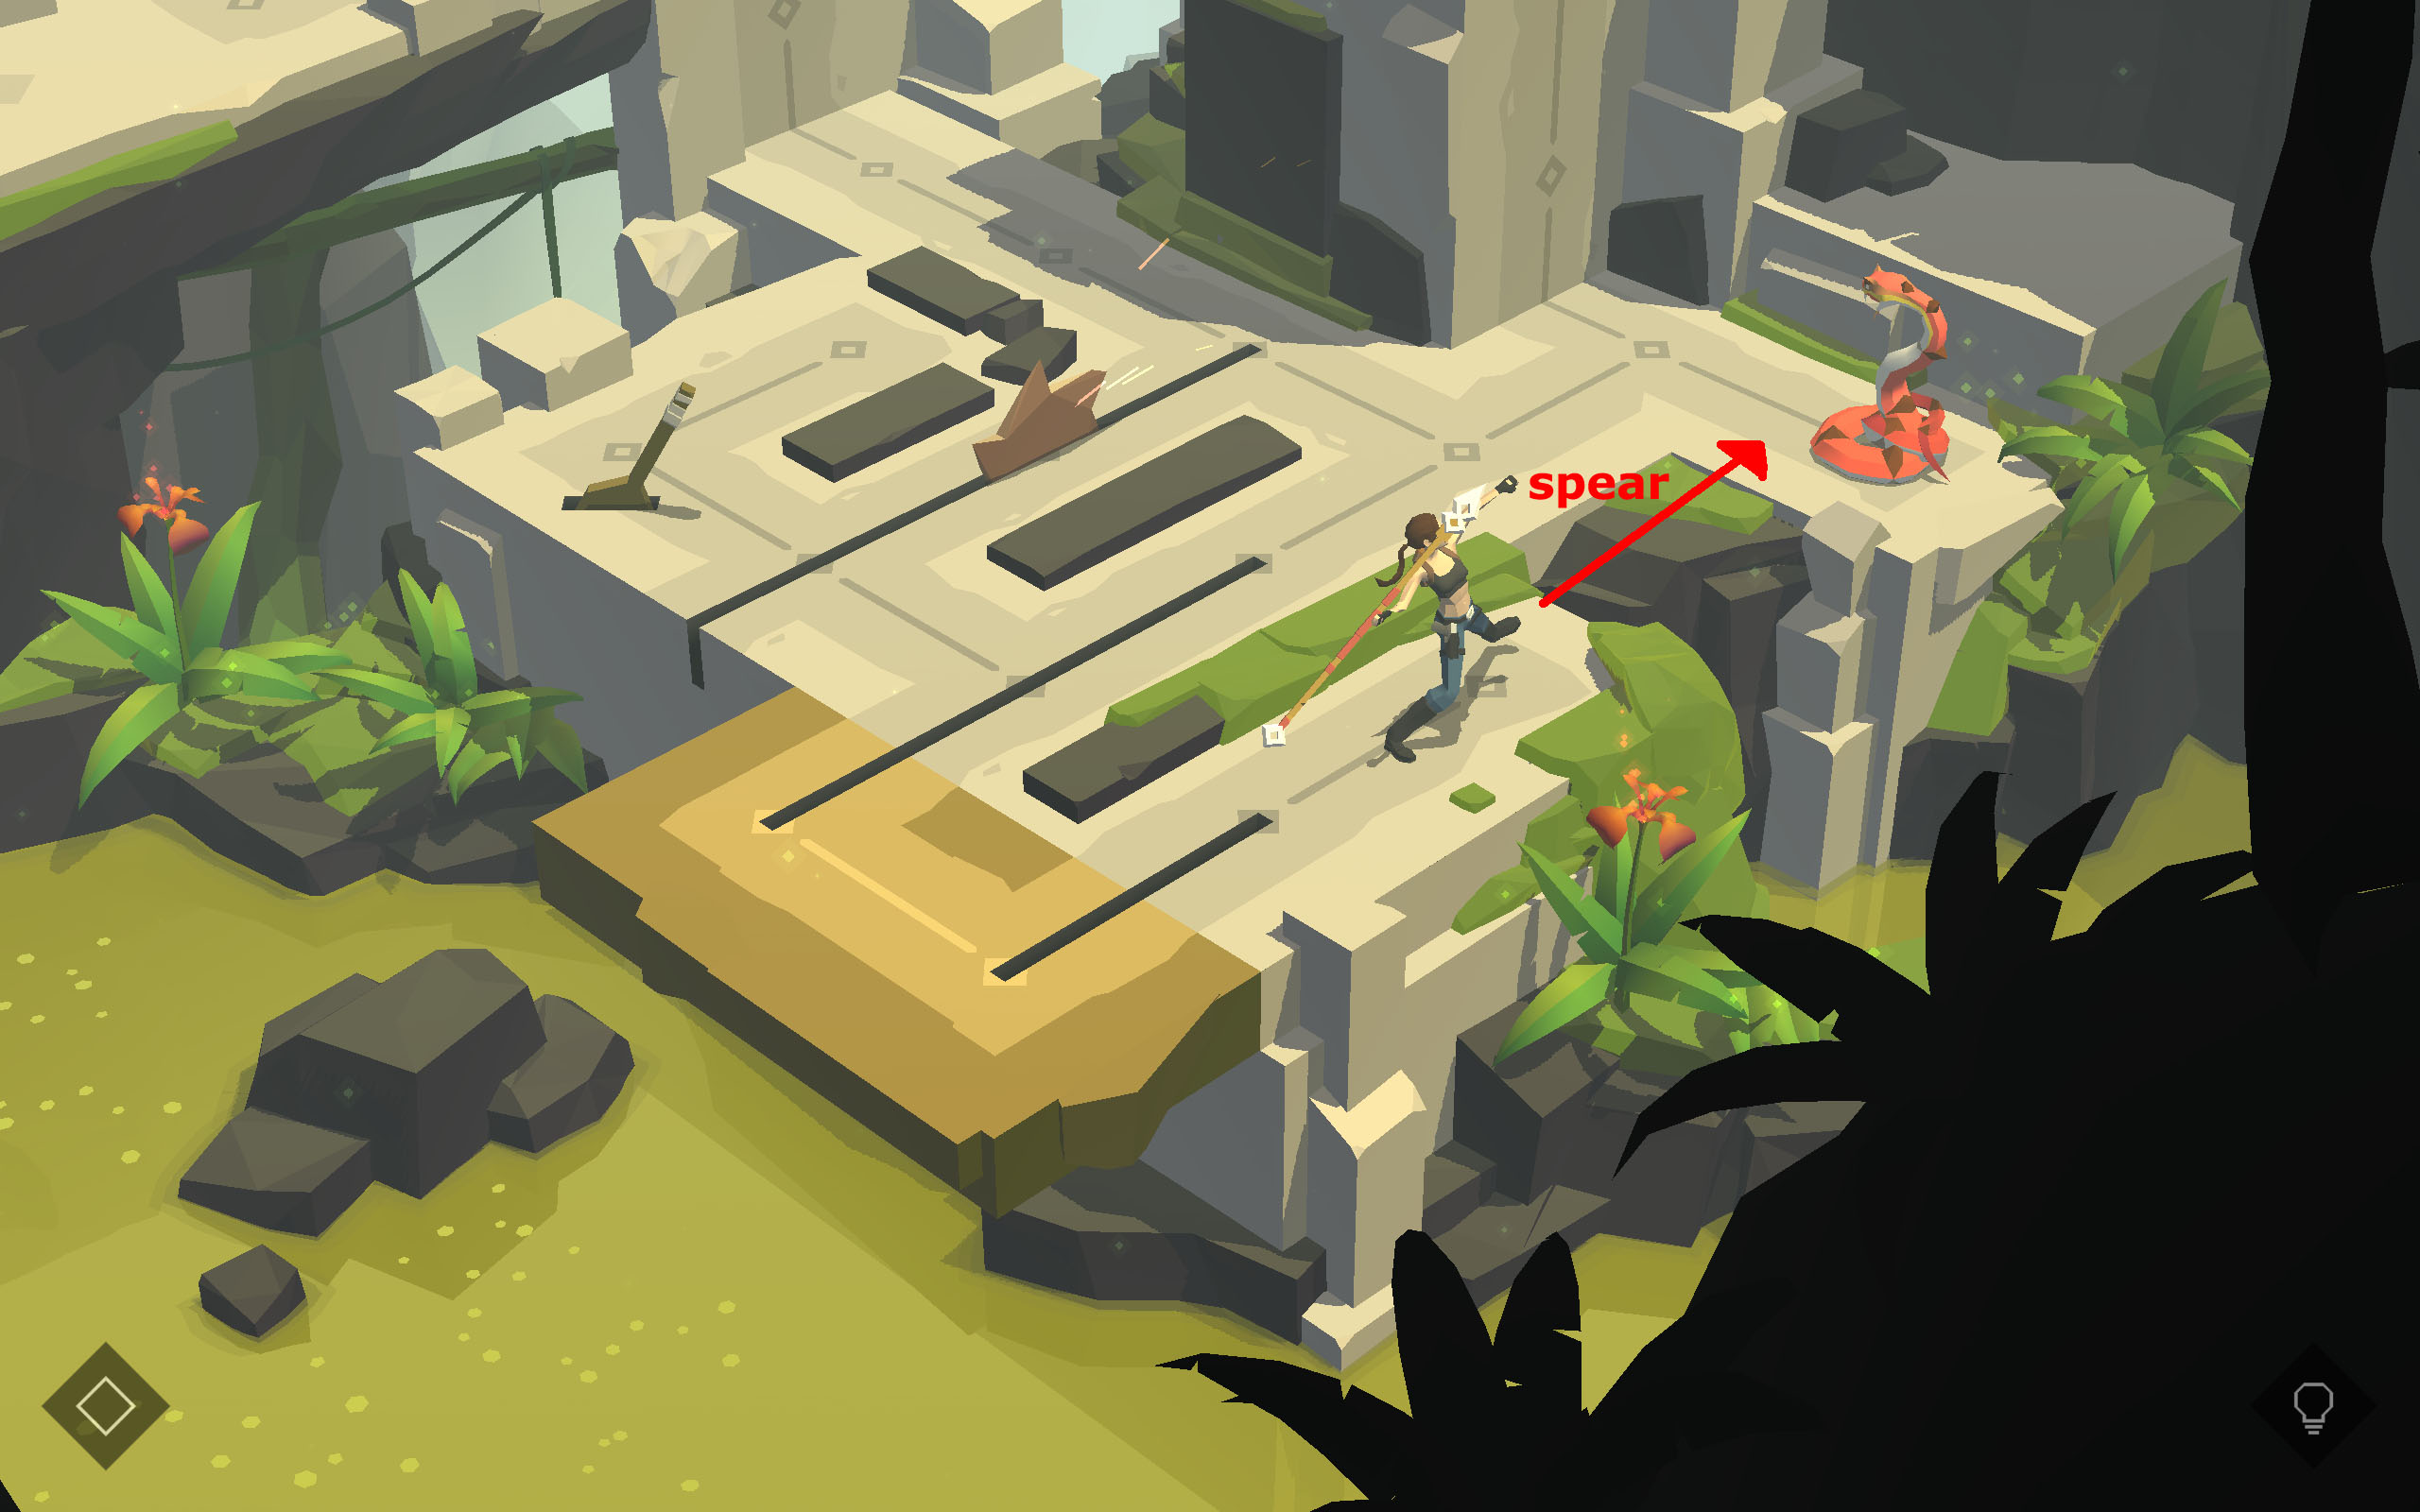 6th part
 Throw Spear
Relics:
On a column in the upper right corner, is the next vase. Inside is the next Emerald (14/19).
Get back down the way you came, at the bottom make your way over to the right, past the Saw Blade. Climb up and immediately up to the right. Step onto the exit square.
8. One Deadly Step
Relics:
In the middle of the screen, near the top, to the left of the path, is the next vase. Inside is a fragment of "The Twin Snakes" (8/10).
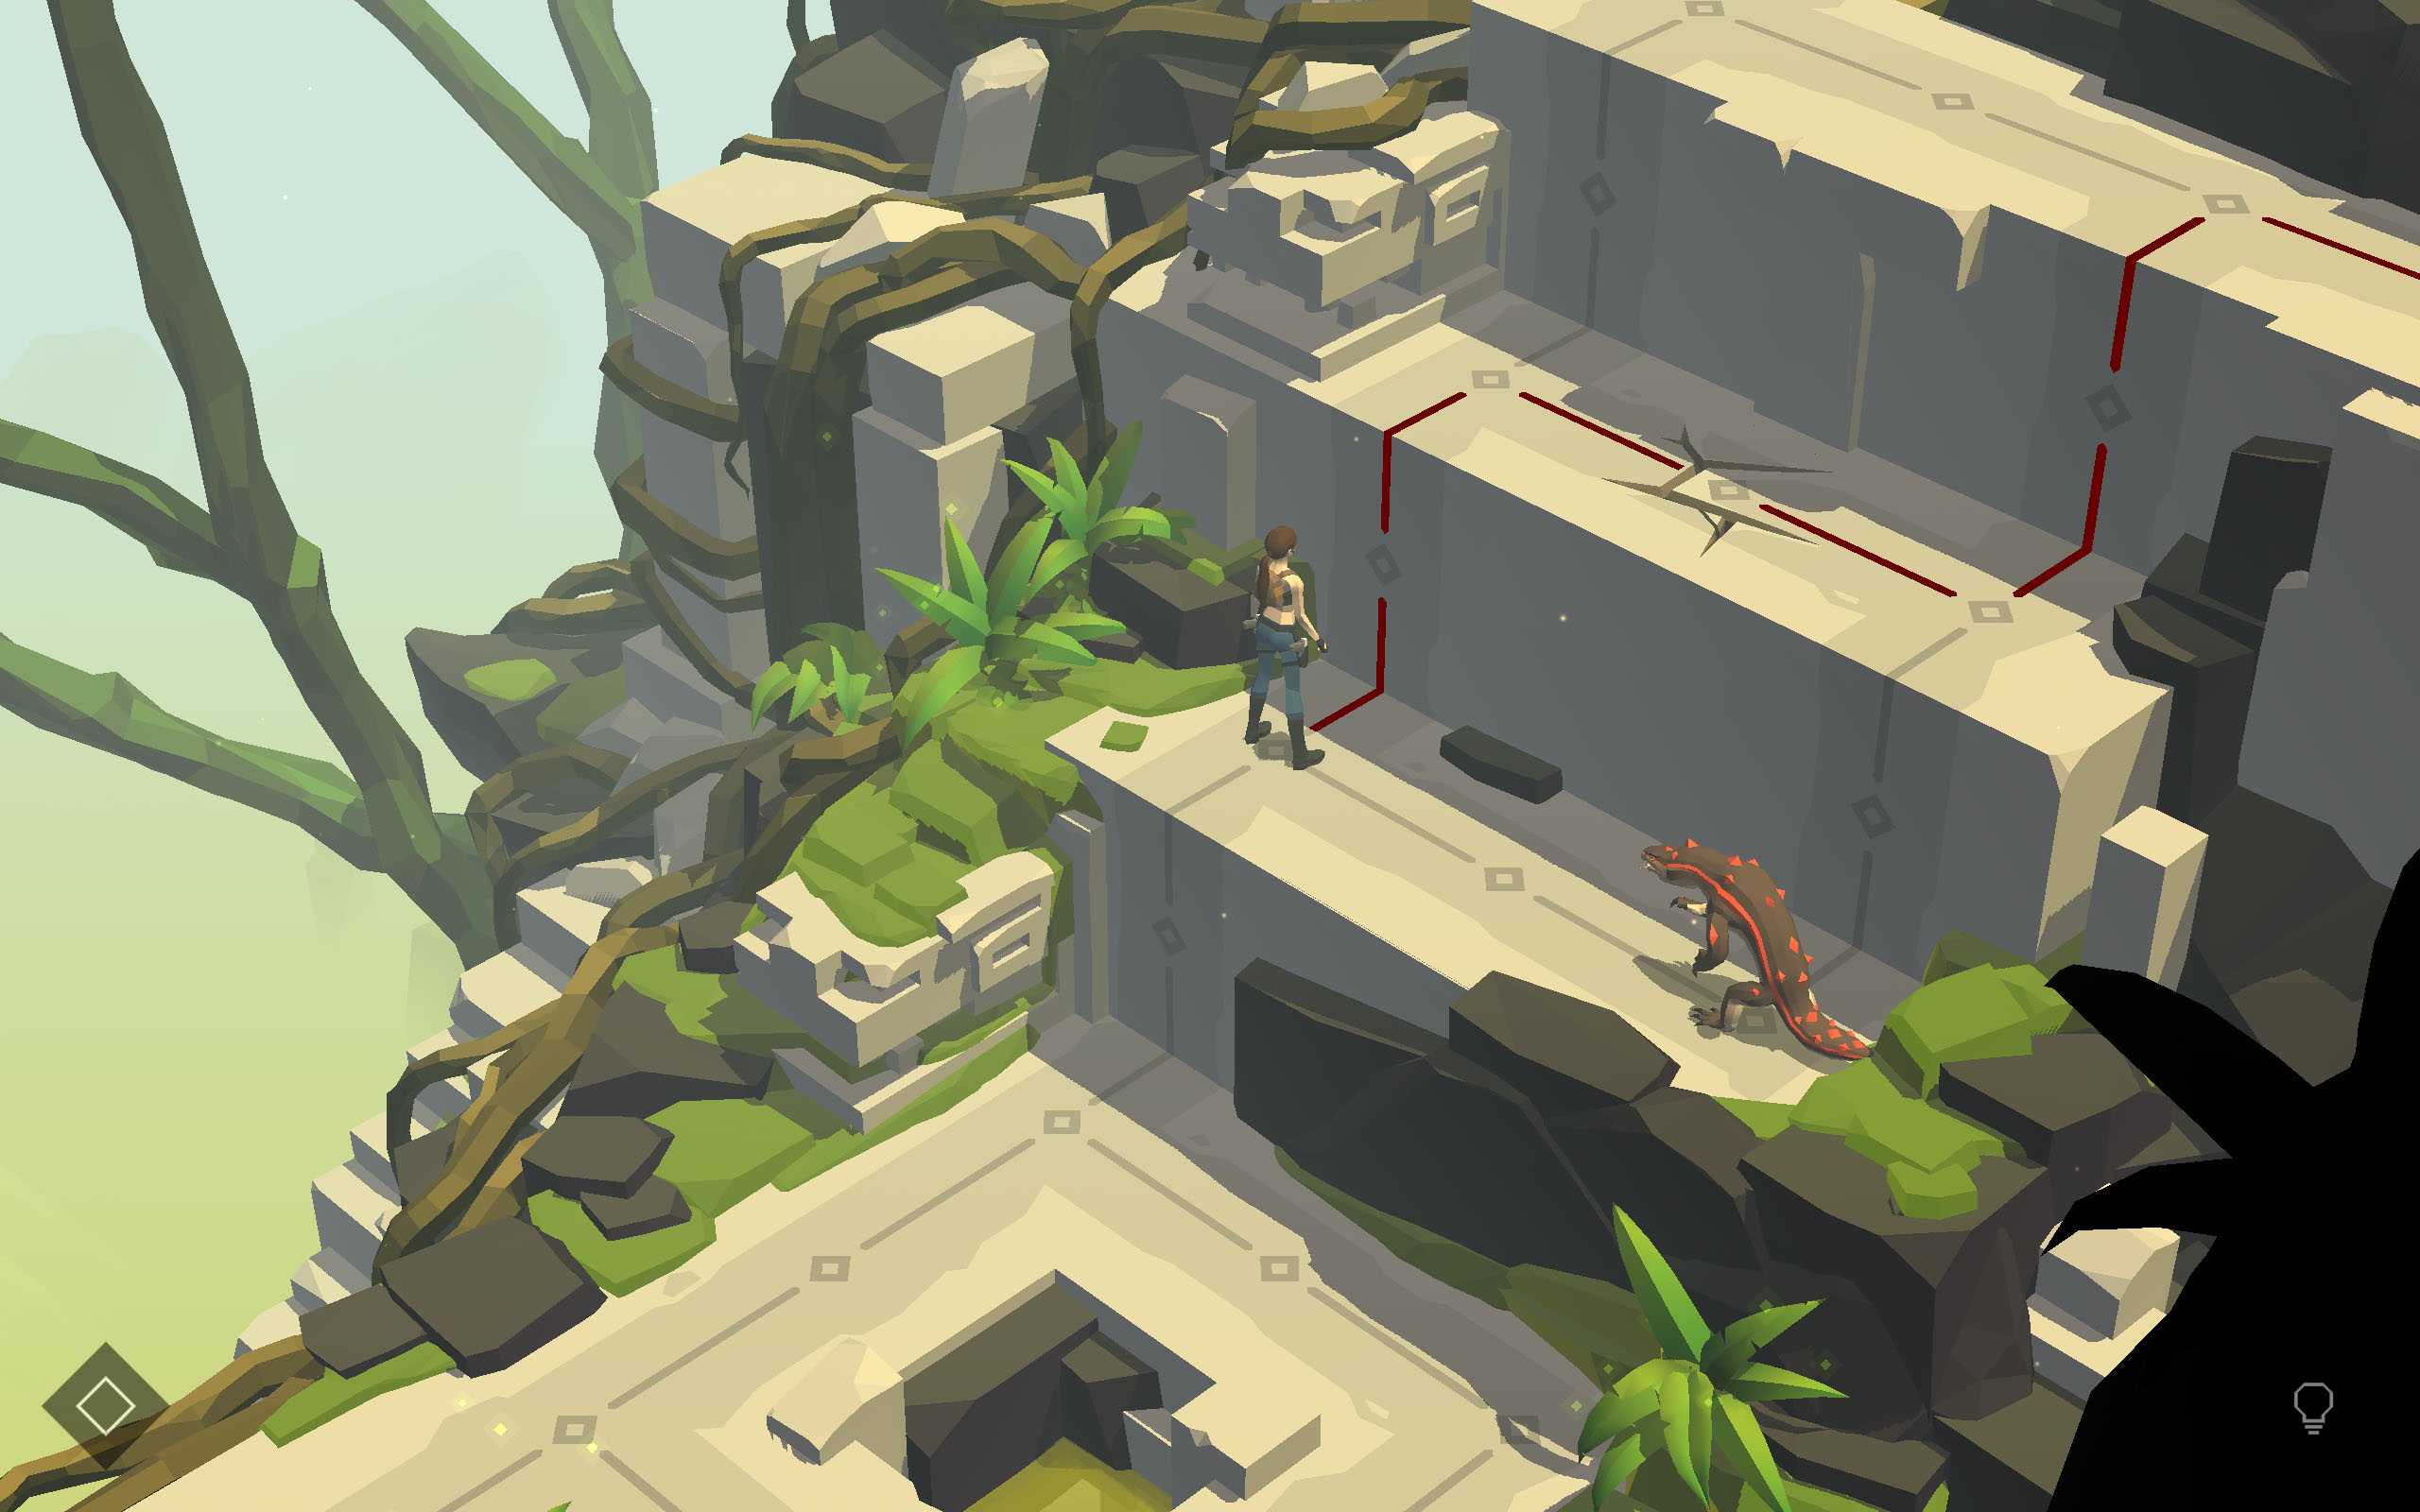
Take two steps forward and then turn right. Approach the Lizard from behind, to kill him.
Relics:
In the right corner, (middle of the right edge of the screen), is the next vase, containing an Emerald (15/19).
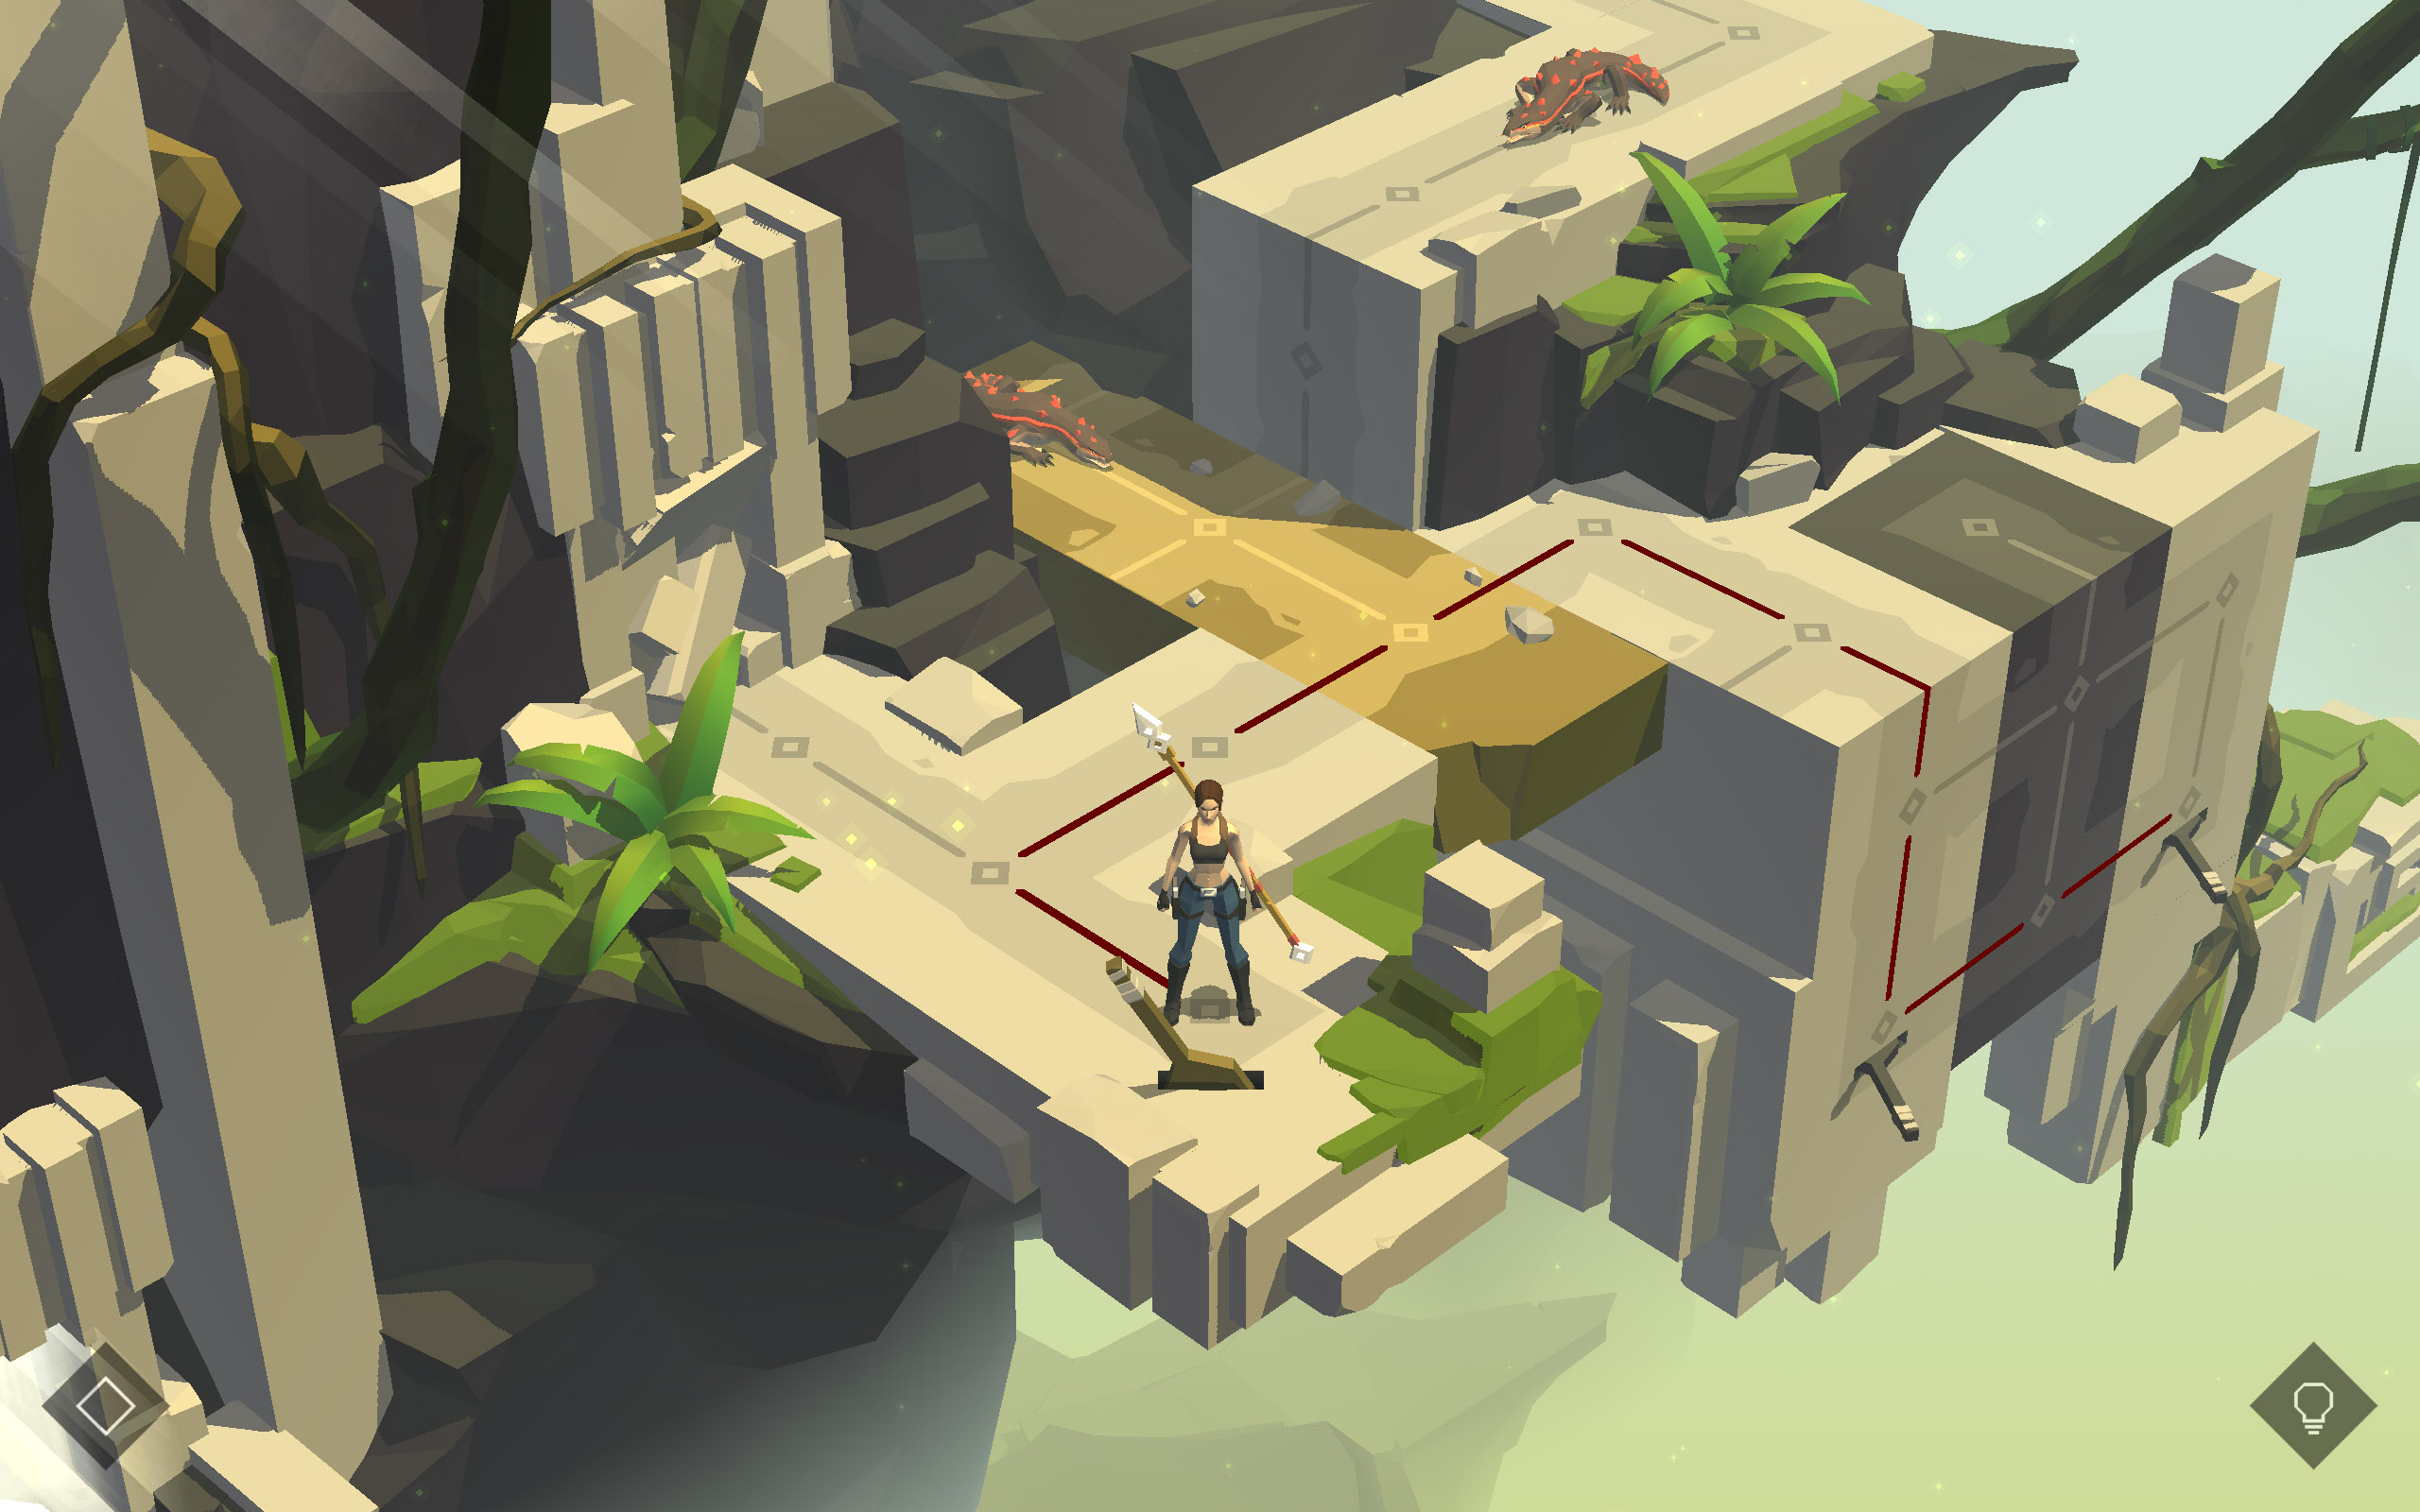
Climb up onto the next level and the second Lizard will spot you. Climb further up and turn right to walk across the Collapsible Floor, on the other side climb further up. The lizard will step onto the damaged floor and fall into the pit. Go to the right and climb up to the golden Lever Switch. Flip it to bring up the golden platform on the left. Get over to the left and climb up onto the platform. Take one step towards the spear and the Lizard behind it will turn its attention towards you. Going back or going forward will kill you. Turn right. Next turn left and go all the way into the corner underneath the Collapsible Wall. Climb straight up to the top.
Relics:
You can spot the vase behind the tall column. Inside is another Emerald (16/19).
Climb down from the column on the other side. When the lizard tries to climb past the damaged wall, he falls down and remains underneath, staring at the wall. Walk straight towards the Spear to pick it up.
 Luring the Lizard
 Getting the Spear
 Using the Spear
X
 Alerted Lizard
The Lizard is a little more dangerous that the Cobra. Not only will it kill you when you approach it from the front, when you step into its line of sight, it will follow you. As long as you walk away from it, this should not be a problem and can even be used to your advantage. For example you can lure the lizard onto a trigger or into a trap. However, if you turn around, the lizard will catch up with you.
Alerted Lizard
The Lizard is a little more dangerous that the Cobra. Not only will it kill you when you approach it from the front, when you step into its line of sight, it will follow you. As long as you walk away from it, this should not be a problem and can even be used to your advantage. For example you can lure the lizard onto a trigger or into a trap. However, if you turn around, the lizard will catch up with you.
Lizard
 Alerted Lizard
9. Cold-Blooded Cliff
Relics:
Immediately to the left is the first vase of the chapter, containing an Emerald (17/19).
Take one step forward and then climb down to the right. Activate the black Wall-Mounted Lever Switch to bring up a black platform above. Climb back up and turn right. Climb up to the upper level and the Lizard will spot you. Climb back down. Turn to Lara's right and then left to step onto the black platform. Immediately turn left again and climb down to the black lever. The lizard should now be standing on the black square, so flip the Wall-Mounted Lever Switch again, to send him down. Climb back up and up to the right. Turn right and climb down to the golden Wall-Mounted Lever Switch. Flip it to lower the golden platform. Climb back up, turn right to get onto the gloden platform. Turn left and climb up to the top.
Relics:
Right of the entrance, atop a column is another vase. It holds the next fragment of "The Twin Snakes" (9/10).
Step through the entrance.
 Flip Gold Lever and 2nd Black Lever
 Trapping the Lizard
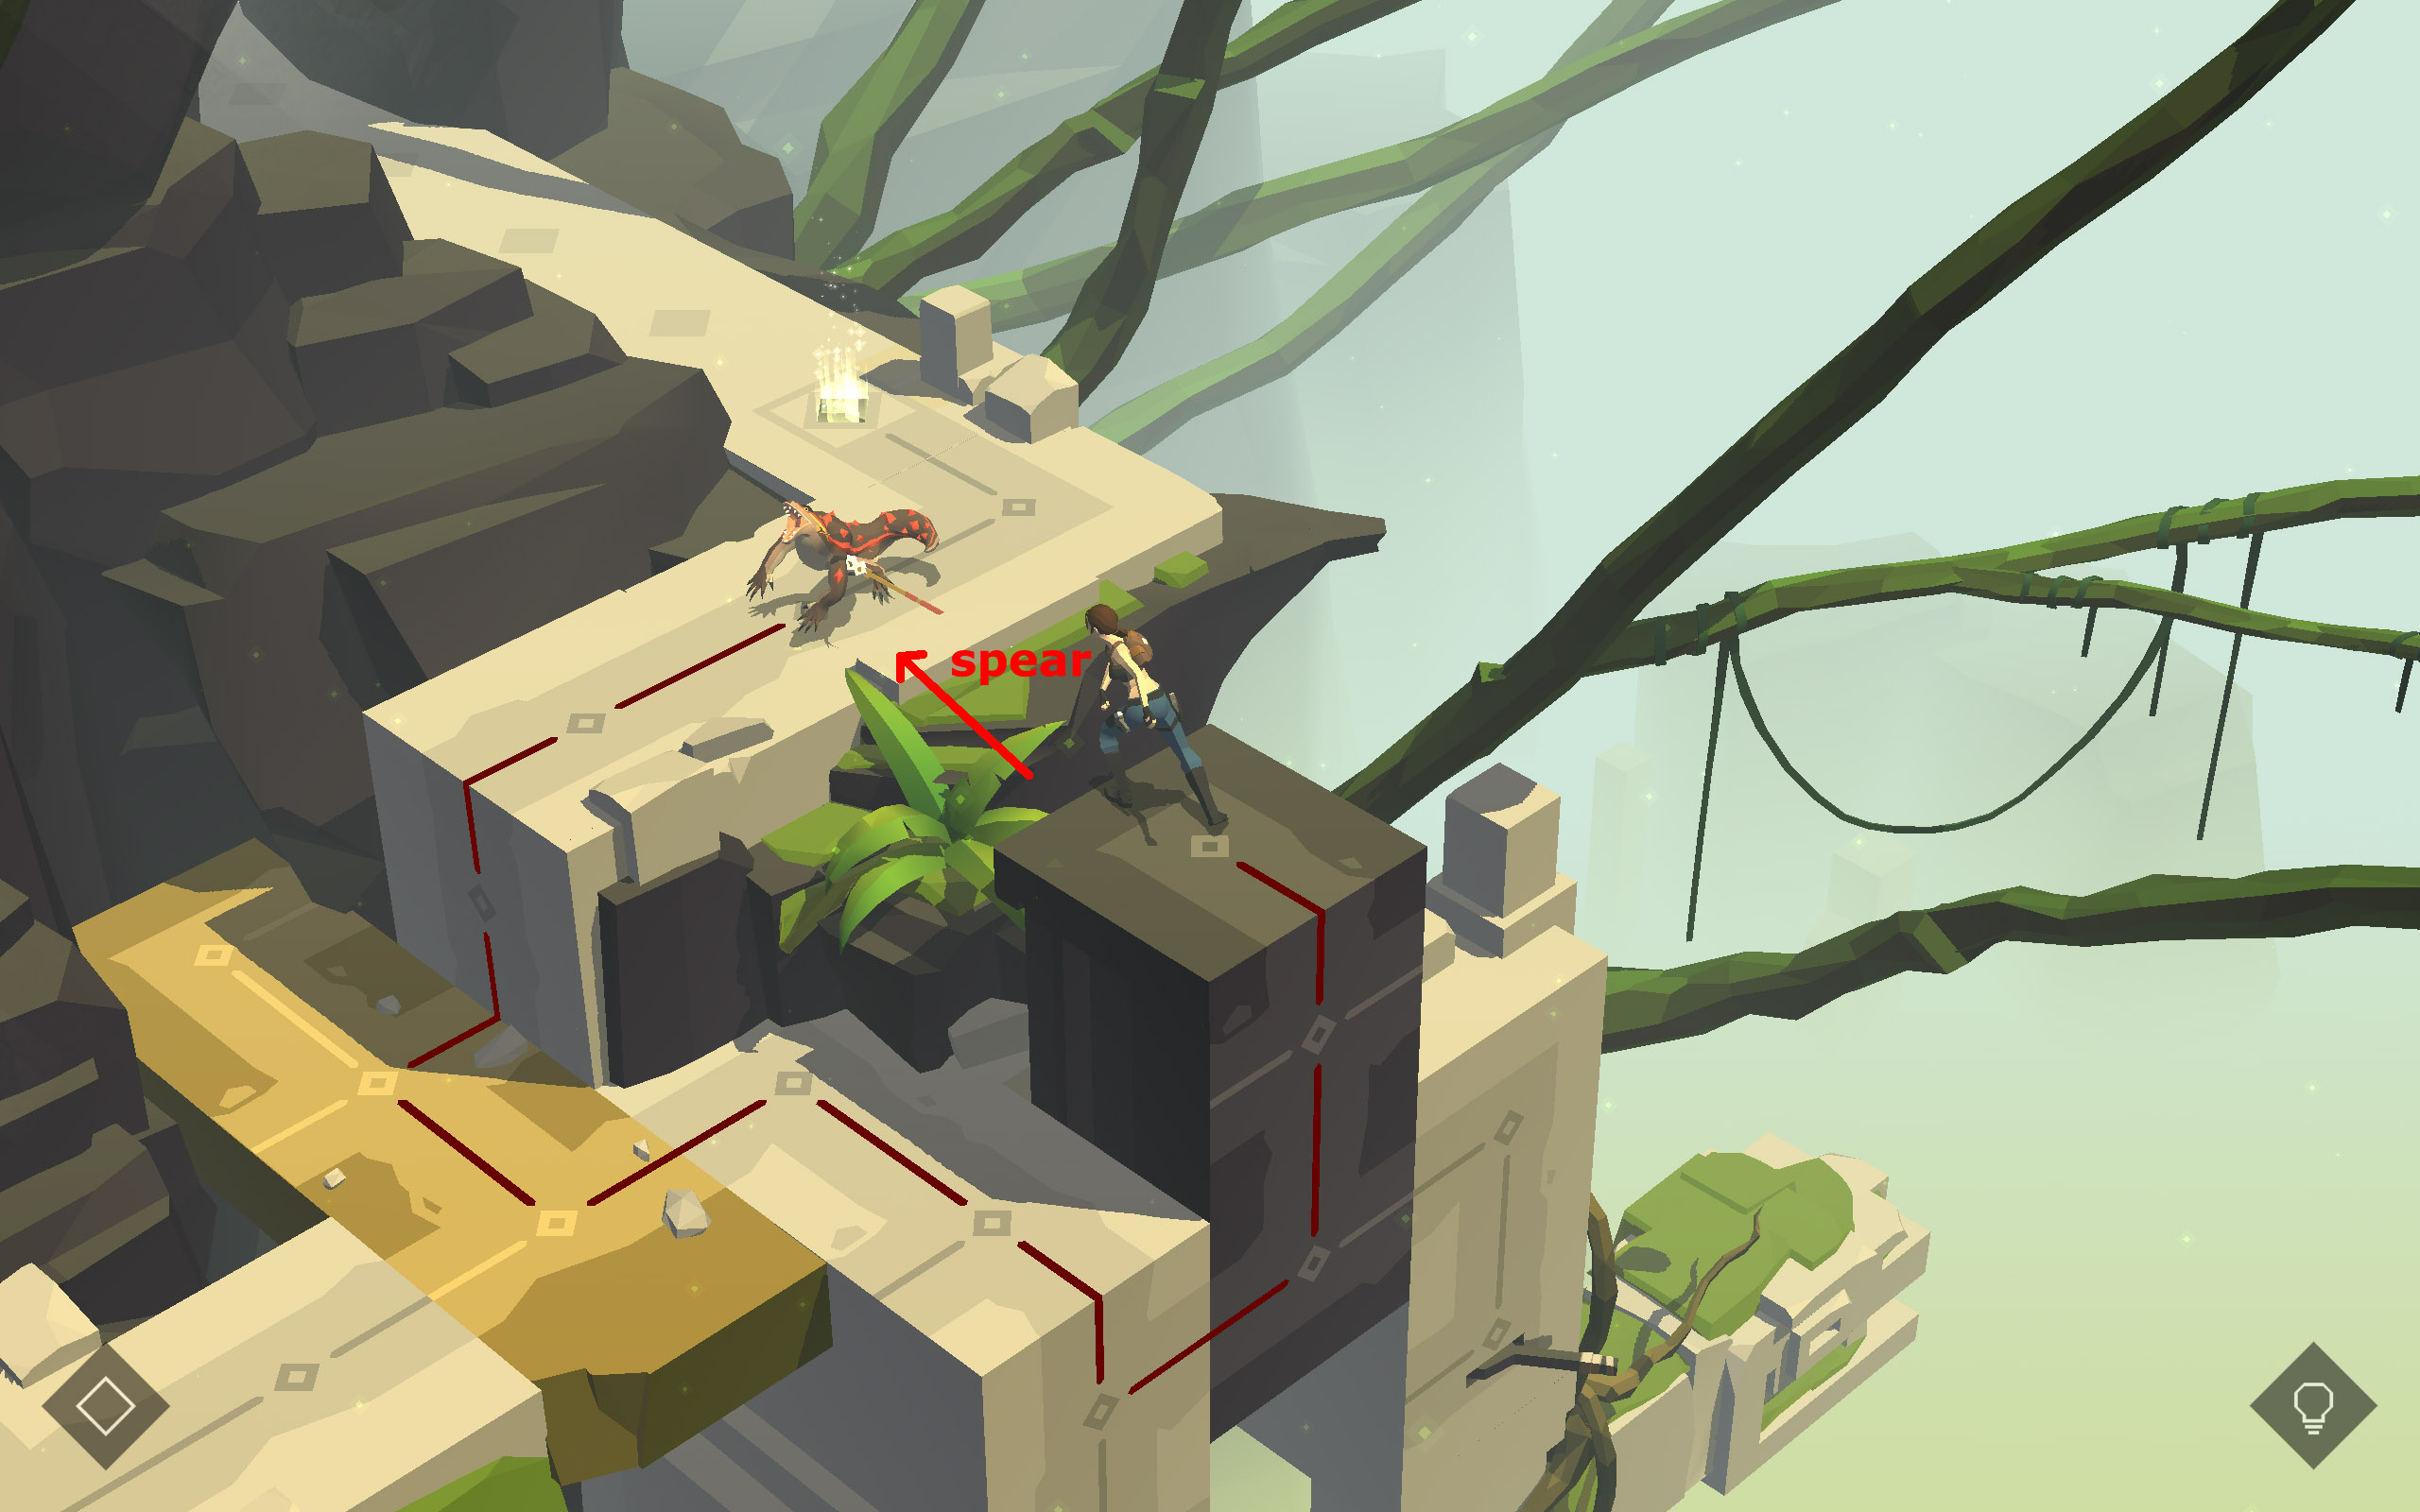 Reaching the Exit
10. The Key of Stones
Relics:
Next to where Lara is standing at the beginning of the level, behind the column, is the first vase of the subchapter. Inside is the final fragment of "The Twin Snakes" (10/10). Finding all 10 unlocks the Area 51 outfit.


Relics:
Before you step through, look up to the black rocks to spot another vase. It contains the next Emerald (18/19).
Now head over to the entrance and step through. Take one step forward and the Lizard will spot you.
Relics:
Right below you, in the green niche is the final vase. It contains the next Emerald (19/19).

11. Return to the Gate
You are back at the gate where you inserted "The Key of Snakes" at the end of "The Entrance". Take two steps forward and one to the right to enter the key. The second door on the left of the path opens. Turn around and take three steps forward. Then turn to Lara's right to take two steps into the new passage into The Maze of Stones.© www.tombraidergirl.com Personal use only, no reproduction. Last changes: 25 Apr 2024, 13:53