")


A Guide to Croft Manor
The Croft Manor is back, and as those who have played previous games (Tomb Raiders I, II and III, as well as Legend, Anniversary and Underworld - short LAU) may notice, the reboot manor is neither exactly the one from the Classics nor the one from the LAU era, but rather seems like a combination of the two.
For starters the main entrance is back where it used to be in the classics - opposite the main stairs - instead of to the side, like it was introduced in the movies and then seen in the Manor since Tomb Raider Legend. The library is up the stairs and to the right, like it has been in the classics, but is still a two-level room, like in LAU.
The manor's address "142 Abbingdon Road, Guildford, Surrey, England, AL9 5NQ" can be seen on several letters found throughout the house. This address does not actually exist, as there is no "Abbingdon Road", but it should be noted that the zip code is the same as for the Hatfield House, the building that stood in for Lara's manor in the life-action movies. This makes the whole address a bogus address since the Hatfield House is not located in Surrey (a county south of London) but in Hertfordshire (a county north of London).
In the following article I will put a focus on all the things there are to see inside Croft Manor, including Easter Eggs. If you are looking for a simple list of Easter Eggs, I recommend you visit WikiRaider, and if you find that any Easter Eggs are missing from the list there, I encourage you to register an account and add them. Here is the link: WikiRaider: Blood Ties Easter Eggs.
Some of the content in this article here was written in collaboration with Jan from WikiRaider, which means that texts from documents can contain the same typos on both web pages. Feel free to blame the last person to edit the WikiRaider article for the item in question, or in some cases blame the original source, we kept typos and BE/AE mix-ups. For further reading on some of the items here, I suggest you pay a visit to The Archaeology of Tomb Raider.
Those who have not finished the main game yet should be relatively safe, as I won't go into details about the story past Syria.
Exploration of the Manor
East Wing: Lord Croft's Study
When you begin playing the "Blood Ties" storyline, you will find yourself inside Lord Croft's study in the east wing of the manor.
The study holds many items of interest, the first of which is the Notice Served, a court order accompanied by a letter of Lara's uncle Atlas de Mornay - the brother of her mother, which Lara receives automatically. This letter forces Lara to solidify her claim on the manor by either proving that her mother is in fact dead - because as long as she's only absent, Lara's uncle Atlas is appointed executor of the estate - or by finding a will from her father leaving the manor to his daughter.
It is unfortunate that you have forced my hand in this matter, but so be it. As you know, your parents appointed me executor of the estate in the event of their absence. Since your mother disappeared, her death was never technically declared. And given the circumstances surrounding your father's death, it's no surprise that he never drafted a formal last will and testament to account for this circumstance. Unfortunately, you have no legal claims to the estate.
I'm willing to negotiate a modest monthly stipend from your trust, but only if you leave the manor by weeks' end. Don't fight me on this, Lara. Your mother wouldn't want that.
Sincerely,
Atlas
Source: WikiRaider
Lara's first move is on the study's safe, which is unfortunately locked by a three digit code Lara has to first figure out. (Even if you know the code from a walkthrough guide or a previous playthrough, it won't help you to open the darned thing.) Try wiggling the handle and Lara will muse that she might find clues to open it in the library. "Hmm, needs a combination. It's got to be in Dad's papers somewhere... Maybe in the library..." But, as I said, the study holds more items to inspect.
The first area we will focus on is the desk. On it sits an issue of "The London Times". The title page shows a picture of Lord Croft and the headline reads "Disgraced! Renowned Historian's Wild Claims Debunked". (When studying the paper closely, you can also read the two sub-headlines "All published works removed from uni shelves" and "Croft will stay silent until new book printed" as well as the name of the author of the article, Robert Chesterwick, Senior Chief Editor. Oxford is given as the location for the article.) It's obvious that Lara has studied the paper, since her file folder marked "Dad's Research" - which was earlier in her London flat - can be seen underneath the paper.
Left of the paper and the research file you will find a picture frame with the Photo of Lara Wearing an Egyptian Crown. You won't know it at this point, but this is the first clue to opening the safe later. The picture holds hidden information that is of no relevance, however. Lara has written The treasure of the ancients on the back.
Another item on the desk is a tape recorder titled First Impressions. This one tells of Lord Croft meeting Lara's mother Amelia for the first time, back when Amelia was an Art History student back at university.
I shared some of my research, against my better judgement. But I wanted to see how she would respond. And she did not disappoint. I felt as if I was suddenly engaged in a mental game of chess - moving and counter moving in argument. At one point that poor old librarian had to shush us as if we were children.
I feel so foolish for not having noticed her earlier. She's a brilliant woman who's challenged my ideas for the first time in memory. In truth, I don't know if she's feeling as exhilarated as I am right now. But I dare say our conversation was mutually stimulating. For the first time in a long time, I find myself thinking about something else besides my research. I hope she returns for another round tomorrow.
Source: WikiRaider
Behind the desk is a picture frame with Lord Croft's Diploma of the University of Oxford. If you are really paranoid you may read something into "Trinity Term" and consider it an Easter Egg, a reference to the Order of Trinity, but Trinity term is simply the name of the third and final term of the academic year at the University of Oxford. When examining the diploma Lara jokes around. "Yep, looks real. Roth once offered me to forge me a fake diploma to show dad." Let's just assume that this one is real and Roth did not do the same for his friend, who accepted the offer, hopefully. But who knows what secrets the Croft family keeps hidden. Anyway, Lara did study at UCL, not at Oxford like her father wanted.
Looking out the window into the garden you may be able to catch a glimpse of the terrace and stairs below. Turning towards the wall with the three windows, you will find the right window covered with ivy from the outside. They don't want us looking out into the garden. But I will continue to do so, numerous times. If you'd like to do so, too, here is a video I've recorded when looking out the study's windows: Croft Manor "Looking out the windows of the Study"
Near the middle window, on one of the shelves to its right, sits a picture frame with a Photo of Lara, Richard, and Ana. When turning it to examine it closer, you will come across an Easter Egg, Lara commenting on the colour of the dress. "Never liked wearing dresses... but the color was nice." Doesn't it remind you of her classic top?
Just besides the photo is a pedestal with a marble bust of Lara's grandfather, the Benjamin Croft Statue Bust. (Apparently his name has changed from Richard James Croft (Sr.), as was established in Tomb Raider Underworld.)
In the next cupboard Lara finds an African Mask, a Yoruba mask Lord Croft received as a gift from a friend he made in Nigeria. Why hide this away in a cupboard? Let's hope Lara makes something nice of her father's and her own collection in the future.
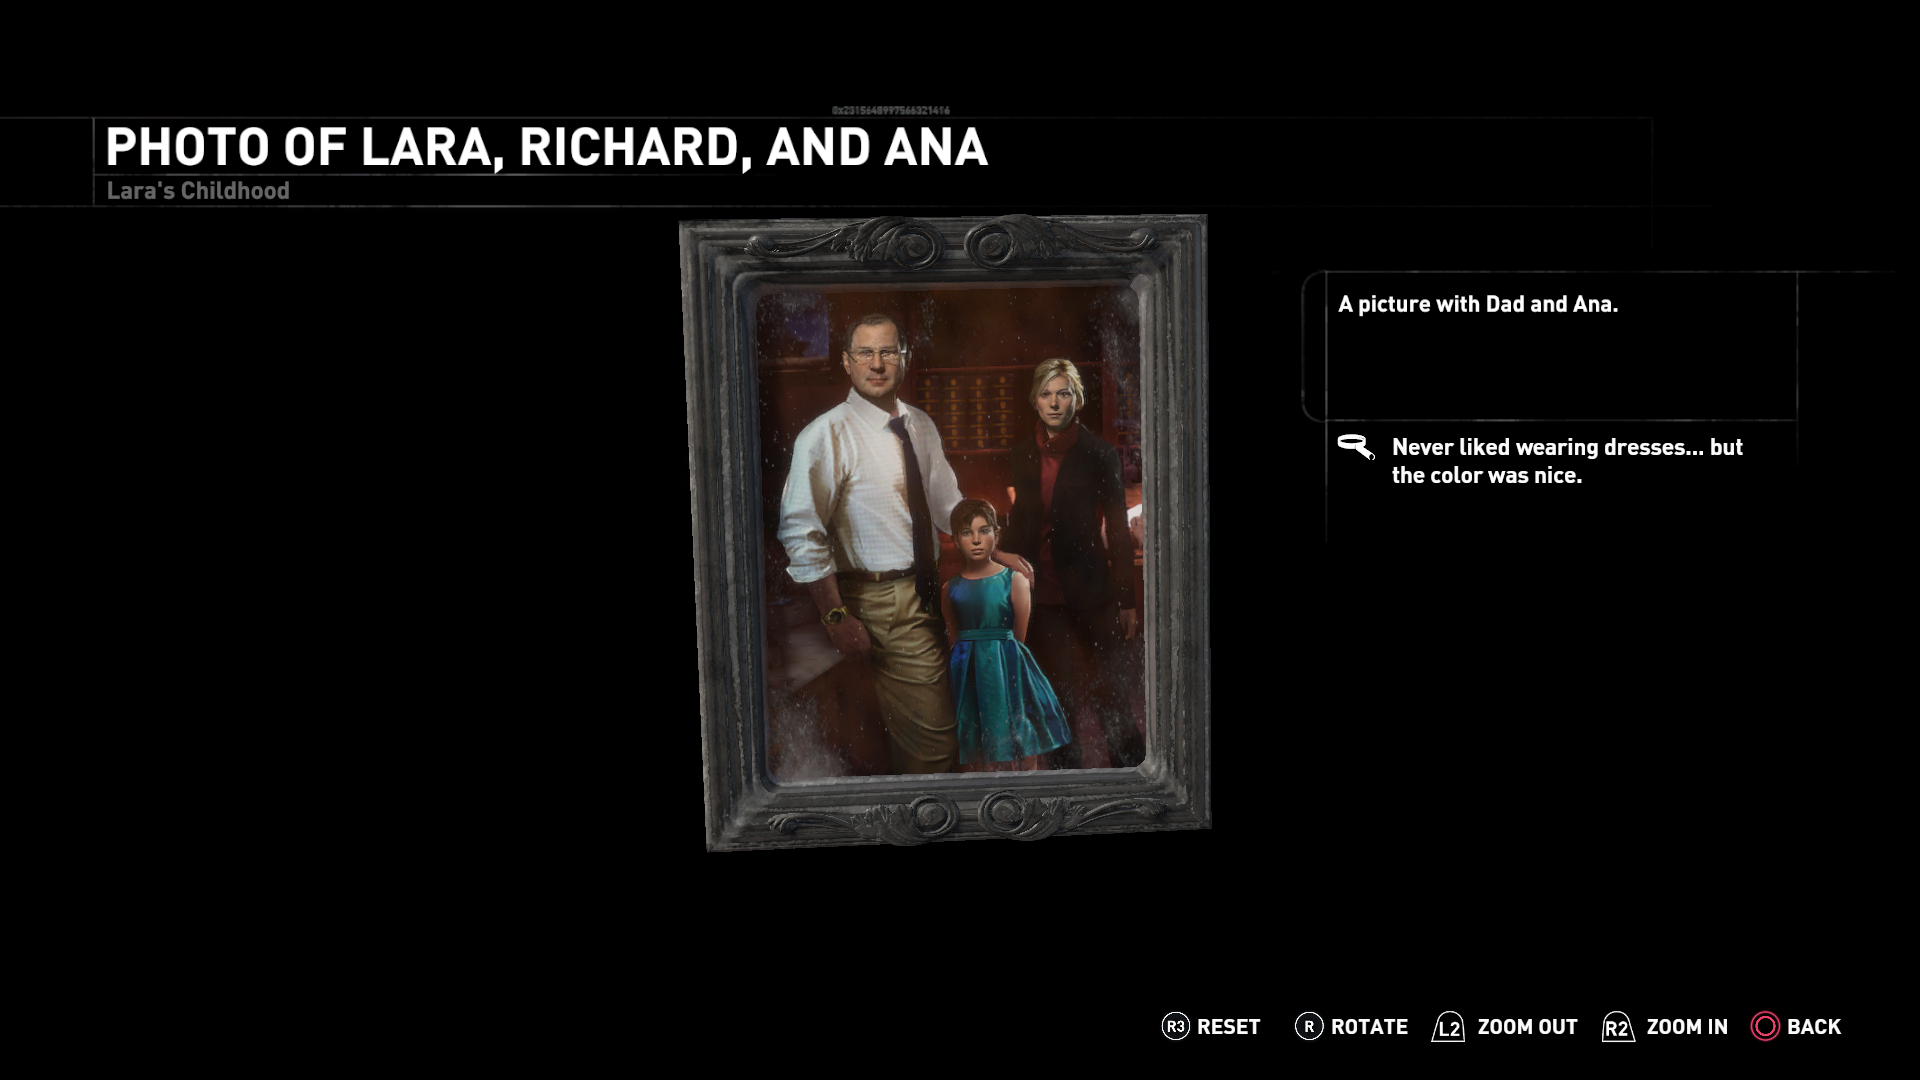 Photo of Lara, Richard, and Ana
 Benjamin Croft Statue Bust
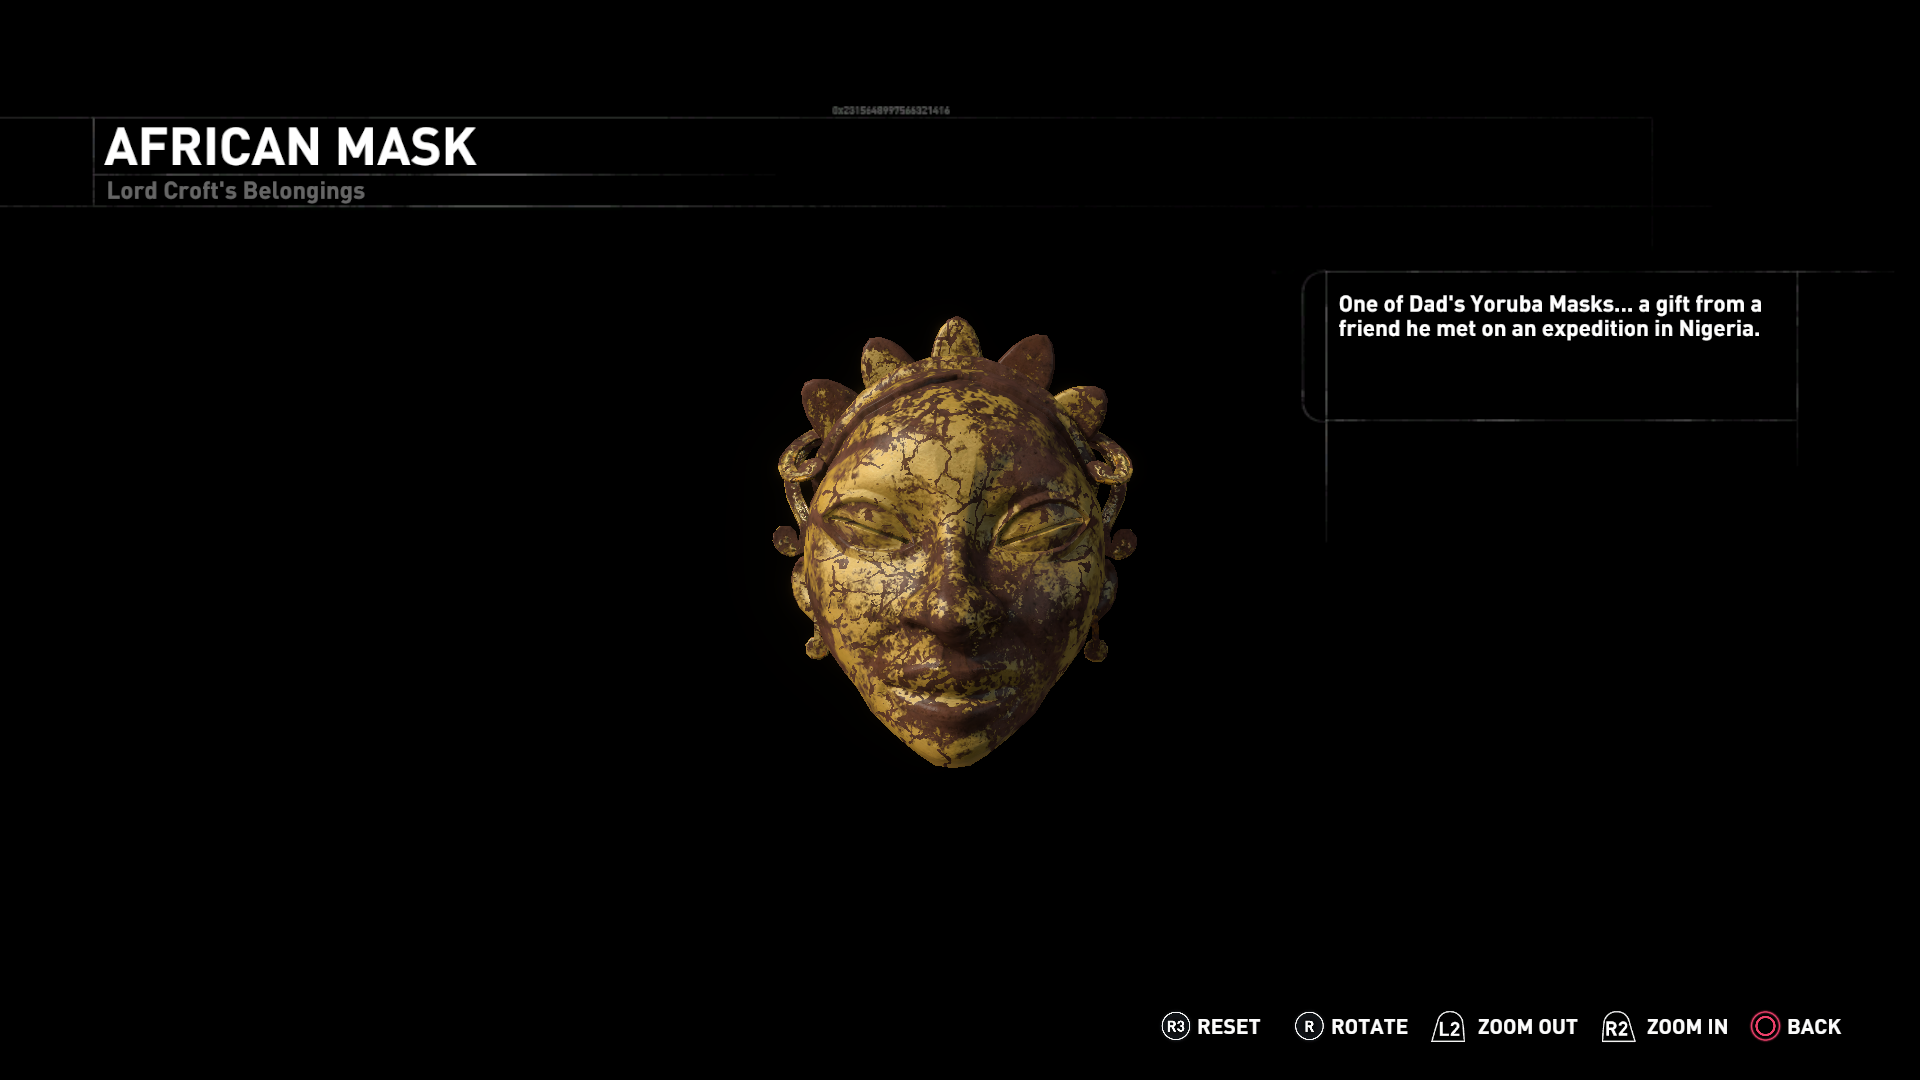 African Mask
If you look out the left window you might be able to spot a balcony railing and part of the manor stretching out to the left of you. (This part is not completely covered on the map.) If you'd open the window, you would be able to climb out and enter the other part of the manor from here. Unfortunately we can't.
Next Steps is a diary entry of Amelia Croft, found on a table in the study and telling of her introducing Lord Croft to her family after breaking off her engagement to the Earl of Farringdon. Those familiar with Lara's original background story may be familiar with the name and may want to consider this an Easter Egg. Lara was supposed to marry the Earl of Farringdon before her life got turned upside-down and she went against her family's wishes, just like her mother now. (Now we can either assume that was never true or that the Earl of Farringdon mentioned in Amelia's diary married someone else and now the de Mornay part of the family wants Lara to marry his son.)
One might think they would be happy that I was being courted by a genuine Lord of the Realm. I just happens to be Richard Croft - in their eyes, the man who single handedly ruined a once great family.
But there's nothing to be done now. Watching how Richard dealt with their subtle insults and disrespect... such grace and calm. I know he did it for me. I think I'm falling in love with this man.
It will break my mother's heart, but I cannot live the life she imagined for me. My time with Richard has only made this clearer.
Source: WikiRaider
 "Truth Behind Myth"
On a drawing table on the right side sits the Ancient Map of Northern Syria, an item familiar to us from the beginning of Rise of the Tomb Raider. Examining the front side and the red circled area will promt Lara to note that her father was "closer than he knew to finding the prophet's tomb".
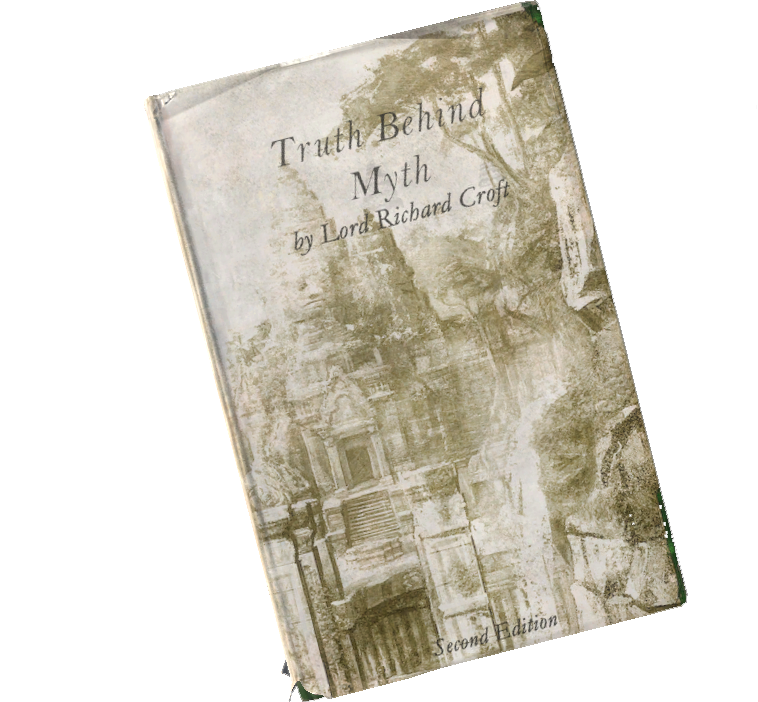
The cupboard just besides this table holds Truth Behind Myth (second edition) by Lord Richard Croft, a book about immortality myths. It is a green book with a white dust jacket that features the image of a Cambodian temple. (The first edition had a different cover. This version can be found featured in "Rise of the Tomb Raider: The Official Artbook, page 43 and in the Croft Manor Cutscene between Syria and Siberia. The first edition (designed by Jeff Adams) shows Lord Croft in front of Angkor Wat's prominent facade. For further reading, I refer you to The Archaeology of Tomb Raider.) Both books are lined by numerous yellow post-it notes sticking out of them.
There are more archaeological items within the study, but none of them have any importance to Lara. The picture left of the door may be depicting the fountain of youth.
Before we move on to the next room, let's take a moment to look back at the cutscene that takes place between Syria and Siberia. (Since you must have seen it before you were granted access to Croft Manor, I guess I don't have to say: "Spoilers!")
The beginning of this scene shows Lara sitting on the floor of her father's study, typing away on her laptop, research and the magazine with the headline "Another Crazy Croft" spread across the floor. Note that her father's book "Truth Behind Myth" lies by her left knee and this one actually has the cover of the first edition, so it is not the exact same book we found in the cupboard. (Irrelevant(?) side note: The brown book on the desk behind Lara has the title "Vagabond".) If you look closely during the conversation with Jonah, you may notice that it looks like the ivy has been removed from the window, also the picture with what might be the fountain of youth is no longer on the wall but sitting on the floor. But don't look too closely or you may notice that everything on the shelves has been rearranged.
You may also want to take note that the book Lara grabs when showing Jonah the symbol she discovered in Syria and which is then stolen by a Trinity agent, is a greyish-brownish book with gold tooling. The intruder throws himself out the centre window when fleeing.
There are two more cutscenes from Croft Manor early in the main game, both memories of Lara's from a time when she was a child.
During Echoes of the Past, where Lara loses consciousness for a moment after falling down the cliff during the bear encounter, Lara flashes back to a time when she came into her fathers study, through the middle window, finding her dad preparing for an expedition to Syria. When she asks to be his assistant, he says, that this time it's too dangerous. He clearly knew that Trinity was after the same thing. Later, during the night at the "Wilderness Refuge" base camp, the same memory continues in Lara's dreams. Her father speaks on the telephone and scares young Lara. Upset she leaves the study.
East Wing: Hallway and Anteroom with Fireplace
As the study holds no further clues to the opening of the safe, we exit into the corridor. On the left side is the locked door into the library, which requires us to find another way in.
On the right side on a crate lies the Expedition Map - 1 of 2, a non-optional relic that enables you to continue. It details the Servant's passage and the wine cellar. After finding this, you can find the entrance to the old servant's corridor on the right wall. Using "Survival Instincts" you will find a set of hand prints on the door, lighting up golden. Opening the door to the servant's passage, Lara finds it too dark to explore further. She wants to find a flashlight first.
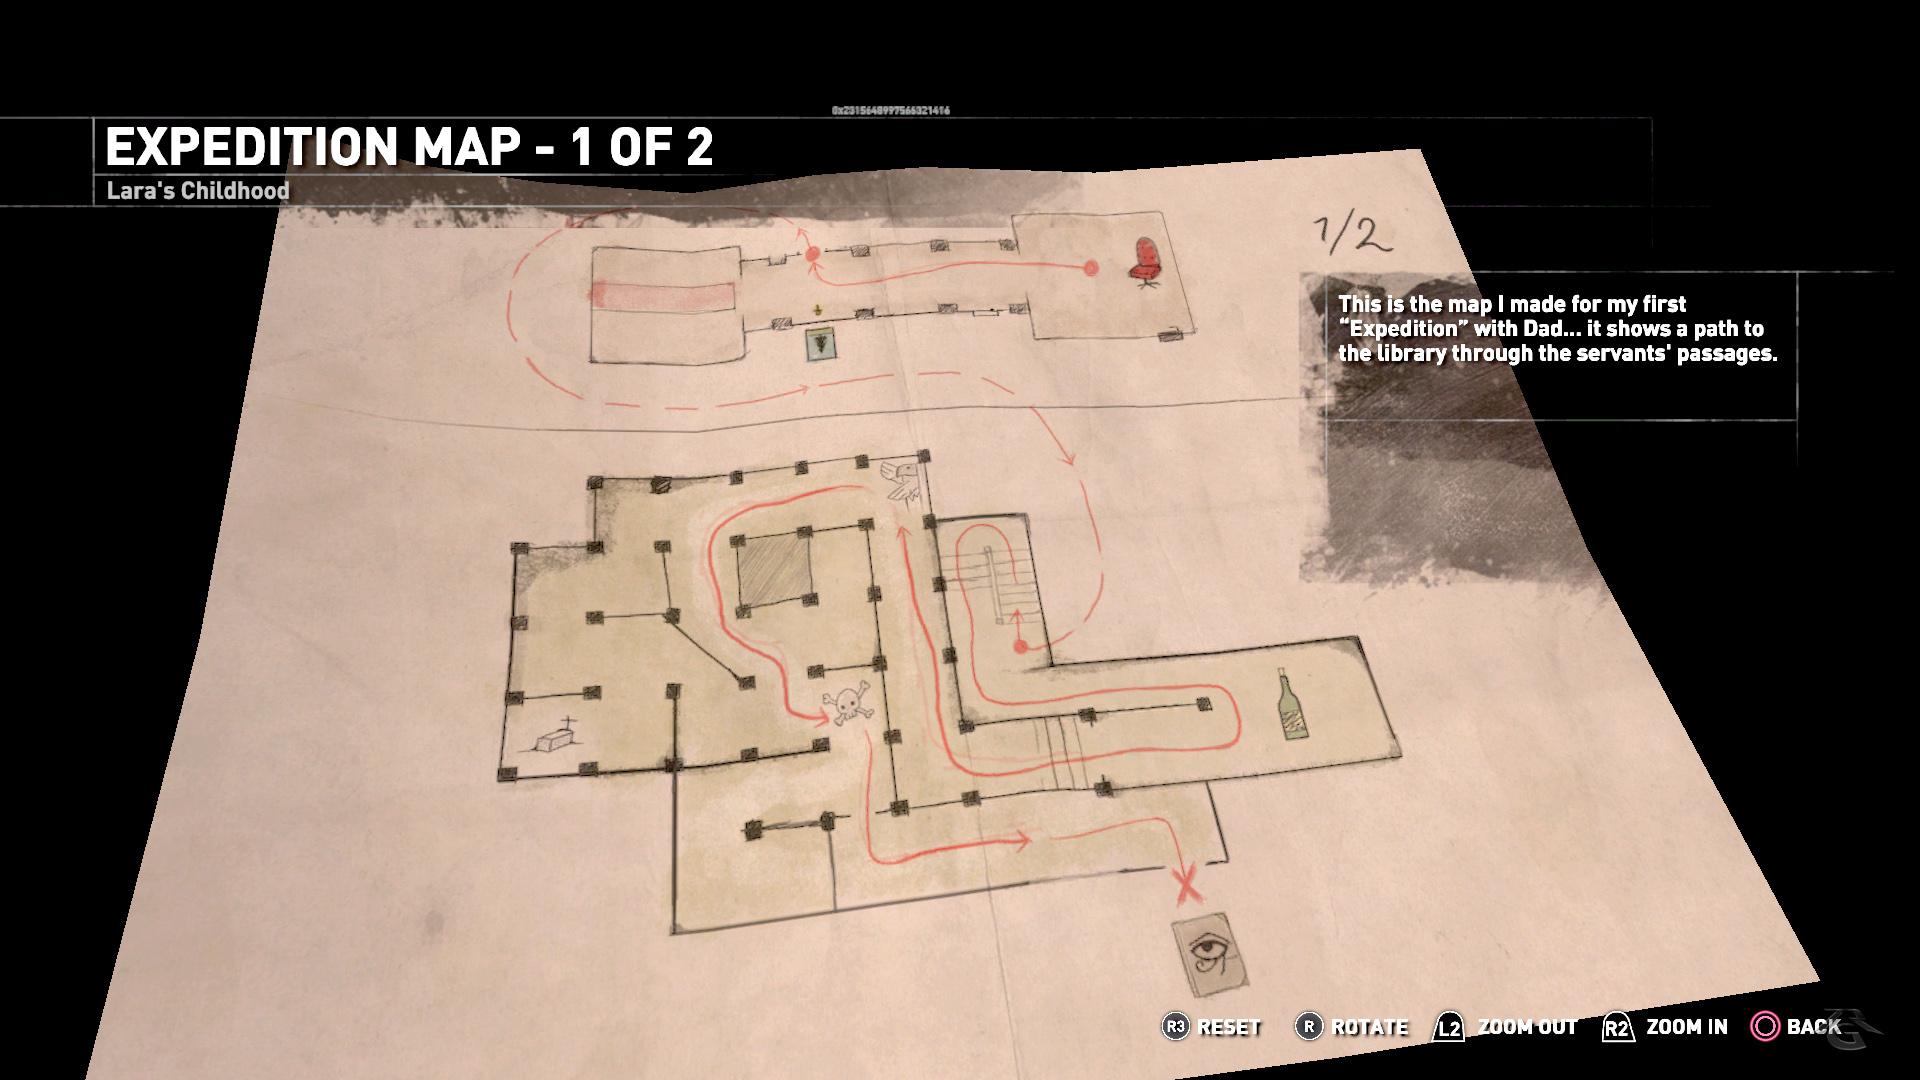 Expedition Map - 1 of 2
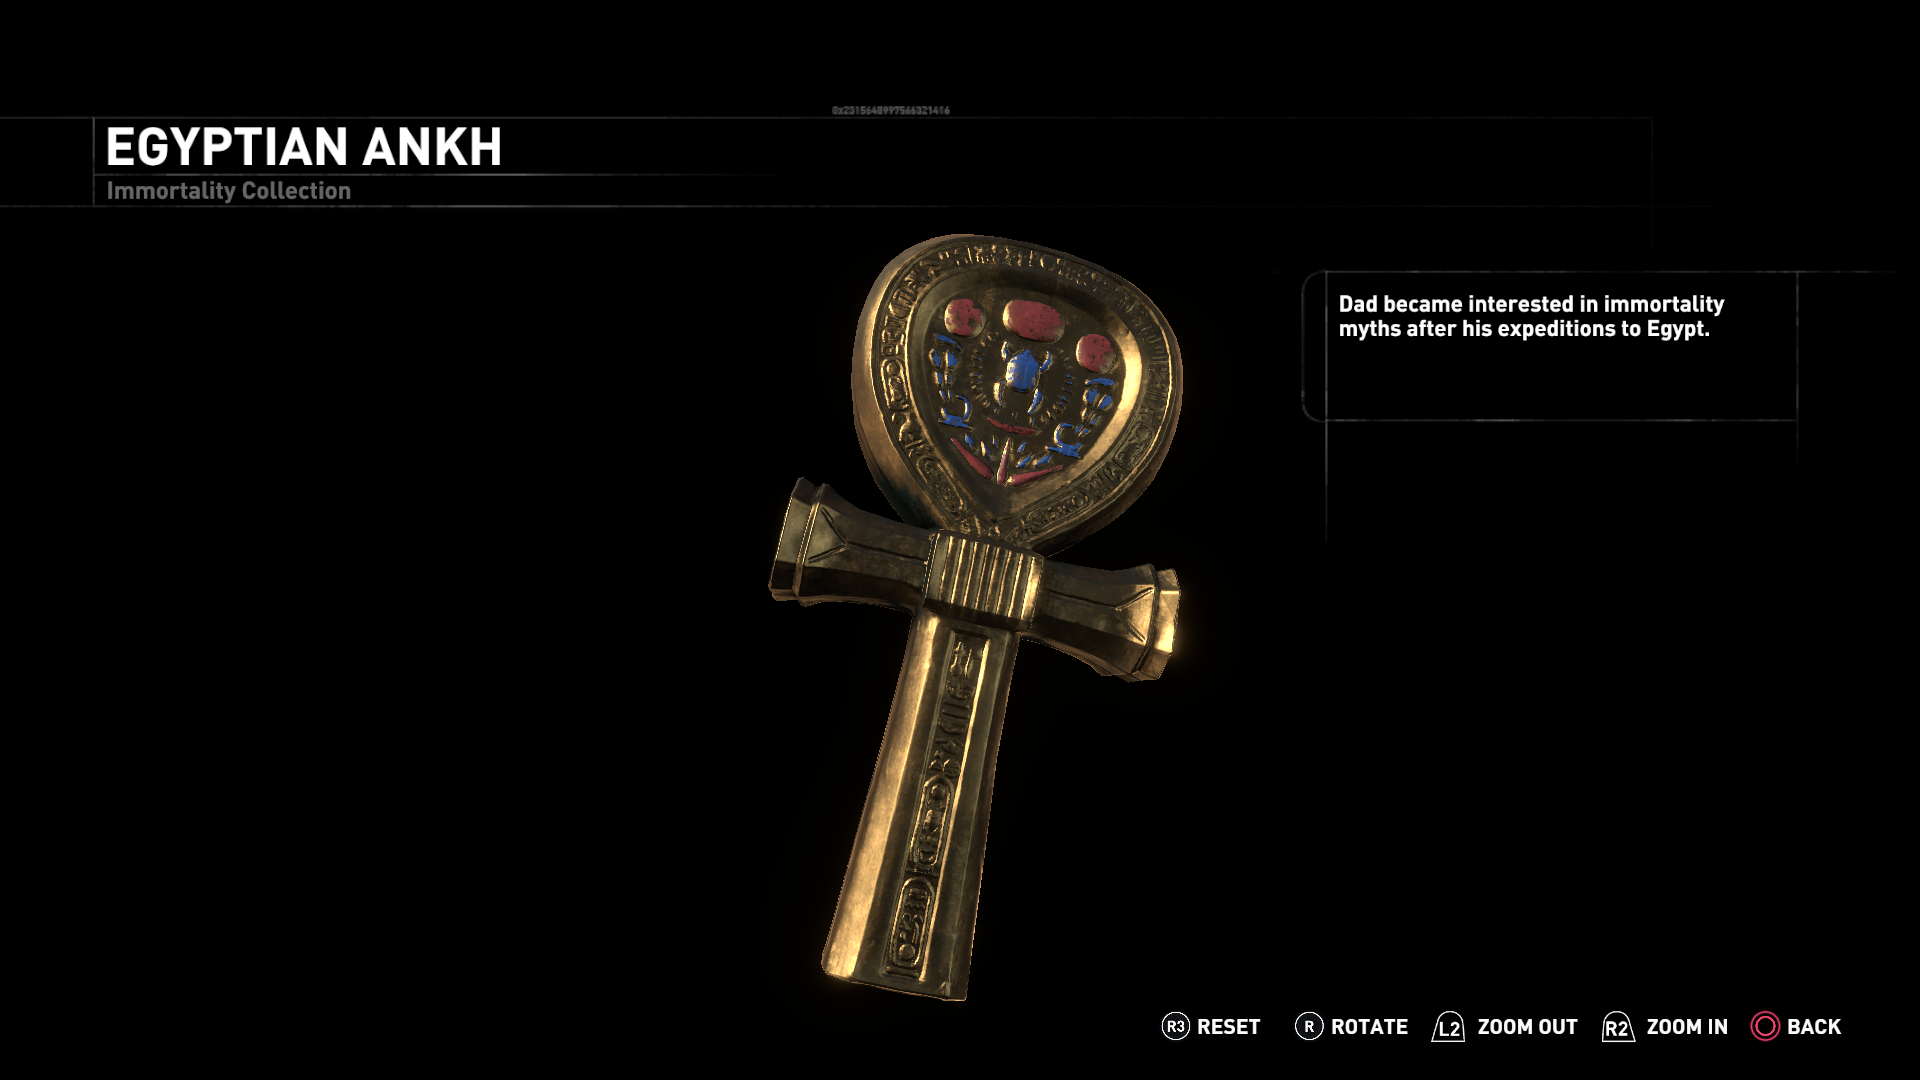 Egyptian Ankh
Just opposite the entrance to the servant's passage is a small glass cabinet holding an Egyptian Ankh, very similar to relics Lara found in Egypt in the original Tomb Raider, the remake Tomb Raider Anniversary and to the Amulet of Horus, the main artefact in Tomb Raider IV The Last Revelation. This item belongs to Lord Croft's Immortality Collection. The Ankh symbol represents life in Egyptian Mythology.
Further along is an antechamber where Lara has apparently set up camp, while in the manor. There is a heater in front of the barricaded fireplace and her running laptop is sitting on a table, while a sleeping bag is placed next to the couch. Next to the laptop sits Lara's "Sisters of Artemis Mug", which can be considered an Easter Egg from the Tomb Raider Reboot.
On the right side there is an armoire that can be opened to reveal more books and relics that are of no importance.
If you look out the window and pay attention to the boarded up part between couch and armoire, you will notice that the another part of the manor, I pointed out from the study window, would be accessible from there. You may also see that there is another storey above us, wonder where the stairs are. There are also more rooms to be seen on the left, at the back of the main hall. Notice how the windows there span two storeys. Could be there is a very large room behind them, like the pool house, a chapel or a large ballroom. It is where the ballroom was in the classic manor. I wish we could explore all of the manor one day, instead of seeing the same rooms rearranged over and over again in every incarnation. There must be guest rooms somewhere.
Notice the "Brown Leather Backpack" sitting on a red armchair on the right side of the sofa. Similar backpacks can be found throughout the game, holding maps detailing survival caches, strongboxes and caves. The similarity to Lara's classic backpack makes this an Easter Egg.
The second armchair on the left side, by the fireplace, holds the letter Asking About Mom. It was written by Lara ages ago and addressed to her father. In it Lara is asking about her mother and if her paintings are locked up in West Wing. (This is another subtle clue that will help you with finding the safe combination later.)
I've been thinking about Mom lately. I wish I knew more about her. How did you meet? What was she like? Winston told me that she was a brilliant artist. Are some of her paintings locked up in the West Wing?
And... I guess I just want to know... did she love me, Dad? Did she ever say that she did? Maybe I'm just being silly, but will you tell me more about her the next time I'm home from school?
Source: WikiRaider
Behind Lara's laptop lies another letter, this one called Clearance. It is another threatening letter from her uncle. It reveals that Lara has flown to Turkey to make her way across the Syrian border from there, no surprise really. It also addresses that Lara has been seeing a therapist, as was revealed in early trailers for Rise of the Tomb Raider.
I've reviewed the report from your therapist. I have to say I was surprised to see a clean bill of health. I somehow doubt you've so easily abandoned your irrational claims.
Indeed, where have you been the past few weeks? My secretary discovered that you booked a flight to Turkey on the 20th. You can't have been simply sightseeing, as your customs claims suggest. I know you're up to something, and I'll be damned if let you use the Croft assets to indulge the same obsession that led to my sister's death.
It's not too late to relinquish your claims on the Manor voluntarily. If you refuse, I will find a way to cut you off.
Sincerely,
Atlas
Source: WikiRaider
Another item to be examined in this room is Sir Lancelot's Suit of Armour. Lara hints that she may have borrowed his sword in the past. Sir Lancelot can also be considered an Easter Egg as this knight of the round table was repeatedly mentioned in Tomb Raider Legend, where Lara went looking for Excalibur, King Arthur's fabled sword.
Before you leave, you might want to glance at the "Clock" sitting on the shelf on the left, I could swear it started ticking, just like the one in the first movie. Easter Egg??? There is a similar clock in the study, but that one does not tick. And we will find more clocks like these throughout the house.
The Grand Hall
Upon exiting into the Grand Hall you'll notice how the Manor is in need of renovation, a recurring theme when you think of how there were signs of renovation in the original Tomb Raider and in Tomb Raider Anniversary. Every 10 years?
While on the upper level, head over to the left to find an armoire. Open it and inside is a Phoenix Figurine another symbol of immortality. Lara's father has a whole collection.
When you continue along towards the area above the main entrance, the side opposite the staircase, you will find Ana's cosy place tucked away in the corner. Here she sat, drank tea and smoked her cigarettes. You can pick up Ana's Cigarette Case, causing Lara to muse why Ana was in the house when all her other belongings are in the guest house. Turning it around you can read the inscription "Stop Smoking Love R" on the backside.
Take a mental note of the locked crate just around the corner.
Since the West Wing is off limits, or rather locked - since we don't really give a damn about off-limits, do we? - let us head down the stairs. The Croft family tapestry has been placed above the landing of the staircase.
When you approach the compass on the floor, Lara will hear voices from the past in her mind: Winston talking to young Lara sitting on the floor staring at the compass, thinking about "finding adventure". Another reboot Easter Egg if you will; instead adventure found her.
On the table in front of the fire place lies an open ledger, another of Amelia's Journals called A Life of Possibilities. It tells of how Amelia is given the opportunity to show her art in New York, but how she will first join her husband in Tibet.
When Richard and I were married, I was prepared to relegate my painting to a hobby, but it was Richard who objected, who gave me my atelier and studio. Without that support, I might still be painting boring landscapes. Now I can't shake the foolish sensation that leaving would be a betrayal.
He will laugh at that and insist I accept, even though I know it will break his heart to be apart. He never once asked me to sacrifice any part of my life for his. I have, of course, in a thousand small ways over the years, but he would never ask.
The discussion can wait, and I will join him in Tibet. I won't cast a shadow over his find. I will be by his side in his triumph, as I know he will stand by my side, in time.
Source: WikiRaider
Also on the right side, in the corner besides the staircase, you will find a pedestal with an Unknown Statue Bust, this one made of bronze. Lara comments that she has to brush up on her ancestors, since she's as clueless as we are on who is depicted here.
Heading over to the other side of the staircase, you will find a locked door.
Behind the covered furniture on the left side you can find another glass cabinet holding another immortality symbol, an Ouroborous Amulet Roth bought from a trader in Greece. The Ouroborous is a tail-devouring serpent, or in this special case two serpents.
On a windowsill just opposite the cabinet lies another letter from uncle Atlas, A Subtle Threat. This is obviously an earlier letter than the one up by Lara's laptop as in it he is advising Lara to seek professional help about her psychological trauma on Yamatai, while the other letter addresses that she was attested a clean bill of health.
Since your return from your expedition to Yamatai, I've grown increasingly alarmed at your erratic behavior. I can only assume you suffered some kind of psychological trauma and are only acting out as a call for help. I want you to know that I hear you loud and clear. Ana and I agree that it's time for you to be evaluated by a professional. I took the liberty of arranging an introduction to a highly qualified colleague of mine. You should be receiving the details in the post soon.
I want to impress upon you the importance of this, Lara. As executor of the estates, it is my duty to see that it is left in capable hands. And if I may be so blunt, you're acting like your father when he was at his worst. He nearly lost the Manor himself in those days. I'd hate for you to repeat his mistakes. I encourage you to embrace the help I'm offering.
Sincerely,
Your Uncle
Source: WikiRaider
Excuse Uncle Atlas' "English", he missed a "u" in behaviour, it's a clear sign of his being alarmed. (Actually there is a lot of American English - i instead of e, z instead of s - in the documents, which unfortunately destroys the illusion that these were actually written by Winston, Lara's uncle or the Crofts.)
By the entrance door you will find Lara's old rusty bike that was at her London flat earlier. Next to it lies her phone with the recording of A Message to Jonah. This one sounds like it's been sent after her return from Syria but before Jonah came to see her at the Manor.
Sorry for not getting back to you sooner. I've decided to do some research at the Manor. A lot has happened and I need some time to think about what I want to do next.
This old place is filled with memories and secrets. Uncle Atlas has tried to keep me out of here for so long, I don't even know if I want to keep it. But... after everything that's happened, maybe I can find out what it still means to me. If it's worth fighting him for.
I'll let you know how things worked out when I'm back in London.
Source: WikiRaider
In a crate on the opposite side Lara finds a Flashlight. She remarks that she's got to remember to pack this for her next trip. When you consider the "Blood Ties" storyline to be placed between Syria and Siberia, you may wonder why Lara didn't bring the flashlight. Well, at least she brought glowsticks. But calling Pierre a litterbug!? Did you notice how she simply drops them upon exiting caves? Returning to our story, we can now enter the dark servant's passage upstairs.
East Wing: Servant's Passage
On the way back to the yet unexplored Servant's Passage you come by the ticking clock again. I swear, the ticking's getting louder!
Behind the panel hiding the Servant's passage, look to the left to find a letter on a crate. Another letter from Atlas called A Brother's Warning. The Earl of Farringdon is mentioned again. Atlas voices his opinion of Lara's father to his sister.
The news has reached Mother. She knows that you broke off your engagement with the Earl of Farringdon. She is beside herself with worry... but for the moment she's controlling the narrative. As fas as anyone knows, you're just having innocent second thoughts. But the moment your affair with Lord Croft goes public, it will be too late. Our name will be as ruined as this man you've chosen to bed!
Don't you see that you're being selfish, Amelia? Please consider your family. You're a De Mornay... everything you do has a great effect on us all.
I'm coming down to London soon. Don't do anything rash until we have a chance to talk.
Source: WikiRaider
Let's head down the creaking wooden staircase. It is in serious need of repair. The landing holds a locked door and a table with another tape recorder, this one titled Travels Together. In it Lord Croft tells of the time he, Amelia and Roth spent in Egypt. (The part telling how Amelia and Roth "have spent more than a few nights drinking and playing cards into the wee hours" caused speculations during one of the Extra Life streams by Kelly from the Archaeology of Tomb Raider, whether Lord Croft is truly Lara's dad. We decided to keep quiet about it, otherwise who knows how Lara's crazy uncle might react!?)
Despite her decidedly proper upbringing, Amelia's taken to roughing it more that I ever have. She fits in and connects with the local populace with such amazing empathy. Because of her, I've had a bit of an unexpected breakthrough in my research. She managed to convince an artifact dealer in old town to sell me a magnificent and quite unusual Tibetan scroll. From what I can tell, it seems to contain details surrounding an immortality ritual of some sort.
I think it's time for me to take the next step with Amelia. In fact, I don't think I can wait any longer. I will ask for her hand tomorrow... in the bright Egyptian sun, amidst the dust and ruins.
Source: WikiRaider
East Wing: Wine Cellar
Further down and we'll come to the wine cellar. On a large wooden chest on the right lies another letter by Atlas, this one titled A Brother's Plea. He's pleading with Amelia not to go to Tibet.
I know we have had our differences in recent years. I've tried my best to keep an open mind about your relationship with Richard, but I just can't let you go on this ill conceived expedition without saying my piece.
You say Richard's theories have merit. You say that he may have actually stumbled upon some mythic, unknown truth. But I have seen nothing to support such claims. And while your word may have been enough in times past, I cannot let you squander away what remains of your name and reputation... and that of our family, truth be told... on some damned foolish crusade.
I intend to go to Richard's investors and let them know exactly how he's spending their money, nut I want to give you a chance to put a stop to this yourself.
Please. Don't go to Tibet. If not for me, at least for Lara.
Source: WikiRaider
Head into the wine cellar. Come on Lara, it's just a little thunder and lightning, don't be silly! It's nothing compared to the time in Ireland in Tomb Raider Chronicles.
On the table at the end you can find yet another letter, but this one's from Winston. Yes, Winston, our butler. In Little Angel he speaks of how Lara set a trap for him, in the walk-in freezer. Easter Egg
I hope this missive finds you on a successful expedition and in good health. Before I bore you with estate affairs, I wanted to let you know that our Little Angel has been into some mischief. As always, I indulged her in our usual game of chess. Over the course of the game, she broached the subject of her mother. She's having trouble remembering her now and wanted to enter her Ladyships' Atelier wich you sealed off, to play on her mother's piano. It enraged her when she wasn't allowed to go in, of course. For someone so young, she has such strong emotions.
Later in the day, she set a trap for me... in the walk-in freezer, of all places. Before I knew what was happening, I found myself locked inside. Mrs. Sheffield discovered me an hour later, shivering and somewhat peeved. It took us an additional hour to find Lara on the grounds. I know all her hiding places, of course, but this time she really did not want to be found. Call it years of observation, but I can tell when she's out of sorts. My lord, if I may be so bold... she misses you fiercely. She is lonely for her father.
Please consider a call as soon as you are able.
Source: WikiRaider
Tomb Raider II, anyone? If you've played that game, you've probably done it. If not, I suggest you get the android or iOs Version, there is actually an achievement for locking Winston in the freezer. ("In the kitchen and up to no good")
Since this is a dead end, take a few steps back. Here you'll discover a trolley with a wine rack on top. Pull it in the direction of the entrance to clear it out of the way and step into the area behind it.
On the left is a wooden table with chairs where the servants used to sit and probably dine. A memory kicks in from when Lara was playing chess with Winston as a child. Examining the item on the table you will discover it's an Old Chessboard. Turning to for examination will reveal that Lara always chose white.
The two green lockers cannot be opened without the necessary gear. Keep that in mind for later.
Further along the wine cellar, shortly after the stack of crates you will spot a ledger on the left, tucked away in a corner between the brick pillar and another wooden crate. It is one of Amelia's Journals titled Decisions.
This really is a rubbish choice. I don't want to lose them. But I love the life I've started to build with Richard. He comes with his own difficulties, but I can accept them.
Will it be enough?
Source: WikiRaider
Just a bit further, on a shelf with wine bottles lies another ledger titled Birthday Expedition, this one written by Winston. This document holds some further minor clues to finding the safe combination as will be revealed soon.
This will be good for her. She's been acting up of late, but I know she's just craving more of her father's attention. He's been so buried in his research. It will be a nice moment for the two of them to reconnect.
And I do believe he needs it as much as she does.
Source: WikiRaider
To clear the path blocked by more trolleys with wine racks, get into the passage on the left and pull out the first trolley there, get behind it and pull out another trolley. Now go around to the cleared exit.
When entering the tunnel behind you will come across the Croft Decanter sitting on a wooden crate on the left side.
East Wing: Basement of Despair
Lara has to crouch down to get into the next part of the basement, the "Basement of Despair". Another memory overcomes Lara. This part of the basement served as an ancient Egyptian tomb for one of Lara's birthdays, where Winston and her dad prepared an expedition for her. There is a lot of water damage in this part of the manor, many pipes have burst. This part is where the earlier collected "Expedition Map - 1 of 2", the one that was found near the entrance to the servant's passage, comes in handy. Examining in, you will find that a red path will guide you through the basement. However there is a tomb marked on the map's left side that is not on this path. Let's go there. So remember, where you can go either left or straight, go straight. And then keep to the right to get into the corner. Here you will come across the Mummy Bear. No (Egyptian) tomb without a mummy, it seems. Note the infinity sign on the wall above the tomb. If you make your way around the next wall, into the crawlspace you can see that there is another one just above the tomb. Clearly a tomb marker.
The paths to the left are of no interest, there are shovels and a wheelbarrow and other work equipment. Watch out for the sling on the ground. Don't worry, it's not set, but there is an item inside. It is a Trap Mechanism made of hair ribbons. If you look up, you see a yellow basket on the ceiling, attached to the sling.
Crawl further along till you come out of a breakthrough in the brick wall and find yourself behind some crates. Lara can squeeze through them. The ladder in front is tempting, so turn around to the left and explore the narrow passage behind the crates. At the end you will come across the main artefact of the Egyptian tomb, an Ancient Anubis Bust. Representations of Anubis have been found in the games countless times but this bust is too ambiguous to scream Easter Egg. Return to the ladder.
Take note of another locker on the left for which you will need a tool. With the two in the wine cellar that makes three, so far. And don't forget the locked crate on the upper level of the main hall, but that needs a different gear item to open.
Scale the ladder and you will come out behind another secret door.
On the table on the left side you will find Renovation Plans for Croft Manor. These detail how electricity has been added. "Dad used to say his granny hated all the bright lights." Turning the plans around you will discover that these are pages 1 and 3. 2 is missing. Wonder what that one's showing!?
On the shelf in front of you lies another tape recorder by Lara's dad titled Cracks in the Foundation. Lord Croft seems to have realised that his obsession with immortality myths is interfering with his personal life and his relationship with Amelia.
I am such a fool. I have let my obsession with this damned Ritual of Long Life rule my better judgement for far too long. And it may already be too late. How could I have not seen this coming? I've made this mistake over and over - always putting my research before my personal life. But it's never hurt like this before.
I simply cannot live without her. If I have to give up this accursed quest that has plagued me for so long... then so be it! I am going after her. Right now. Tonight!
Source: WikiRaider
East Wing: Library
Open the secret wall panel to emerge on the ground floor of the library.
Let's begin with an important story document first. Head over to the desk and pick up the diary on a chest in front of it on the right. Here you will receive the Clues for the safe combination.
Lara's expedition treasure...
My favourite painting by Amelia...
The day of our wedding anniversary...
Source: WikiRaider
We've already caught a glimpse of Lara's expedition treasure, the crown she is wearing in the picture we found on the desk in the study. And we have a general idea that Lara's mum's paintings are in the locked-down West Wing of the manor.
In the chest underneath the diary with the clues you will find an Old Lighter, Lara calls it dad's old lighter but examining the underside reveals that it is actually granddad's old lighter. Let's use it to light up the fireplace, it seems very damp and cold in the library. Notice how the windows are boarded up and in places broken.
While we're at the fireplace, examine the small table next to it. Atop lies another tape recorder, next to a familiar item that won't allow being picked up, the "Jade Water Buffalo" Lara recovered on Yamatai; a reboot Easter Egg. The tape in the recorder is titled Invisible Ink. It holds a tiny clue. For Lara's birthday expedition Lord Croft used invisible ink that requires a heat source to illuminate the ink. Good thing we just created a heat source.
Turns out it requires a very specific kind of vellum, and a heat source to illuminate the ink after it's dried. It should prove a nice challenge for Lara to puzzle out.
Source: WikiRaider
On the right side of the fireplace you will find a ladder you can climb up. At the top head over to the left bookshelf to find a picture. It is an old Photograph of the Library, a woman is studying plans spread out on the desk. Turn it around to find the additional information "1820 additions to the main hall in progress".
The Crofts - way ahead in the field of photography
Curious how the picture was taken in 1820. Nevermind that, but look at the corner were you just went up a ladder, there was a staircase back then.Back downstairs look at the smaller desk by the window on the left to find a Hieroglyphics Worksheet. (You may want to visit The Archaeology of Tomb Raider for further reading.) As this relic is part of the "Safe Combination Clues", we may put it to good use soon.
Below the hieroglyphics worksheet lies another item, a very old Egyptian Hieroglyphics Book with the Eye of Ra depicted on the cover. The Ey of Ra is very similar to the Eye of Horus, although usually the Eye of Horus is a mirrored version of the one depicted here. However, since the Eye of Horus in Tomb Raider IV The Last Revelation had the same orientation as the symbol shown here, consider it an Easter Egg.
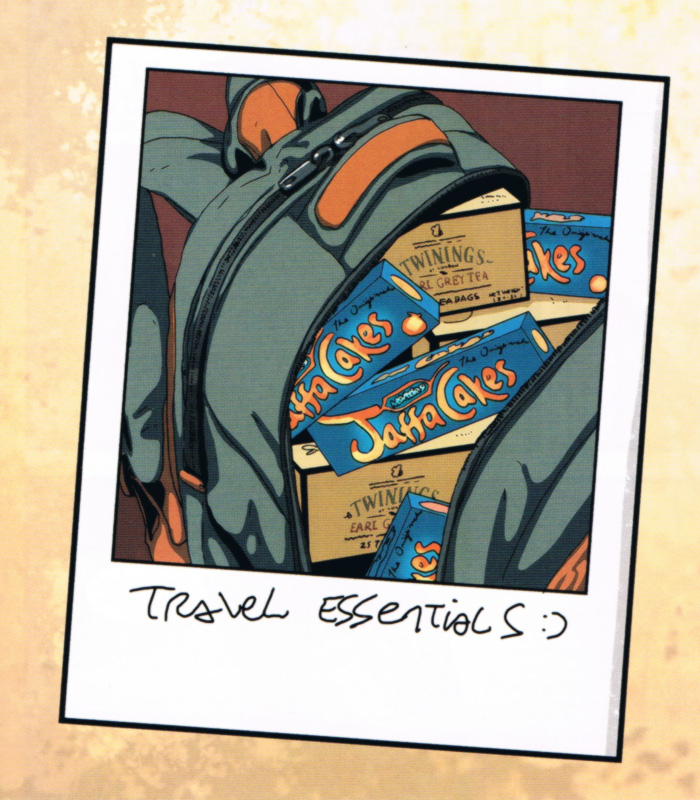 Comic Issue #5 "Sacrifice for a Friend"
Turn around and look on the shelf behind the couch. Here lies a Note from Winston. It reads "Jaffa cakes next to William Blake". This is in fact a double Easter Egg, while William Blake played an important role in the first movie, where a vital clue was hidden in one of his books, Jaffa cakes are a thing in the Dark Horse Tomb Raider Comics. (In Issue #4 Lara has hidden a note in a Jaffa Cake wrapper, in Issue #5 we see them on a Polaroid marked as "travel essentials" and in a later issue Sam offers them to Lara when she suffers from stage fright.)
Return to the main desk, where we left a tape recorder earlier. It is titled Discoveries. It tells of Lord Croft's travel to Tibet. He speaks of an Elixir here, Lara muses if it was the Elixir of Life. This is another Easter Egg, as there was a java based mobile phone Tomb Raider game called "The Elixir of Life".
On the windowsill behind the desk you can spot a "stuffed T-Rex", a very famous enemies from Tomb Raiders I to III and Tomb Raider Anniversary. Easter Egg
Pick up Lara's Childhood Drawing from the windowsill. It is an "expertly drawn" tiger guarding a large Easter Egg, it seems.
Time to examine the right side of the library. On a trolley you can find yet another diary, this one titled The Journey. Amelia is drawn into her husband's discoveries and the search for the fabled Elixir of Life. There, she said it. Now it's officially a mobile game Easter Egg.
Head further into the passage and you will find an old record player you can activate. Lara feels that the music is familiar. If you've played Tomb Raider II, the Venice part, you will feel the same. If you now start climbing bookshelves while listening to it, you might get a sense of deja vu. In any case: Easter Egg.
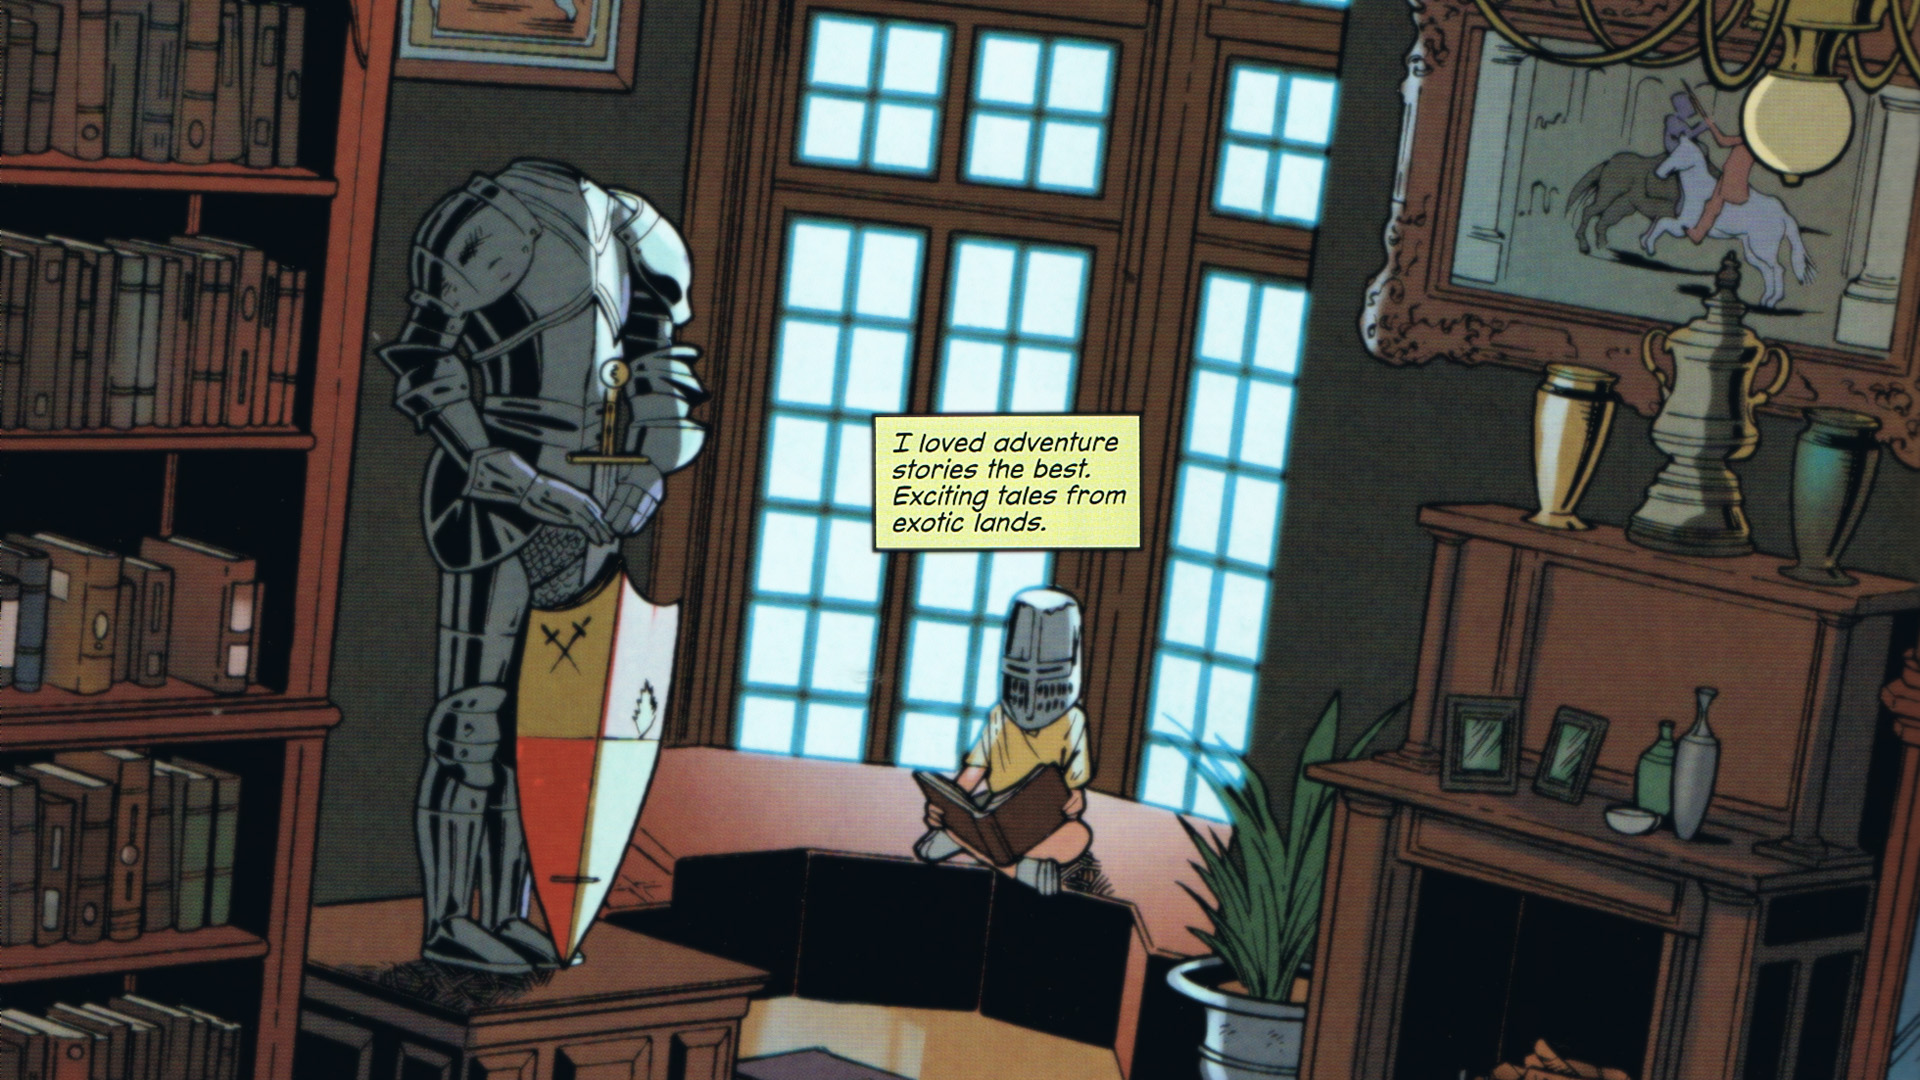 Comic Issue #9 "Lost and Found"
At the end of the room you will find a headless suit of armour. It is Sir Reginald's Suit of Armour. Lara muses whether his helmet fell of or if she didn't put it back. This is another Dark Horse Comics Easter Egg. In Issue #9 "Lost and Found", we can see young Lara sitting in the library reading, and wearing said helmet.
Between Sir Reginald and the gramophone you can see another blocked door, which might lead to another small study inside the library, or a "restricted area" with dangerous books?!
The library door is also locked from the inside so we need to find another path. Explore the slightly elevated area of the library to find a movable ladder. The path above is blocked, so pull it along the shelves to the left. Now climb up and at the top pull out the trolley on the right. Get back down, move the ladder back into the first position and climb up into the next gap. Move along the parapet to the other side, where you will find the Expedition Map - 2 of 2. It is blank. So it's completely useless... unless you've paid attention. Or notice how the game simply tells you every solution.
Take note of the locked crate and then climb back down to the fireplace. Use the map here to obtain the Expedition Map - 2 of 2 (Revealed). It will point to a spot under a trunk near the bookcase.
Find said trunk on the slightly elevated portion of the library and push it towards the wall with the fireplace. A secret compartment in the floor is revealed. Open the chest to get the Master Key. This will open most doors in the manor, including the West Wing and two chests.
Climb up the ladder again and return to the chest on which you found the "Expedition Map - 2 of 2". Open it using the Master Key and you obtain the Egyptian Crown aka "Lara's expedition treasure". Alright, let's see. This is the clue for the first digit of the safe combination. Examine the crown. The Uraeus (rearing cobra) at the front carries an Egyptian hieroglyph, which corresponds to a number. The "Hieroglyphics Worksheet" that came from the smaller desk down in the library will tell you which one. The symbol is that of two falcons. Consulting the worksheet will tell you it corresponds to the number 5.
You are free to leave the library now, by unlocking either the door up here or the one down by Sir Reginald.
East Wing: Ground Floor Passage
If you unlock the one by Sir Reginald, you will get to see more of the manor, however.
Step out into the passage and you will discover another letter on the trolley in front of you. It was written by Winston and is titled Storms Pass.
If you like, you can use the Master Key to unlock the door to the right to find that it's the one from the servant's staircase. The rest of the hallway is used for storage. If you look at the right wall you see a barricaded doorway. This does not lead into the secret passage that comes out in the library but a little further along, probably behind the fireplace. Makes you wonder if there is another secret passage there or whether this is just an access hatch for the chimney. The other doorway ahead would lead into a room underneath Lord Croft's study.
In the other direction you will find another fireplace, this one boarded up, with the head of a bear above it. I guess back then no one in the Croft Family had slayed a T-Rex yet.
Right of the fireplace is another barricaded doorway.
Unlock the door at the end of the passage to come out in the passage besides the staircase in the grand hall. While you come by here, you may want to light up the main fireplace as well. Lara needs to get that roof fixed.
West Wing
It's time to continue the exploration of Croft Manor in the West Wing, which can now be opened using the Master Key. There is a lot of structural damage in this part of the manor; a tree has fallen through the window on the right. On the left side there is another boarded up doorway, leading into rooms of the manor we will not get to explore this time around.
The passage ahead has the door open. Again, there is a barricaded door on the left. Makes you wonder if the rooms behind are in a better or worse state than the rest of the west wing. Let's hope they've been put up to protect the rooms behind them.
The cupboard just next to that door holds a tape recorder titled Consumed by Grief.
I will need Winston more than ever these next few months to help look after her. I never quite realized how much grief can consume a man... but I am utterly consumed. I know I can't escape the pain, but I will try my damnedest to avoid it. I will seal the West Wing, for as long as I live in this place. It will remain exactly as Amelia left it.
Perhaps someday Lara can find her own answers there.
Source: WikiRaider
... work in progress...